&color=rgb(100%2C100%2C100)&link=https%3A%2F%2Fgithub.com%2Faserto-dev%2Ftopaz)
Gateway-enforced API Authorization
Jul 20th, 2024

Omri Gazitt
API Authorization |
Topaz |
Open Policy Agent |
Authorization |
Security

Introduction
In a previous post titled “An easy button for API authorization”, we made the case for using Topaz for enforcing fine-grained API access. Topaz is plug-compatible with OPA, which is the most popular technology for building gateway-enforced API access control. But Topaz natively supports the relationship-based access control (ReBAC) model, which is a natural fit for API authorization.
Rather than having a custom policy for each service, ReBAC transforms API authorization into a data problem, which allows each service to be authorized in a consistent way, without making changes in the API code itself.
Best of all, it enables answering governance questions like “which endpoints can a user invoke”, and “which users can invoke this endpoint”. Let’s dive into the details.
And if you’d rather watch a 5-minute video than go through this walkthrough, we got you covered 🙂
Enforcement by the API Gateway
API Gateways are a natural control point for platform engineering teams to enforce cross-cutting concerns, such as logging, rate-limiting, metrics, and enforcing security practices. Since an API gateway is in the execution path of every request, the code it runs must run quickly and efficiently, so that it doesn’t add significant latency to the application.
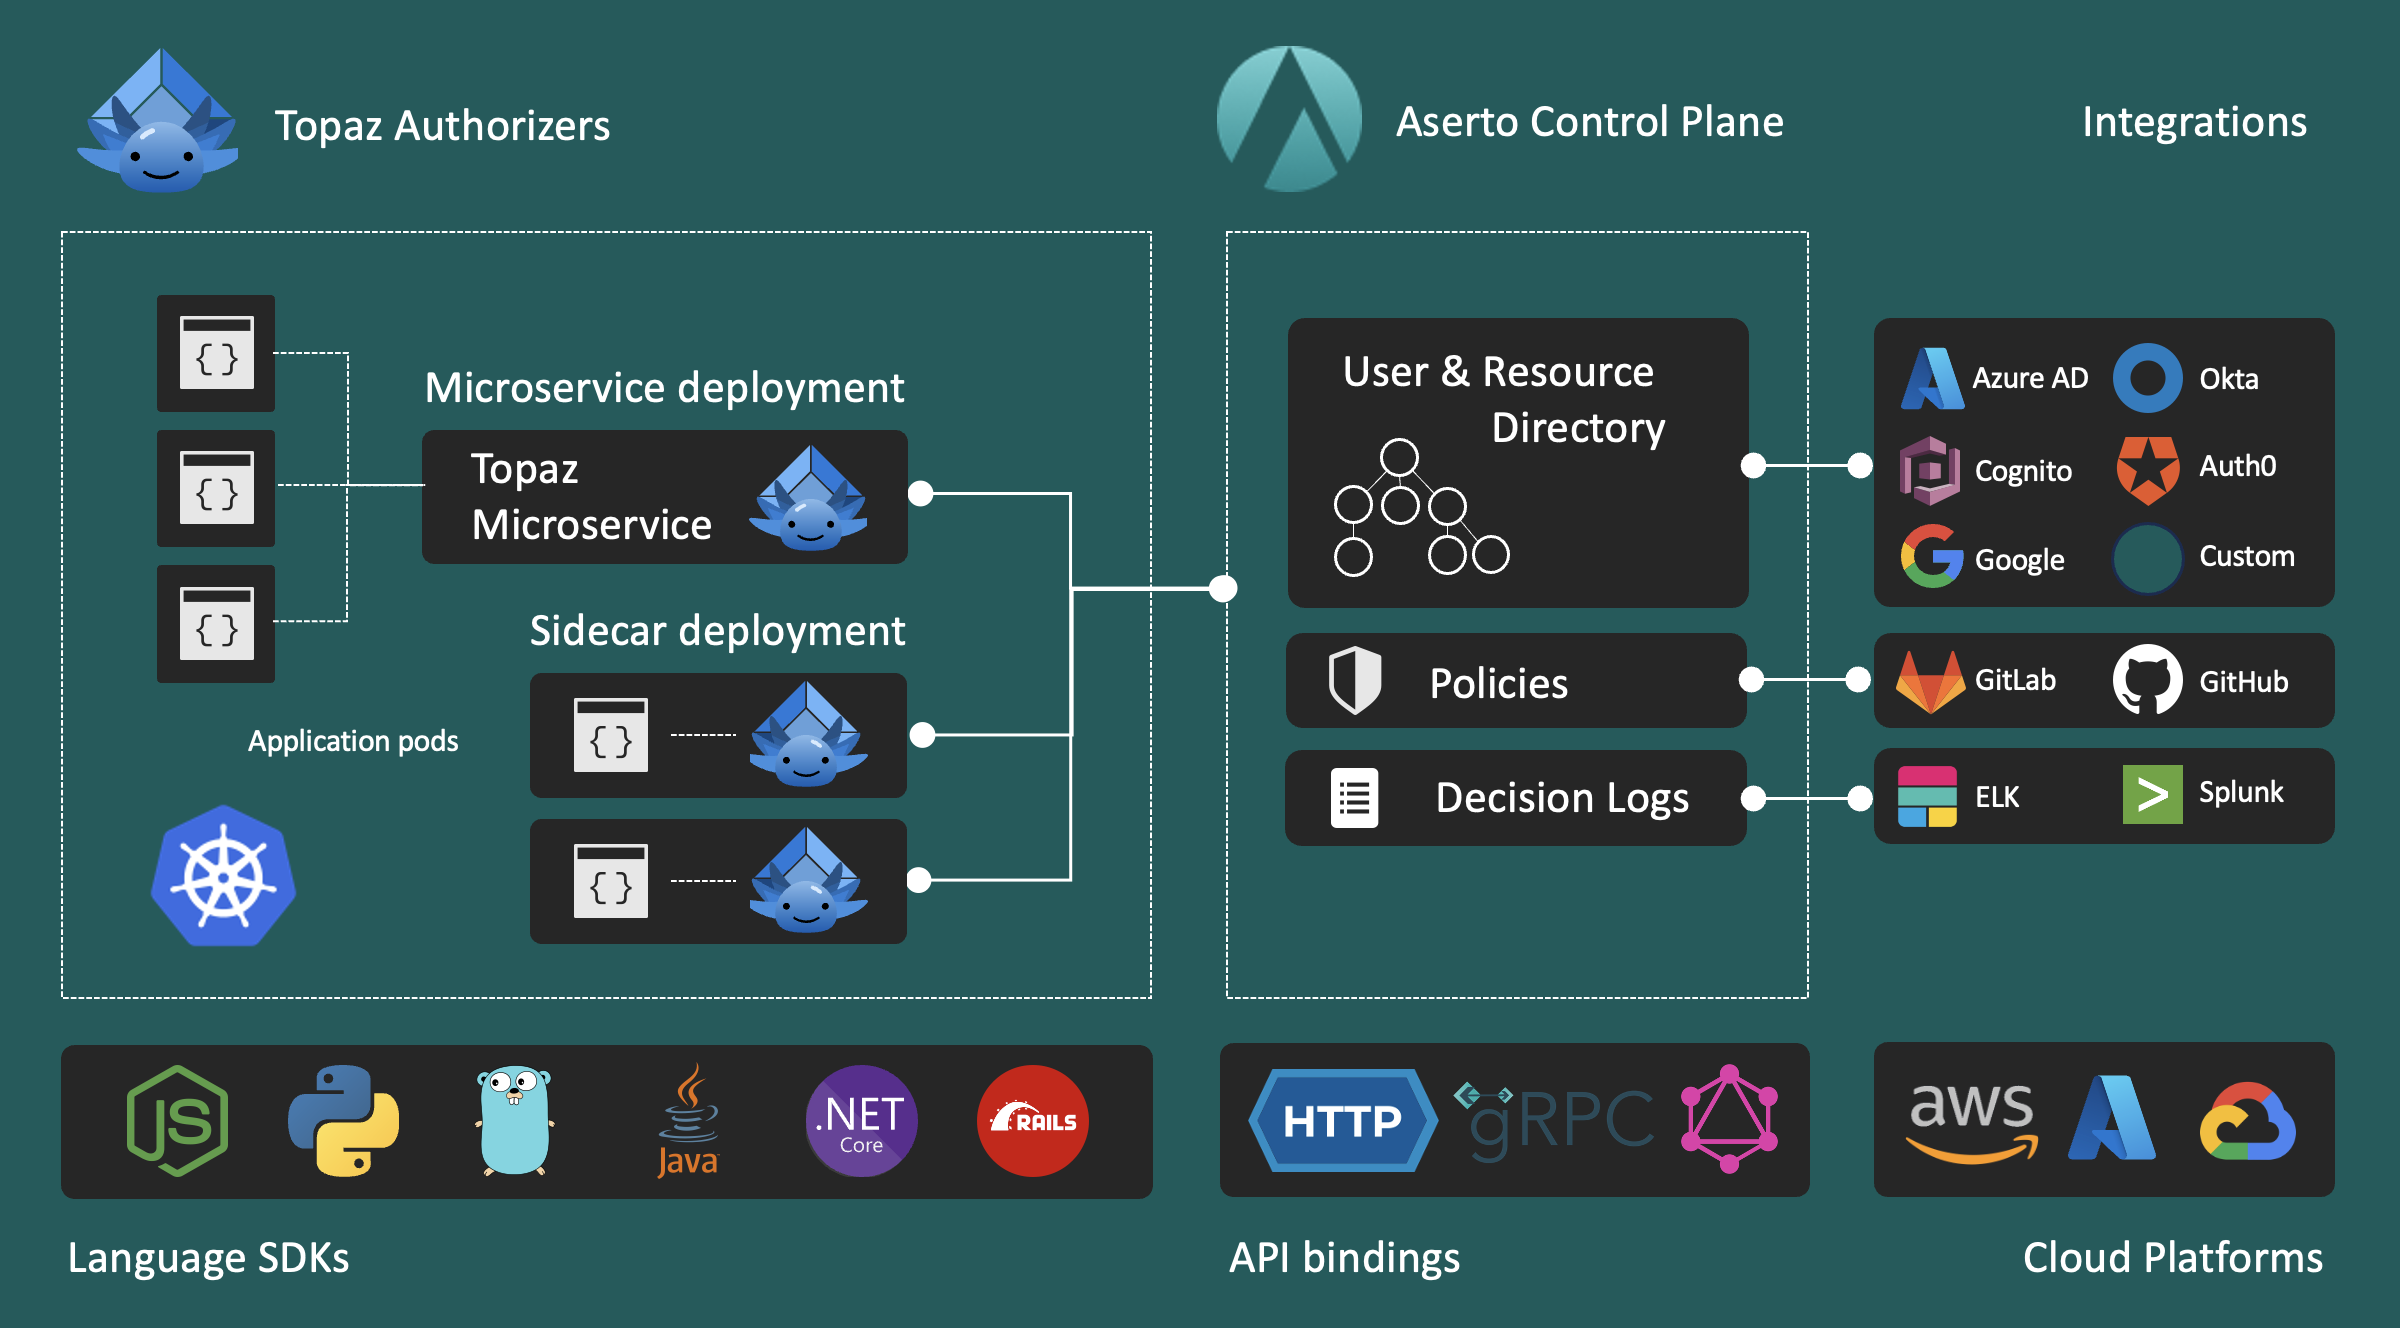
To accomplish this, the authorization service needs to be deployed right next to the gateway. Topaz is a great fit, since it can be deployed as a microservice in the same cluster as the gateway, or even as a sidecar in the same pod.
At the same time, a Topaz instance stores state - namely the relationships between users, groups, services, and endpoints. That state needs to stay fresh, and that’s where a control plane comes in. Every time a relationship between an endpoint (or service) and a user (or group) gets added or removed, this should be done centrally, and then transmitted to the Topaz instance that is doing the enforcement.
This hub-and-spoke architecture is how the Aserto control plane works with Topaz instances that are connected to it as “edge authorizers”.
For expediency, this walkthrough uses the Aserto hosted authorizer as the policy decision point that is called by the API gateway. In a production environment, you’d change the authorizer service endpoint to a Topaz instance that is running in your cluster, and connect that Topaz instance to the Aserto control plane. Everything else is basically the same.
With that said, let’s jump in!
Instantiate the API Authorization template
Go to the Aserto Console, and if you don’t have an account yet, sign up for a free account. Once you’ve verified it, pick an account name, and select the API Authorization template.
If you already have an Aserto account, you can install the API Authorization template here.
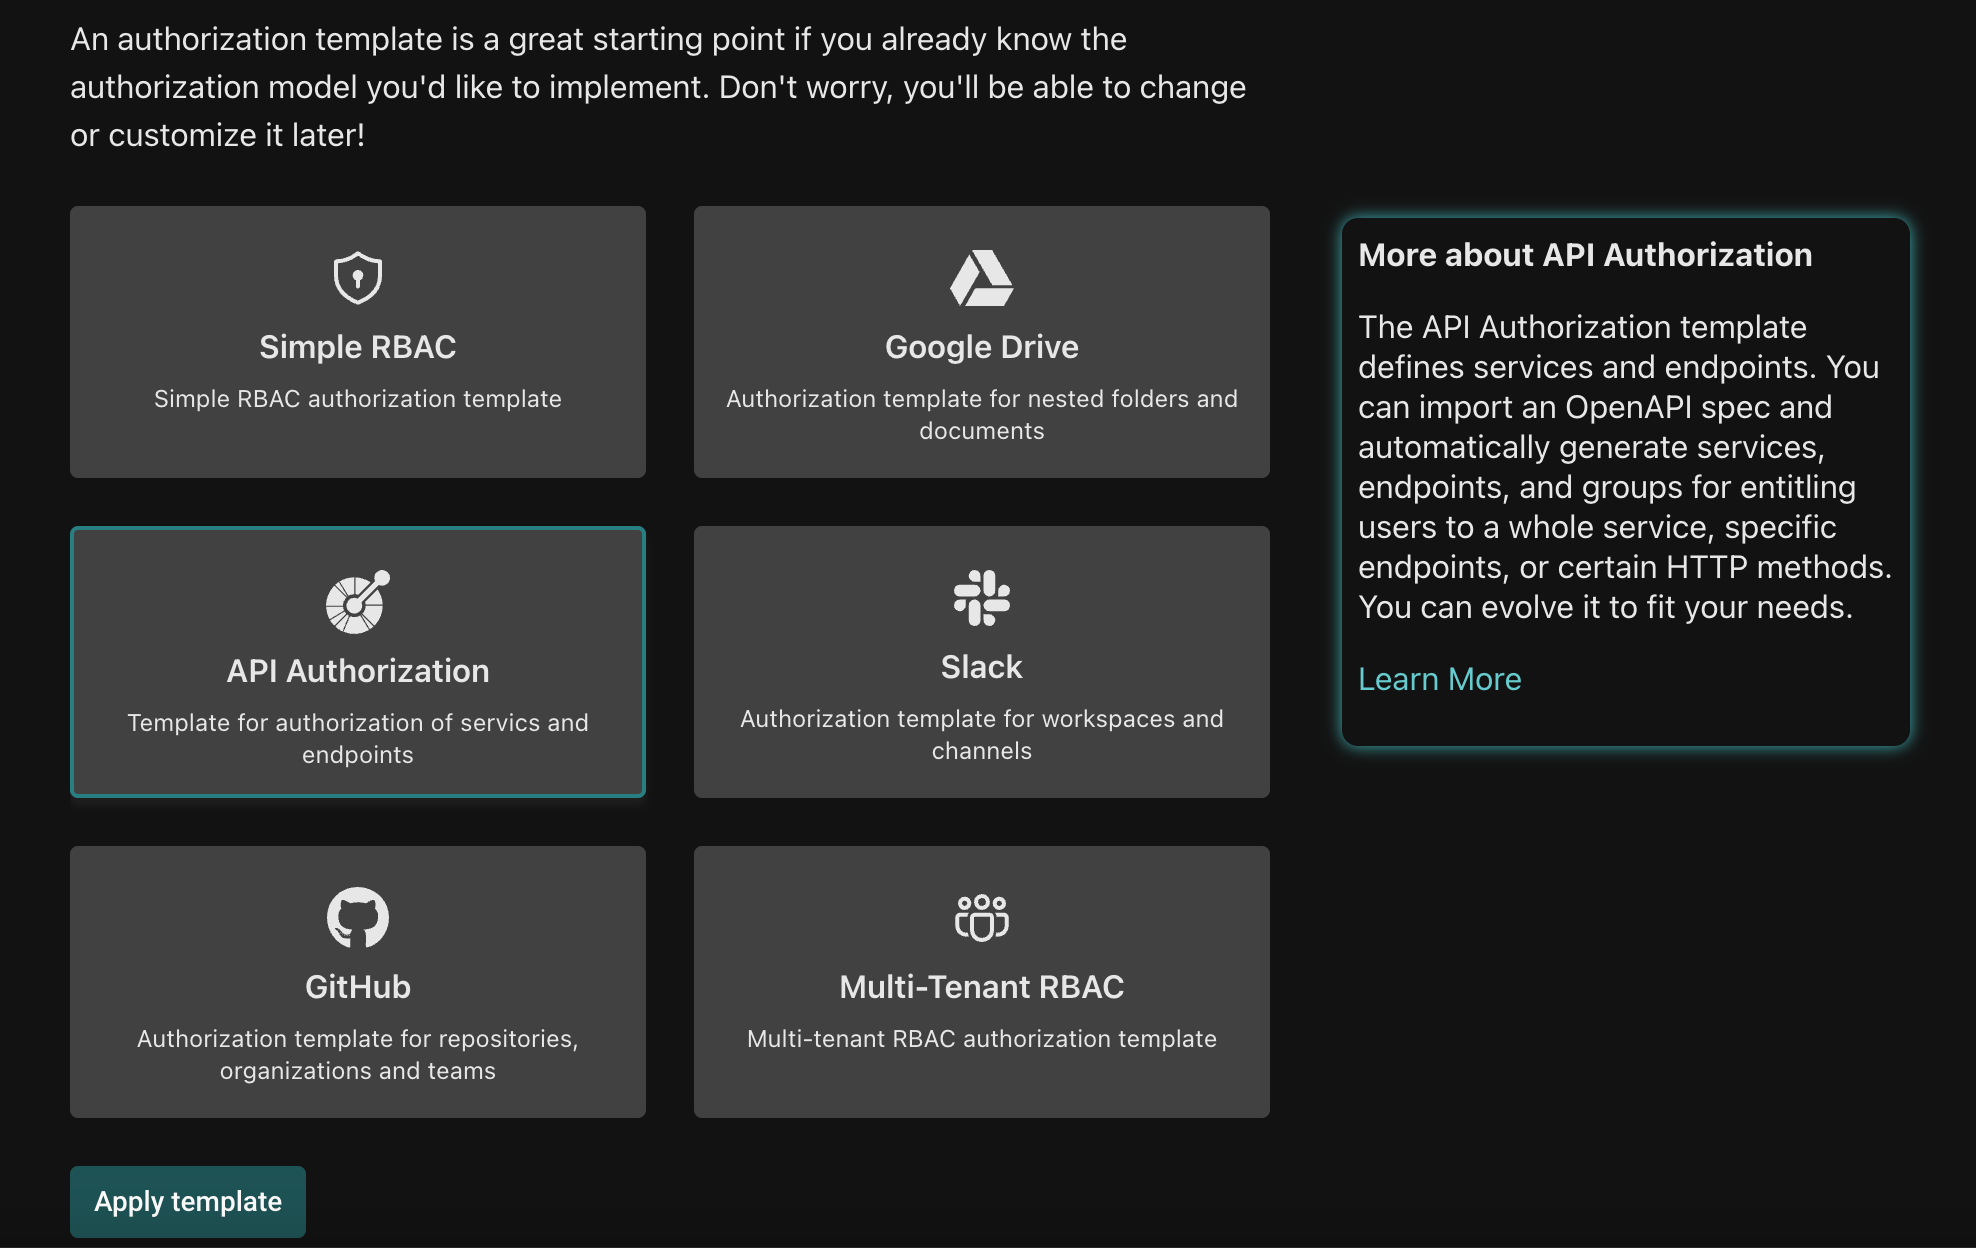
This results in the creation of a new policy instance named api-auth.
Your tenant now has the API Authorization model, which includes the user, group, service, and endpoint object types, and the relations and permissions on these types.
Finally, the template also loaded some sample users and groups, modeled after the Rick and Morty cartoon, as well as three sample services - Petstore API, Rick and Morty API, and Todo API.
Import an OpenAPI definition
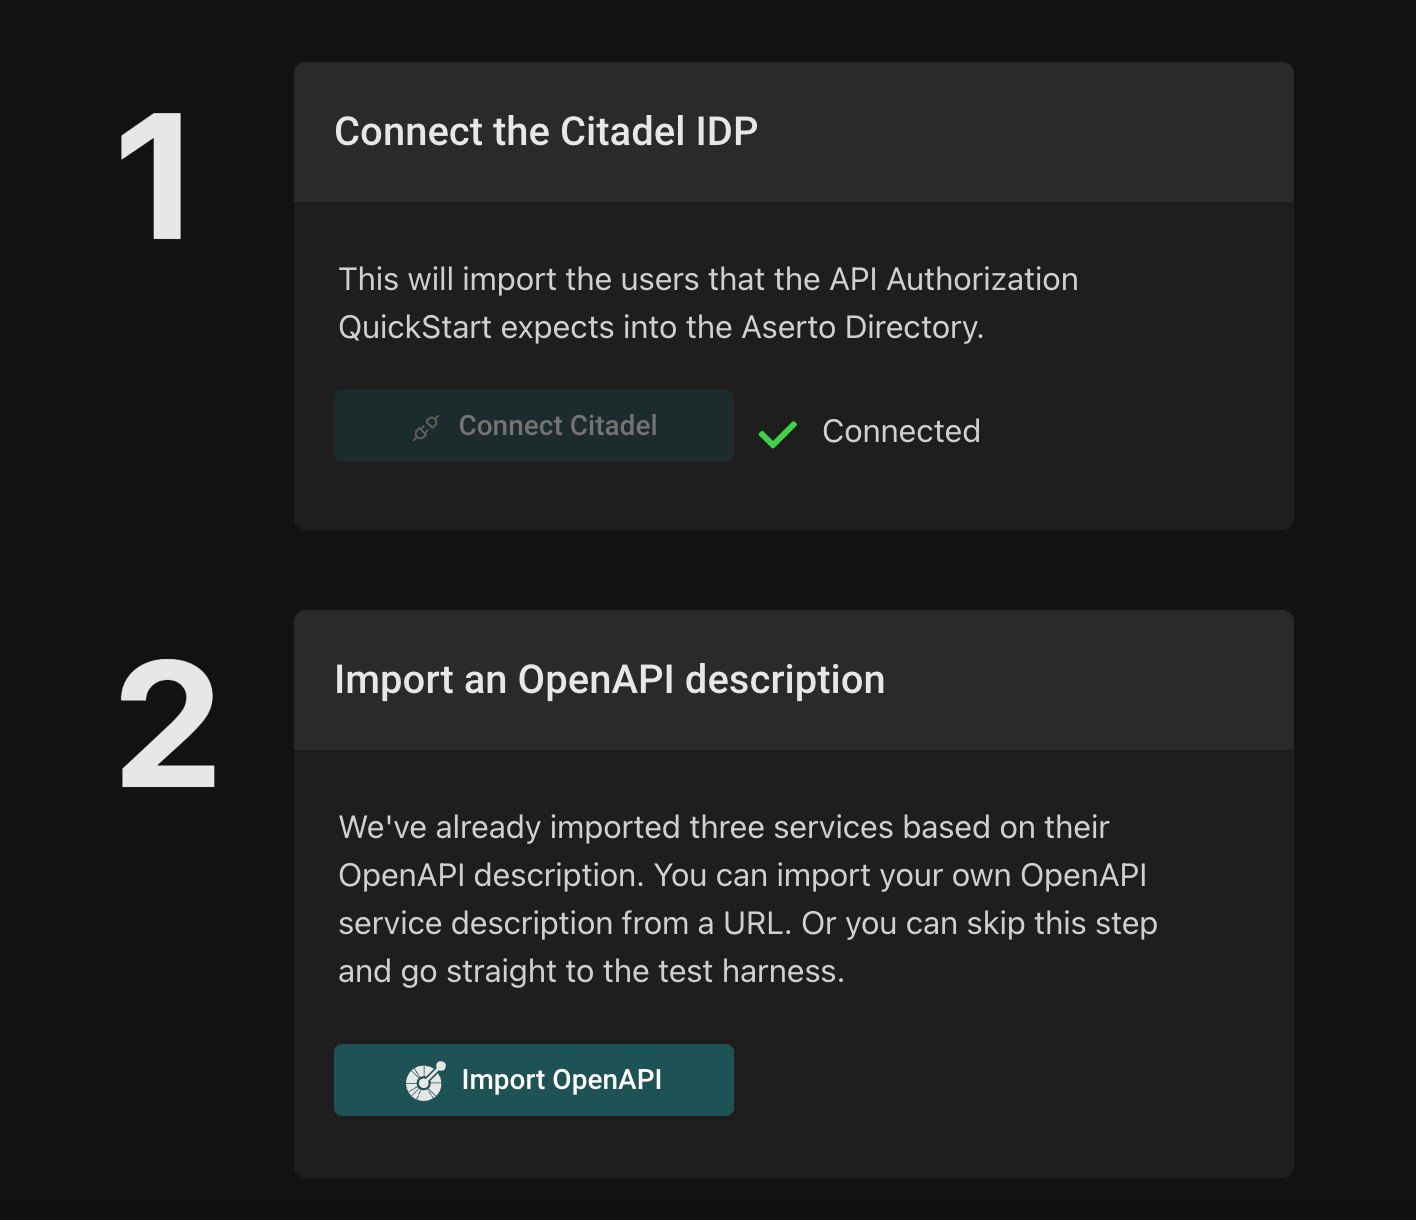
Click on the api-auth policy instance, and select the Quickstart tab. The Citadel identity provider that contains the Rick and Morty users is already connected. In the next step, you can optionally import your own OpenAPI spec. If you have one ready, try it out… otherwise feel free to skip this step and rely on the existing three services that we’re using as sample data.
The OPA policy
Click on the Modules tab, and observe a single Rego module - the boilerplate policy-rebac.check module.
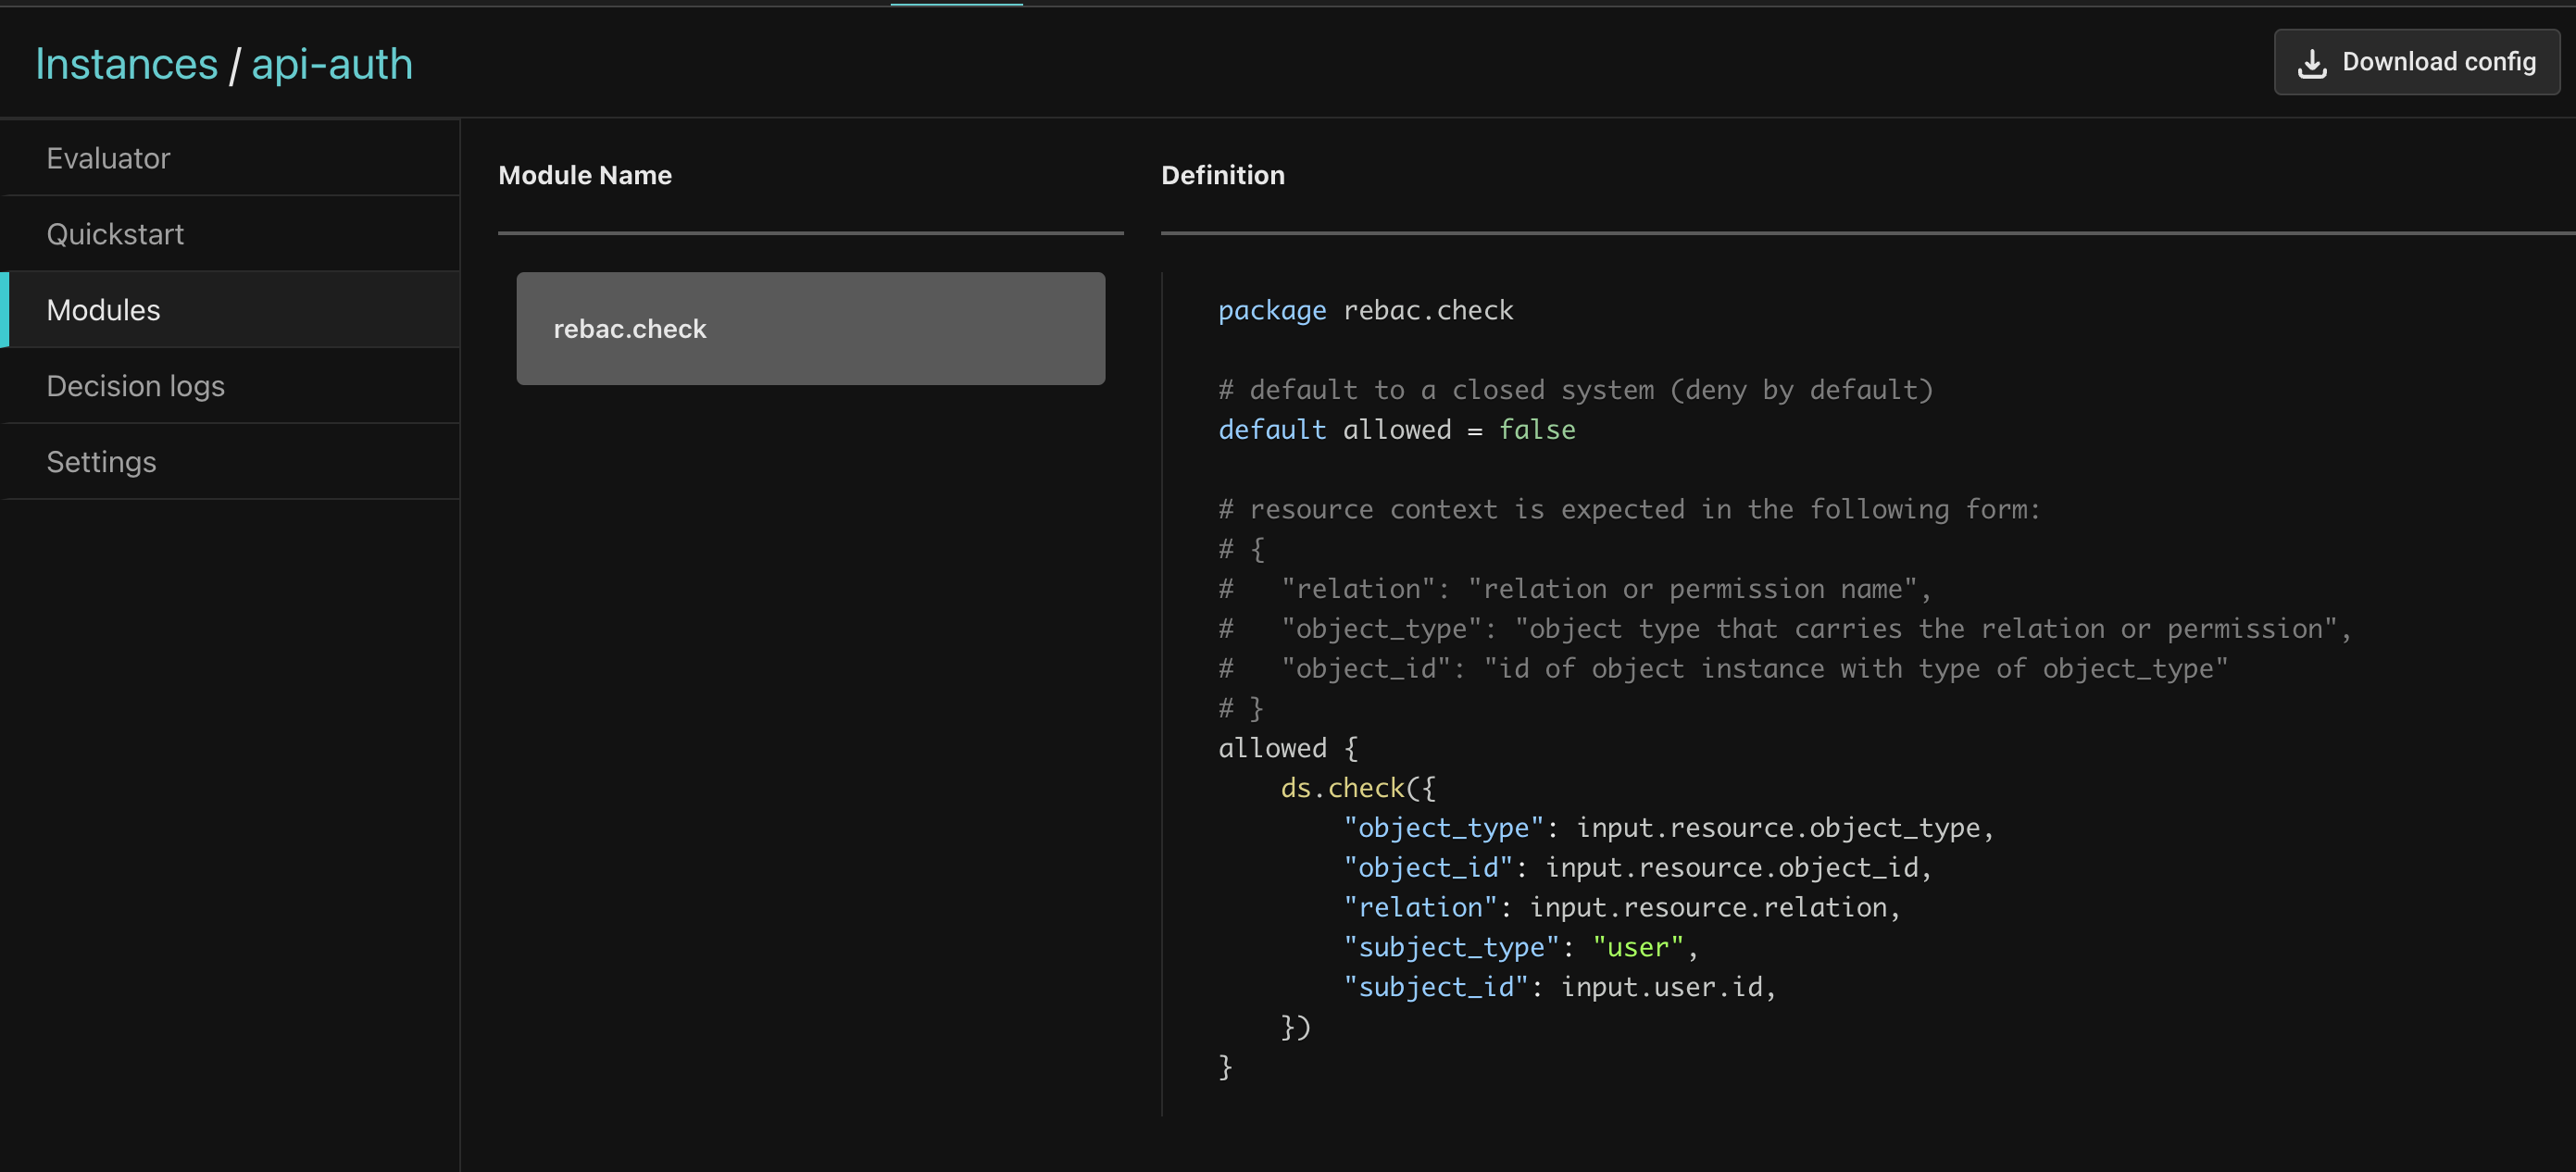
Compare that with the complexity of having to manage a custom policy for every service! As mentioned, we are transforming a policy problem into a data modeling problem, which we will explore next.
But it’s important to note that any additional attribute-based access control or environment-oriented access restrictions can be easily added to this boilerplate policy. For example, you can easily extend the policy to ensure that users who are “contractors” are only allowed to invoke endpoints on weekdays.
Since every OPA policy is a Topaz policy, you can bring the full power of OPA and Rego to bear on your custom authorization policies.
The API Authorization model
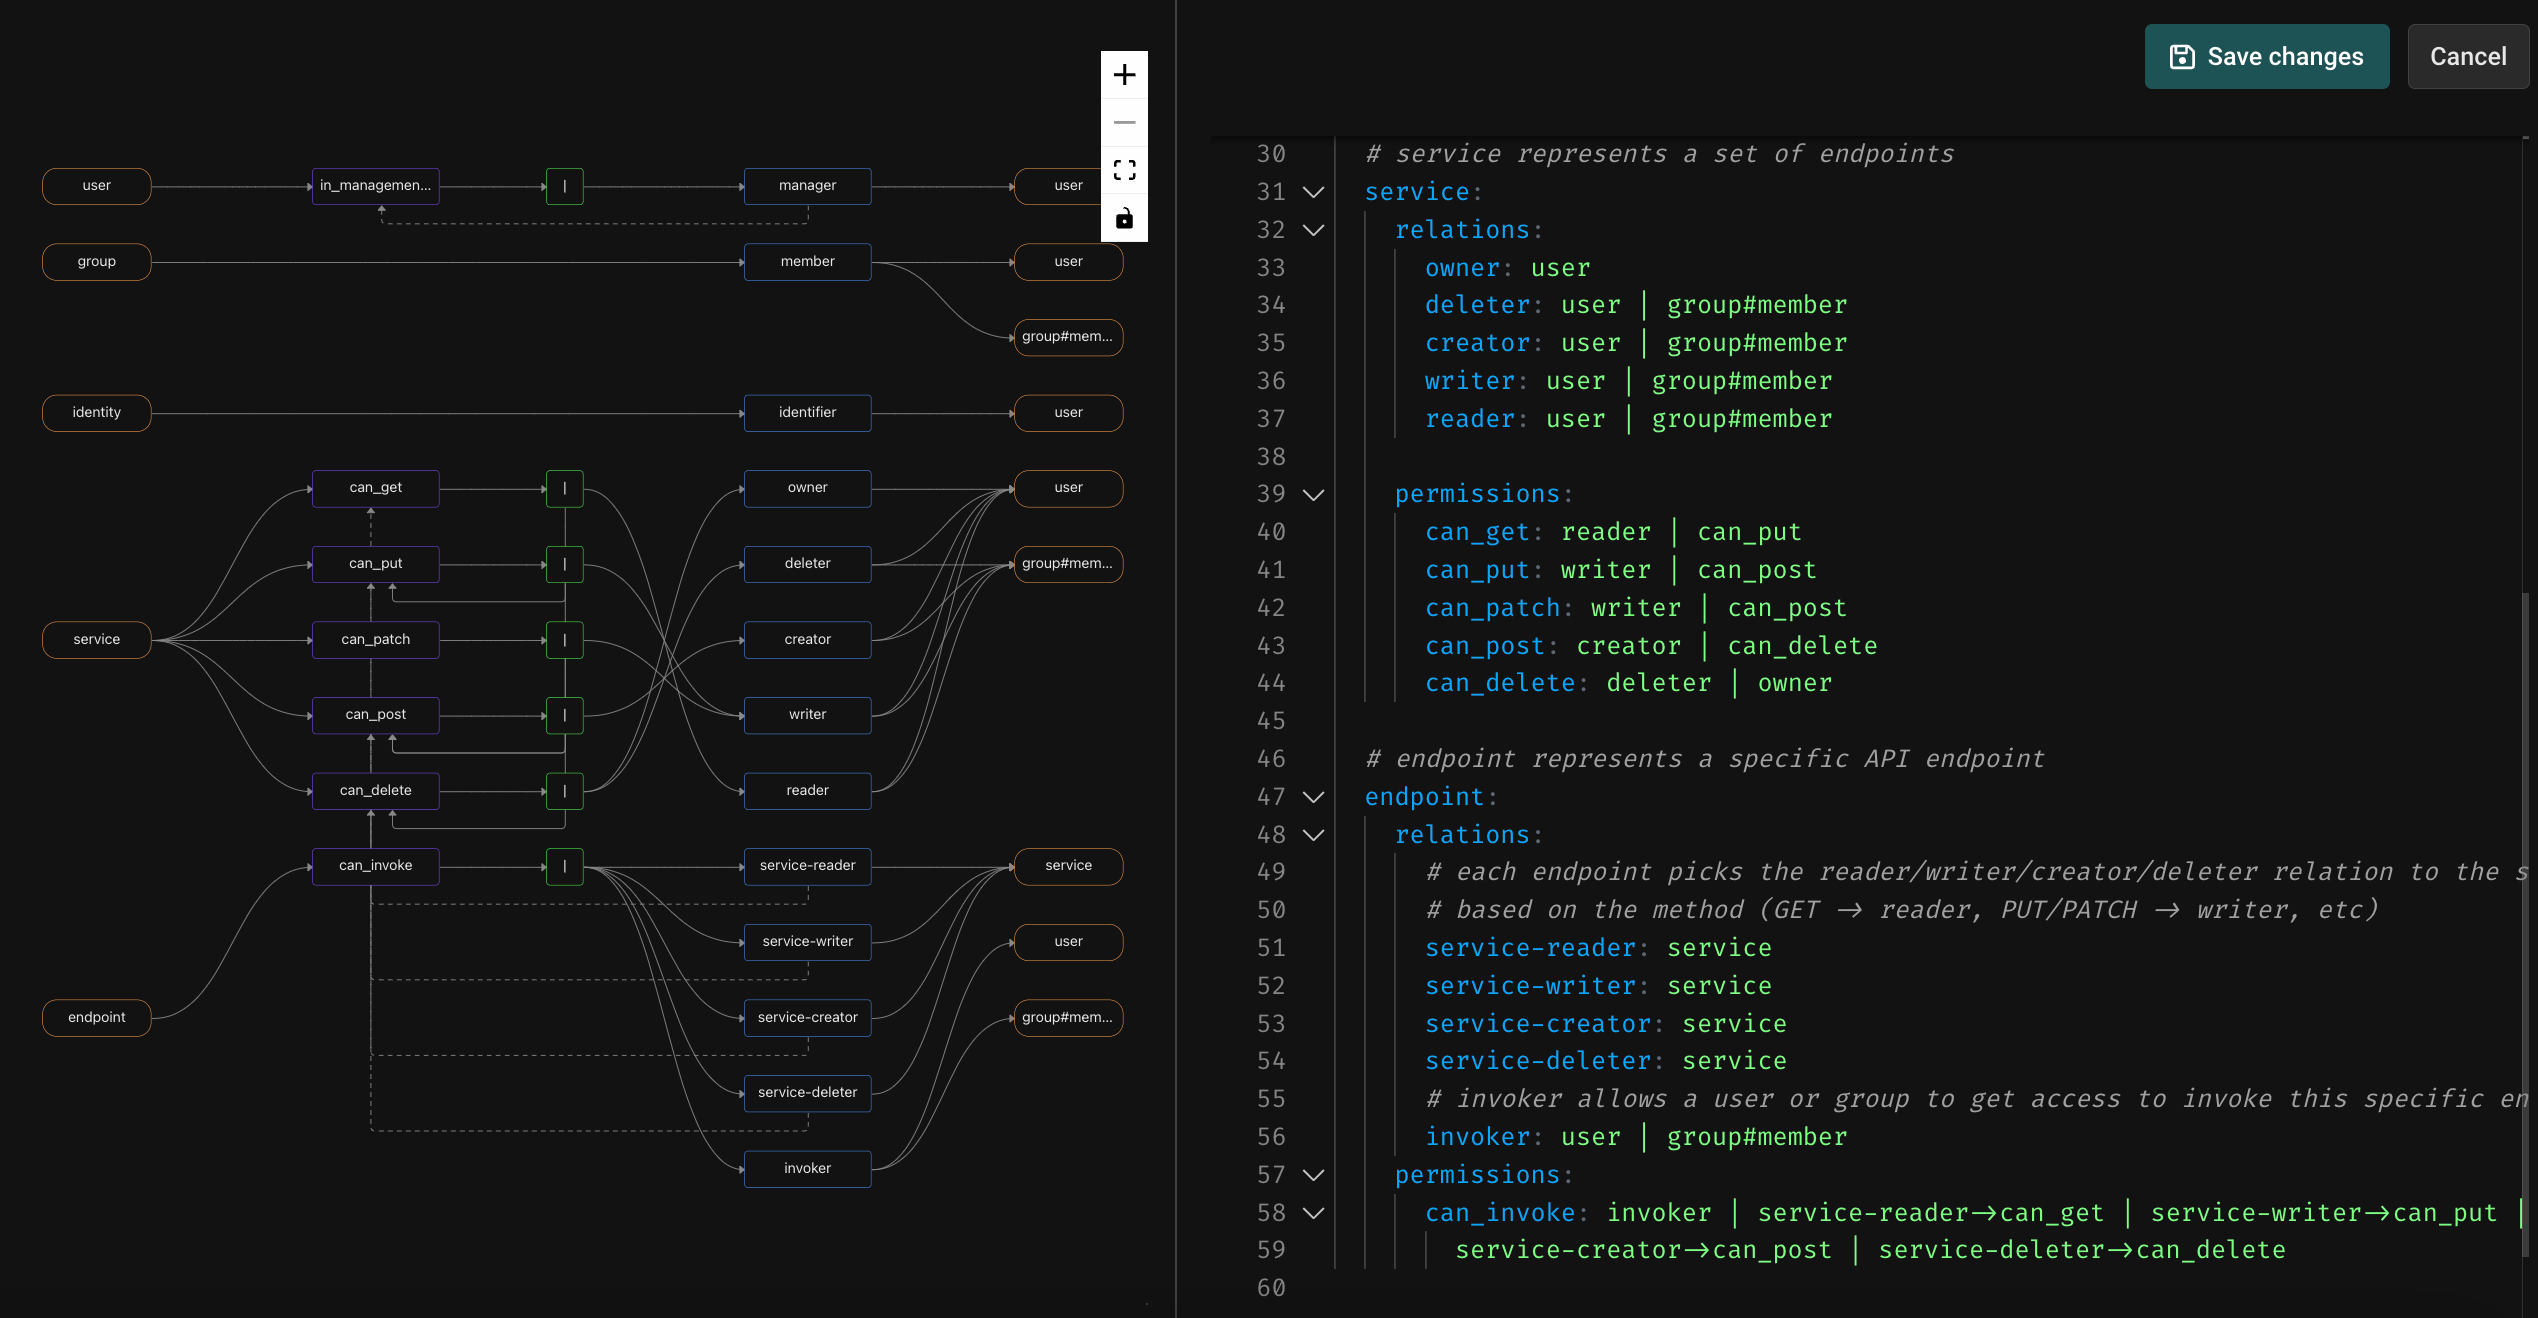
Click the Directory tab, and the Edit manifest button. This will show you the API Authorization model definition. The important type definitions are for service and endpoint.
types:
  # user represents a user that can be granted role(s)
  user:
    relations:
      manager: user

    permissions:
      ### display_name: user#in_management_chain ###
      in_management_chain: manager | manager->in_management_chain

  # group represents a collection of users and/or (nested) groups
  group:
    relations:
      member: user | group#member

  # identity represents a collection of identities for users
  identity:
    relations:
      identifier: user

  # service represents a set of endpoints
  service:
    relations:
      owner: user
      deleter: user | group#member
      creator: user | group#member
      writer: user | group#member
      reader: user | group#member

    permissions:
      can_get: reader | can_put
      can_put: writer | can_post
      can_patch: writer | can_post
      can_post: creator | can_delete
      can_delete: deleter | owner

  # endpoint represents a specific API endpoint
  endpoint:
    relations:
      # each endpoint picks the reader/writer/creator/deleter relation to the service
      # based on the method (GET -> reader, PUT/PATCH -> writer, etc)
      service-reader: service
      service-writer: service
      service-creator: service
      service-deleter: service
      # invoker allows a user or group to get access to invoke this specific endpoint
      invoker: user | group#member
    permissions:
      can_invoke: invoker | service-reader->can_get | service-writer->can_put |
        service-creator->can_post | service-deleter->can_delete
Let’s start at the bottom. An endpoint has a can_invoke permission, which is directly assignable by creating an invoker relationship to a user or a group. This allows an API administrator to entitle a user or a group directly on a discrete endpoint.
The endpoint also has relations called service-reader, service-writer, service-creator, and service-deleter which ladder up to the enclosing service. The default transformation that occurs when importing an OpenAPI definition is to set the relationship of the endpoint based on its HTTP method - a GET creates the service-reader relation, a PUT or PATCH creates the service-writer relation, a POST uses the service-creator relation, and a DELETE uses the service-deleter relation. This allows the can_invoke permission to ALSO be assignable via relationships that a user or group has to the service. You can of course customize this default transform if you have different conventions or needs.
Now, let’s look at the service type. A service has discrete permissions called can_get, can_put, can_patch, can_post, and can_delete which are assignable through the reader, writer, creator, deleter, and owner relations on the service. These permissions are additive, in the sense that a deleter can invoke DELETE endpoints, and can also do anything that a creator can do. A creator can POST, and can also do anything that a writer can do… and so on.
To put it all together, users (or groups) can be entitled at the level of an entire service, at the level of a class of endpoints on a service (e.g. all GET endpoints), or at the level of a discrete endpoint. This provides a lot of flexibility in API entitlement, while keeping things simple and consistent.
Next, let’s look at the user, group, service, and endpoint instance data.
Authorization data
Click on the Objects tab, and within that the Service type. You should see the three services that were automatically added by the template.
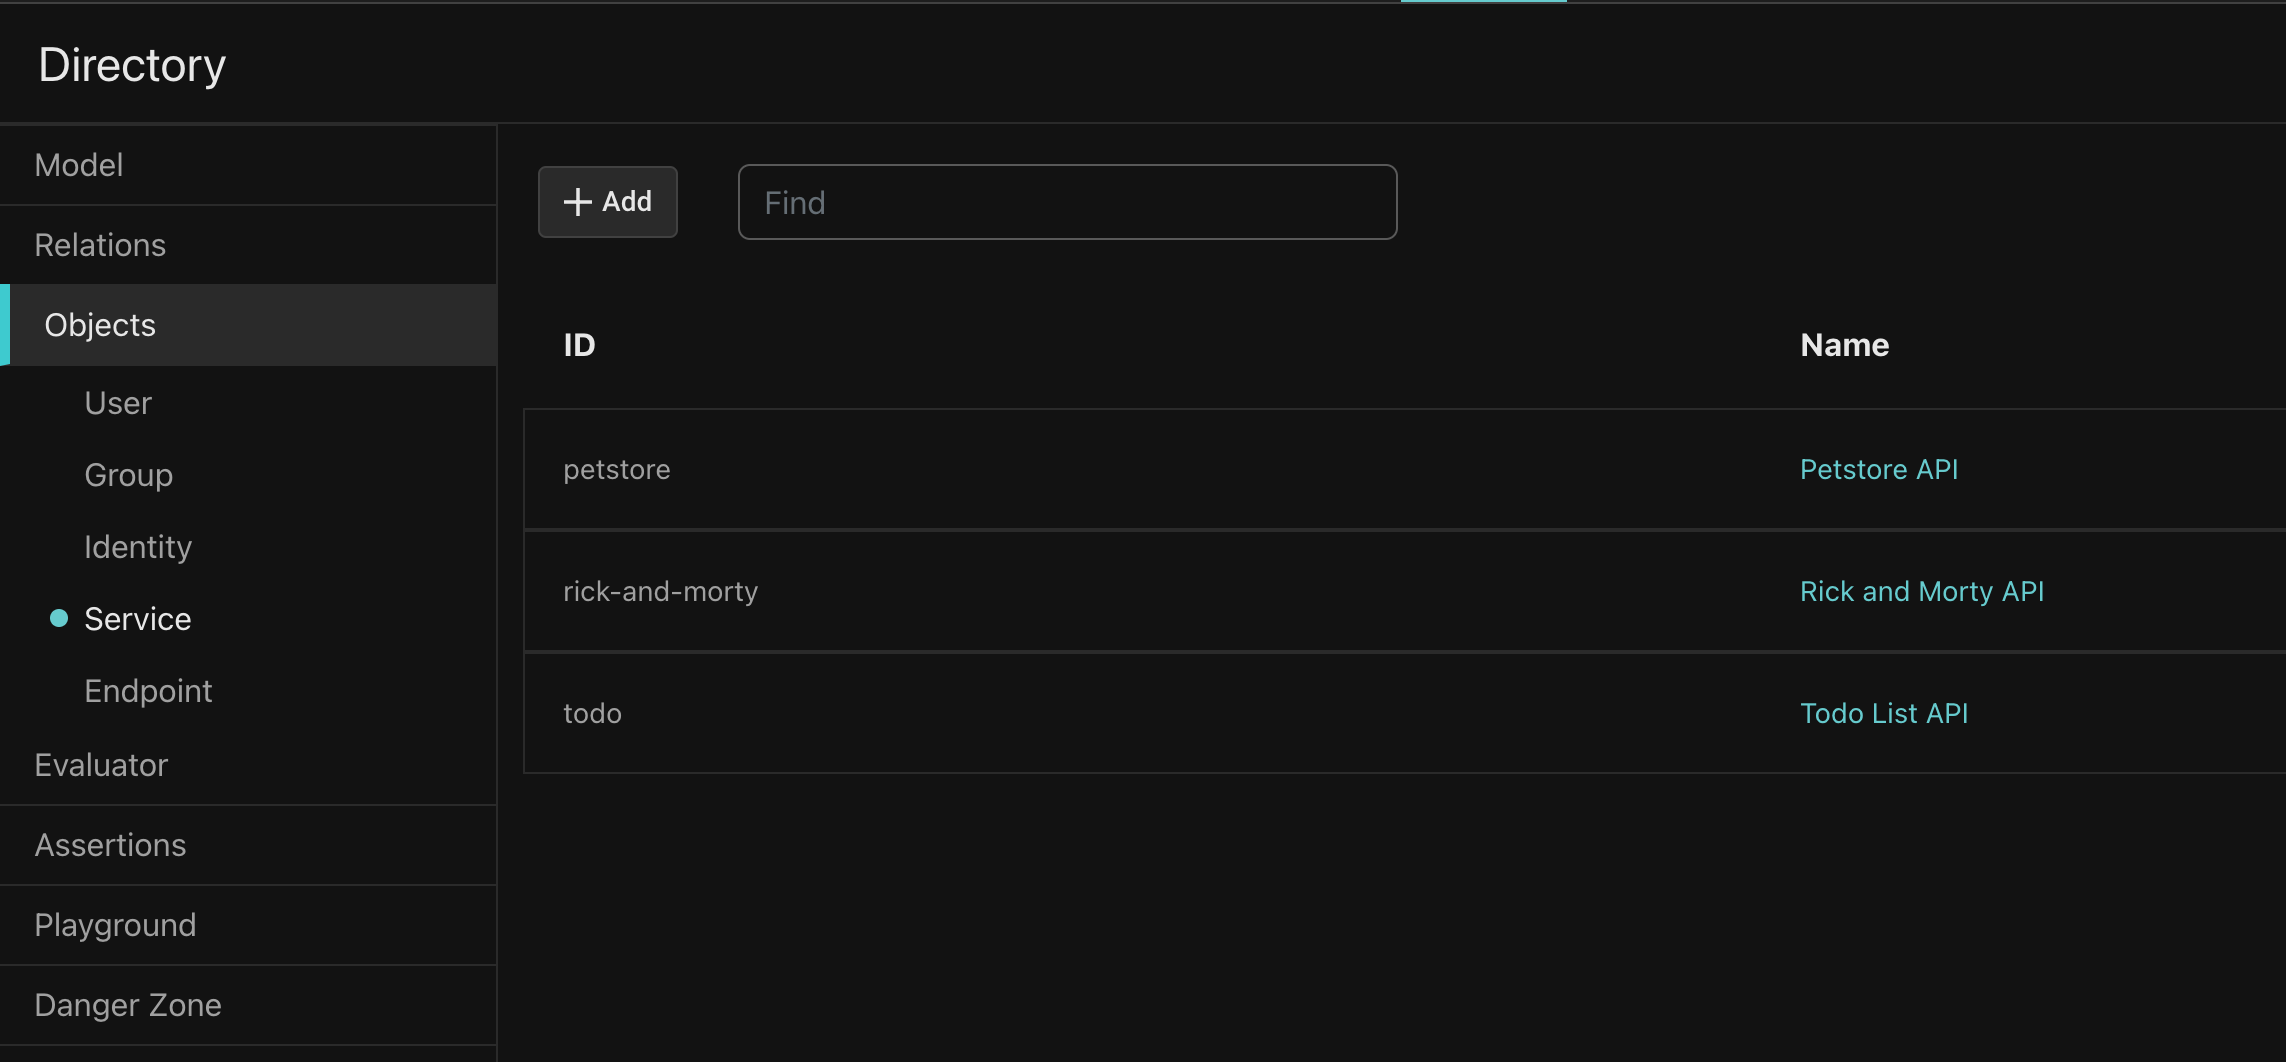
Let’s follow the trail of entitlements from users and groups to the services and endpoints. Click on the User type, which should show the five Citadel users - Beth, Jerry, Morty, Rick, and Summer.
Let’s click on Rick. As you can see, Rick is a member of the Global Deleters group.
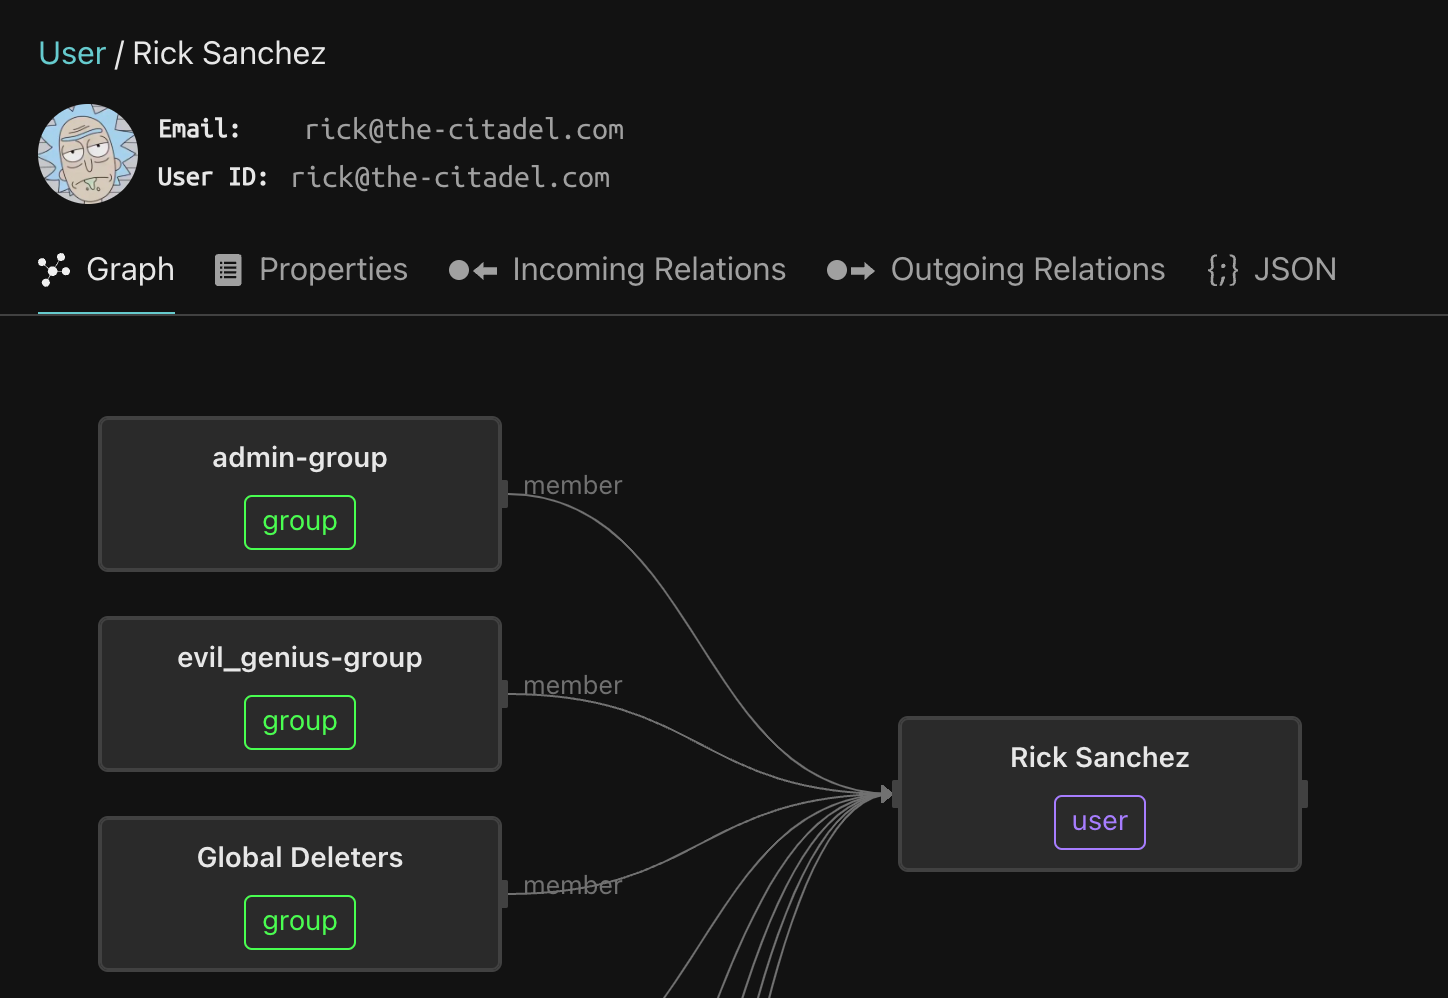
Next, click on the Global Deleters group.
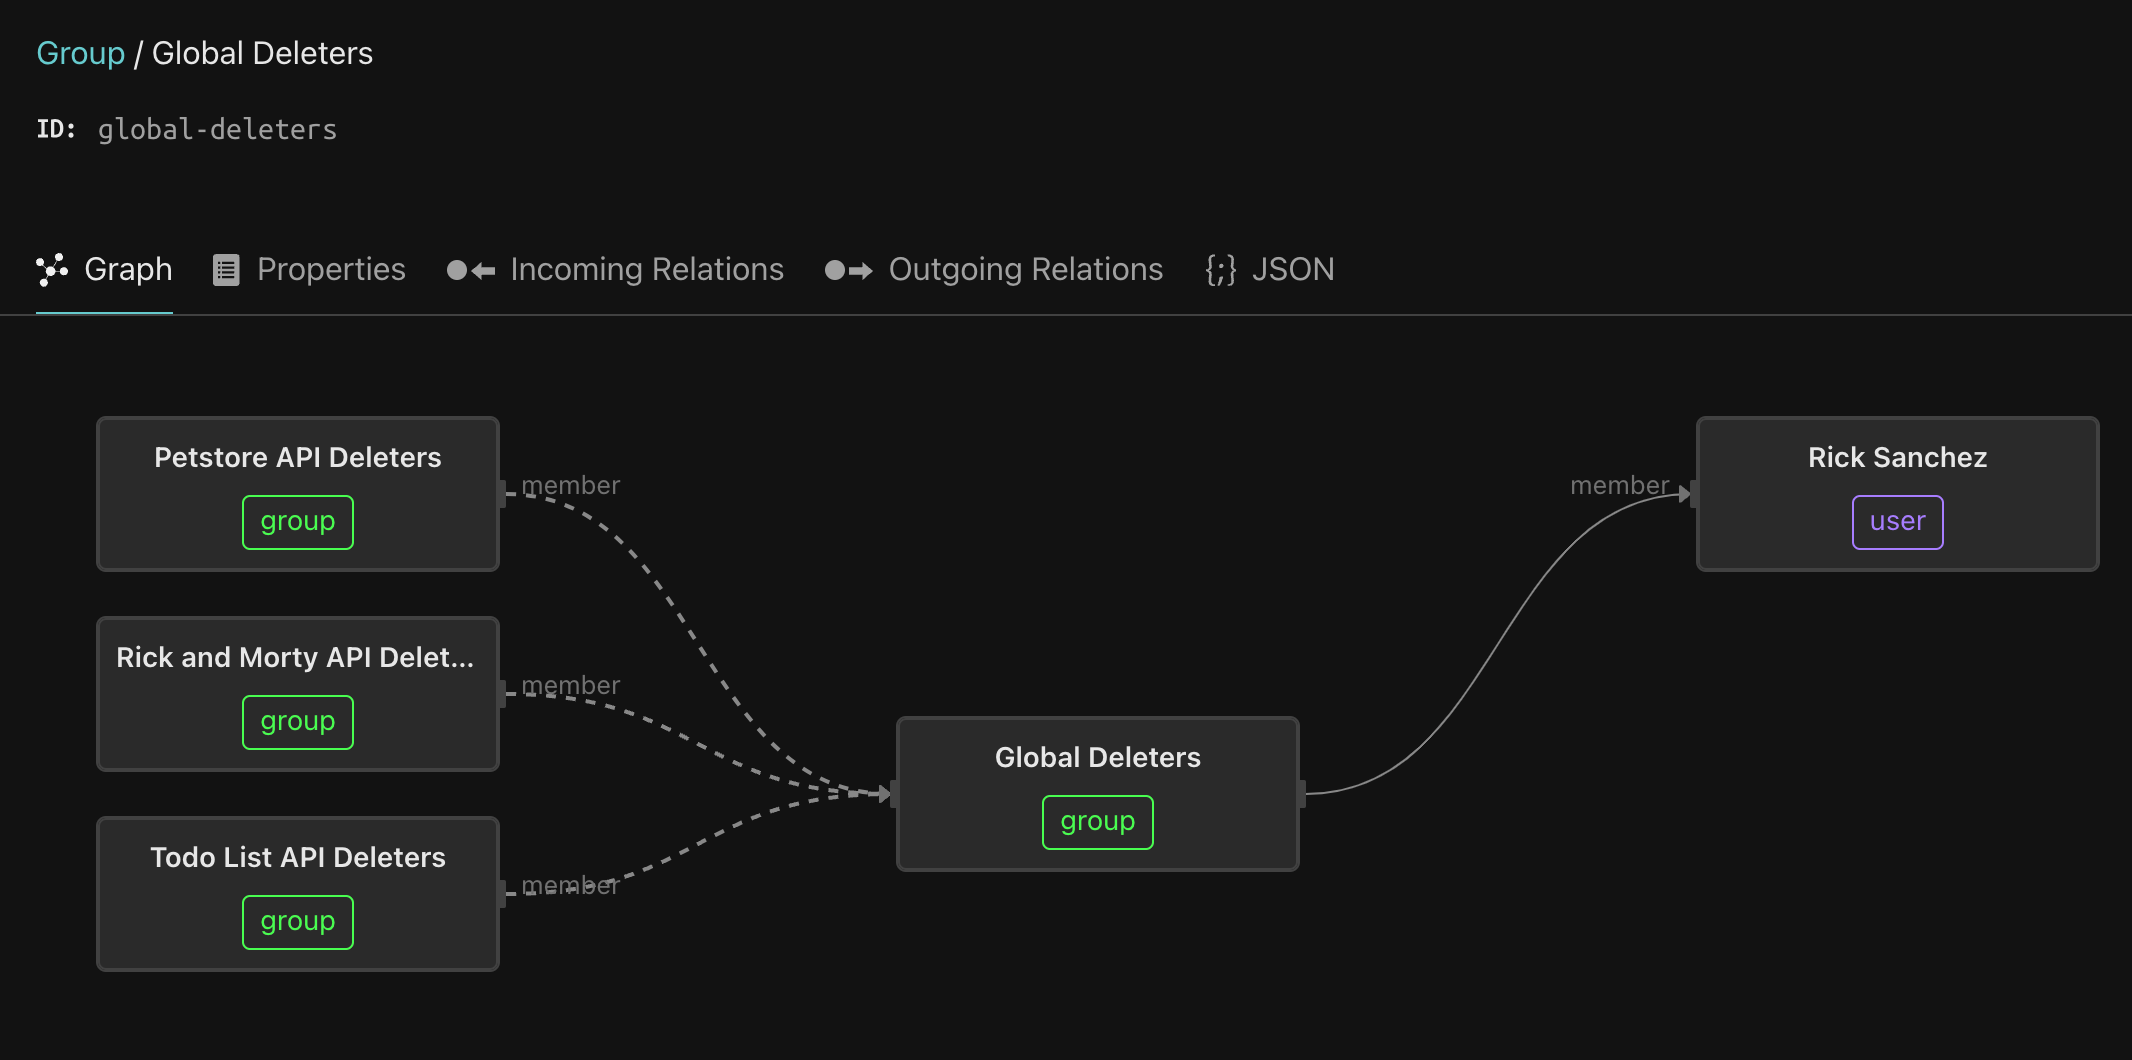
This group aggregates the deleters group for each service. This pattern makes Rick a super-user - he can invoke any endpoint in the system, since the members of the Petstore API Deleters, Rick and Morty API Deleters, and Todo API Deleters groups can invoke any endpoint on the respective services, and being a member of the Global Deleters group means that Rick is transitively a member of these groups.
Next, let’s look at Morty - click the User type and then click Morty. Morty is a member of the Petstore API Creators group, which means he can invoke any Petstore endpoint that is not a DELETE. This demonstrates the pattern of how to entitle a user on a set of methods within a service.

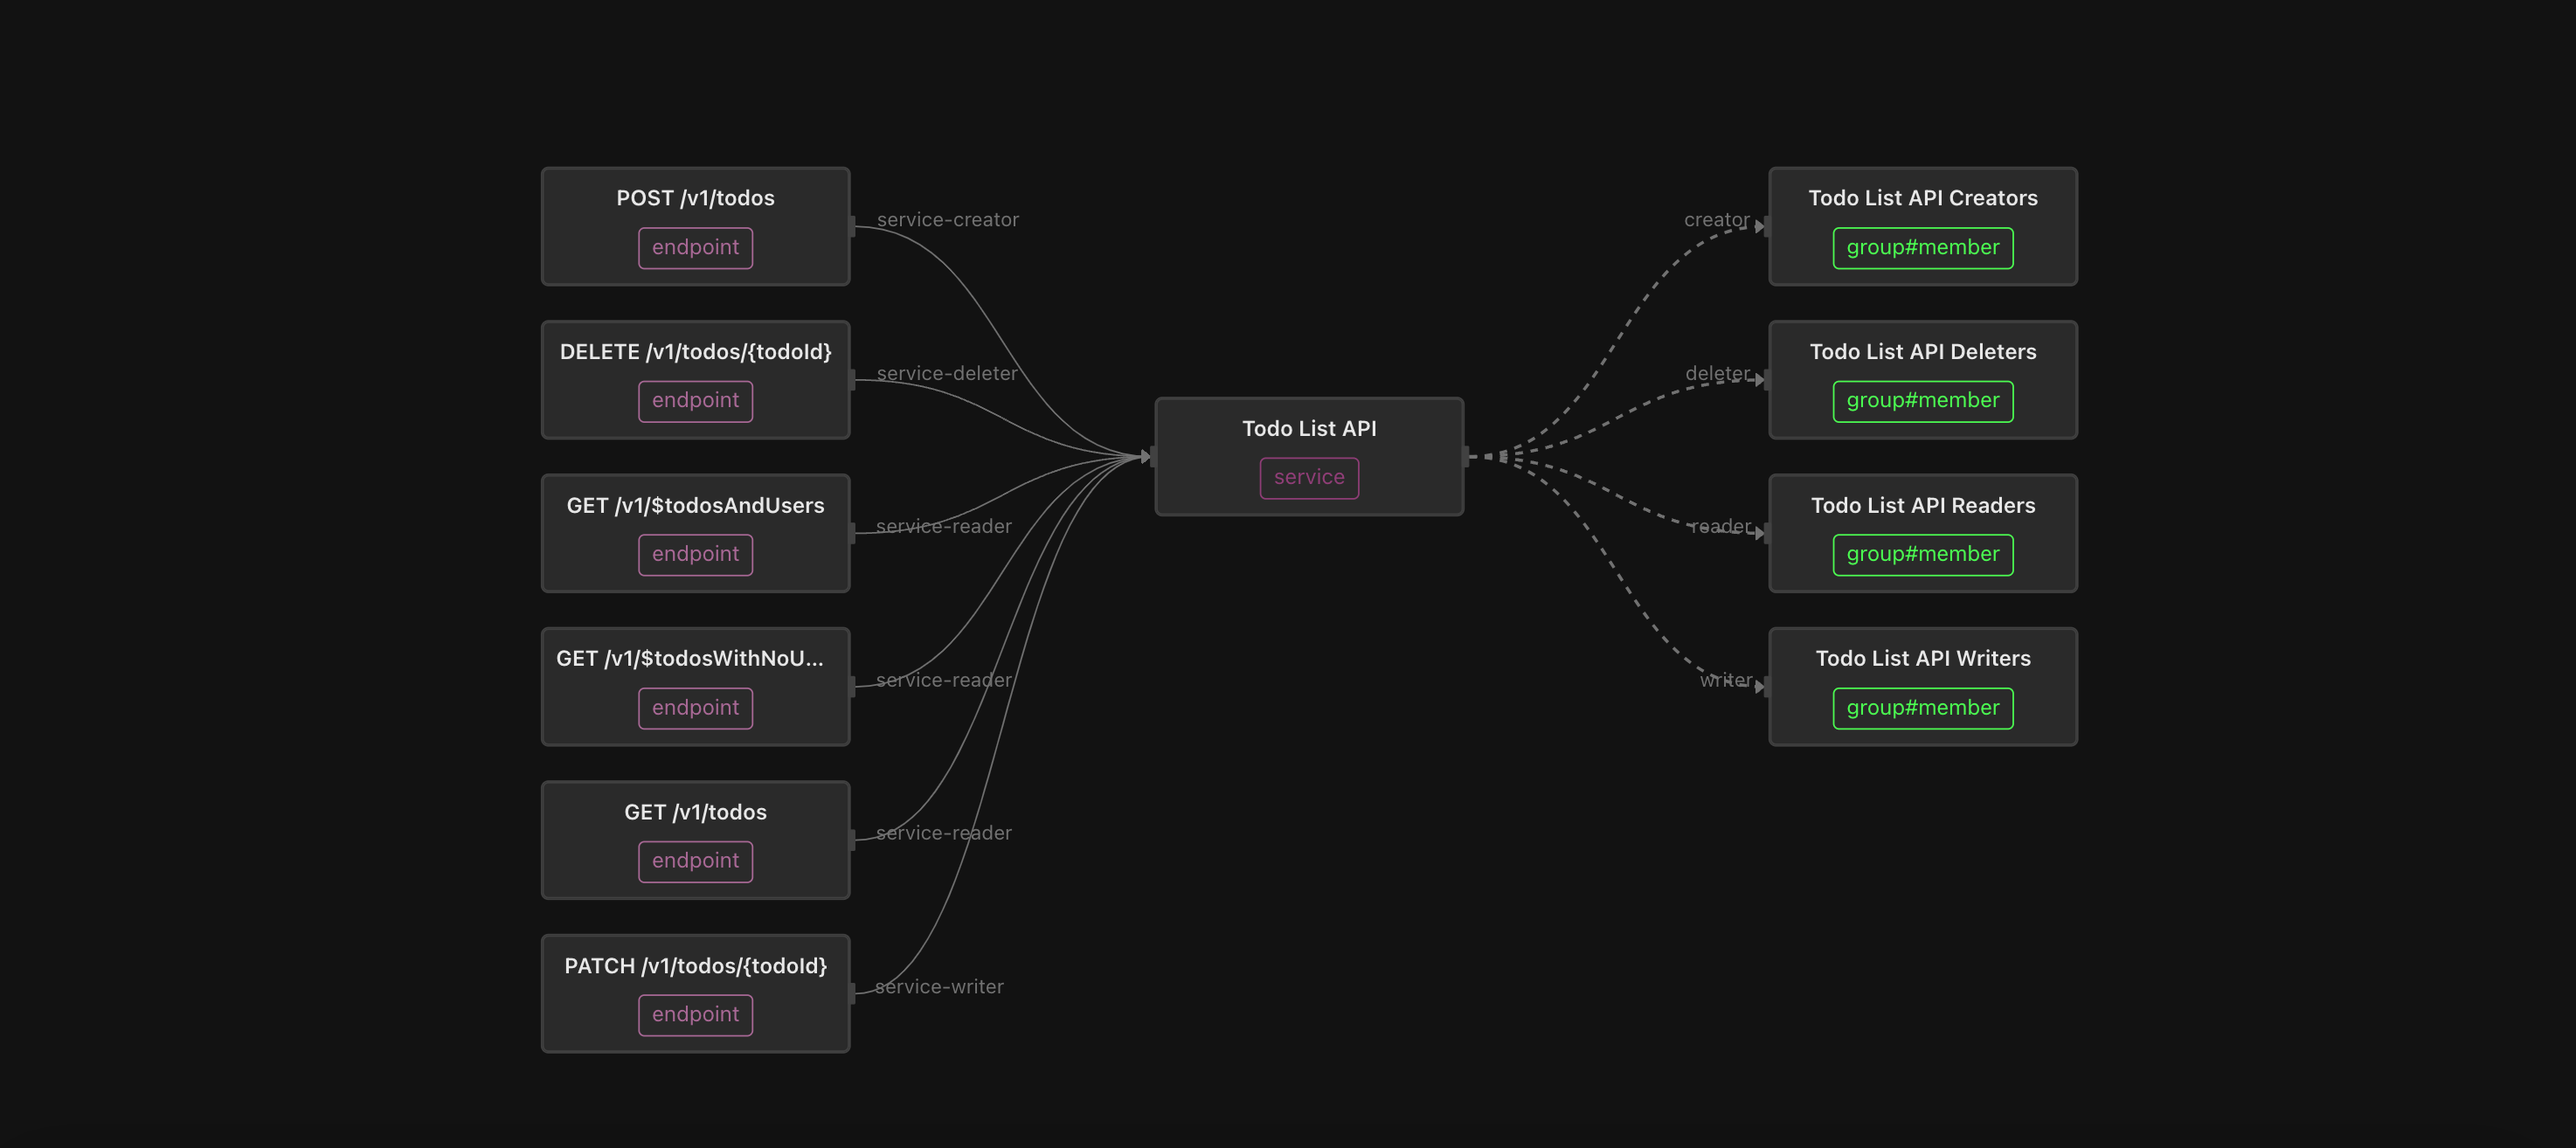
Finally, let’s go back to the Service type and click the Todo List API. This shows the six endpoints that are part of this API.
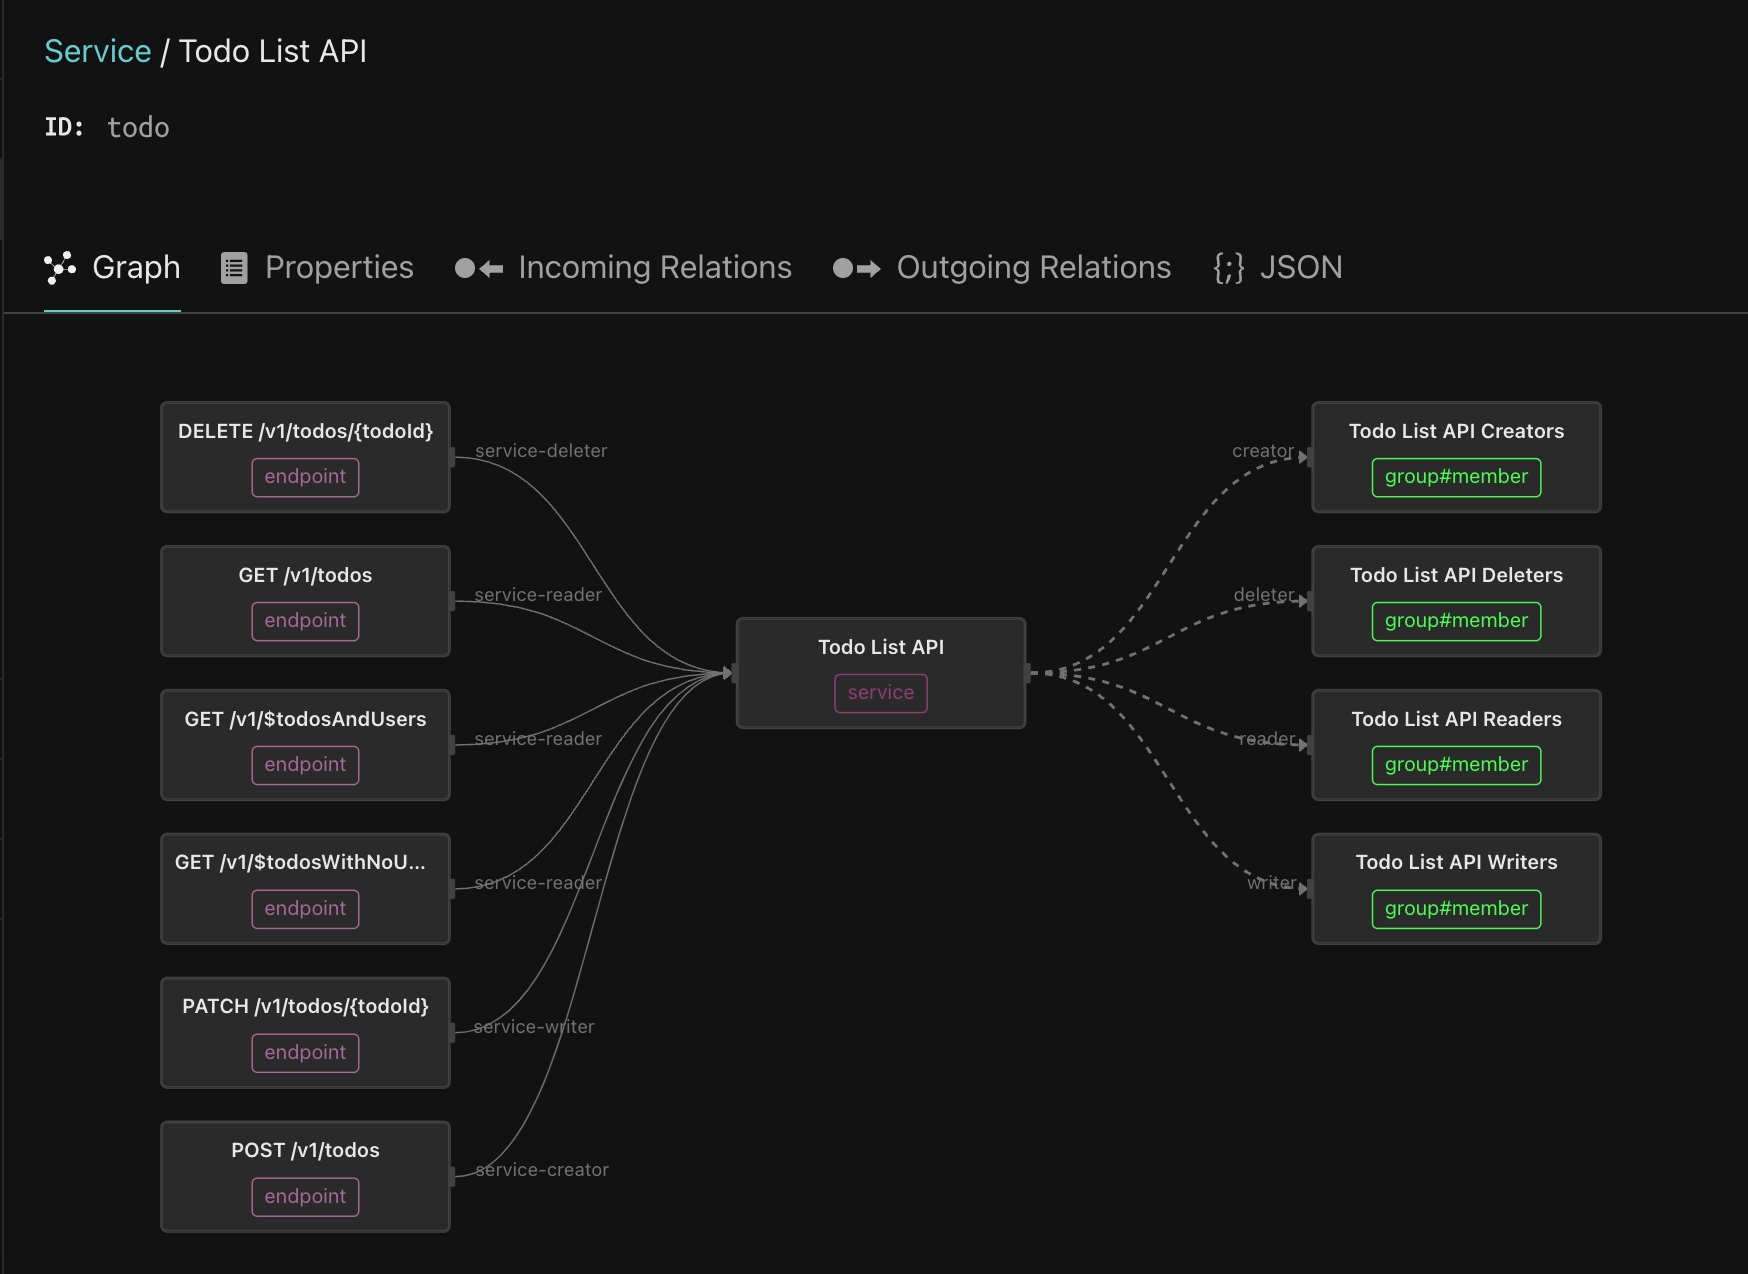
The group called Todo List API Readers is a reader of the service, meaning every member is entitled to invoke all the GET endpoints on this service. Click on the Todo List API Readers, and follow the trail of nested groups. As you can see, it includes the viewer-group, which comes from the Citadel IDP.
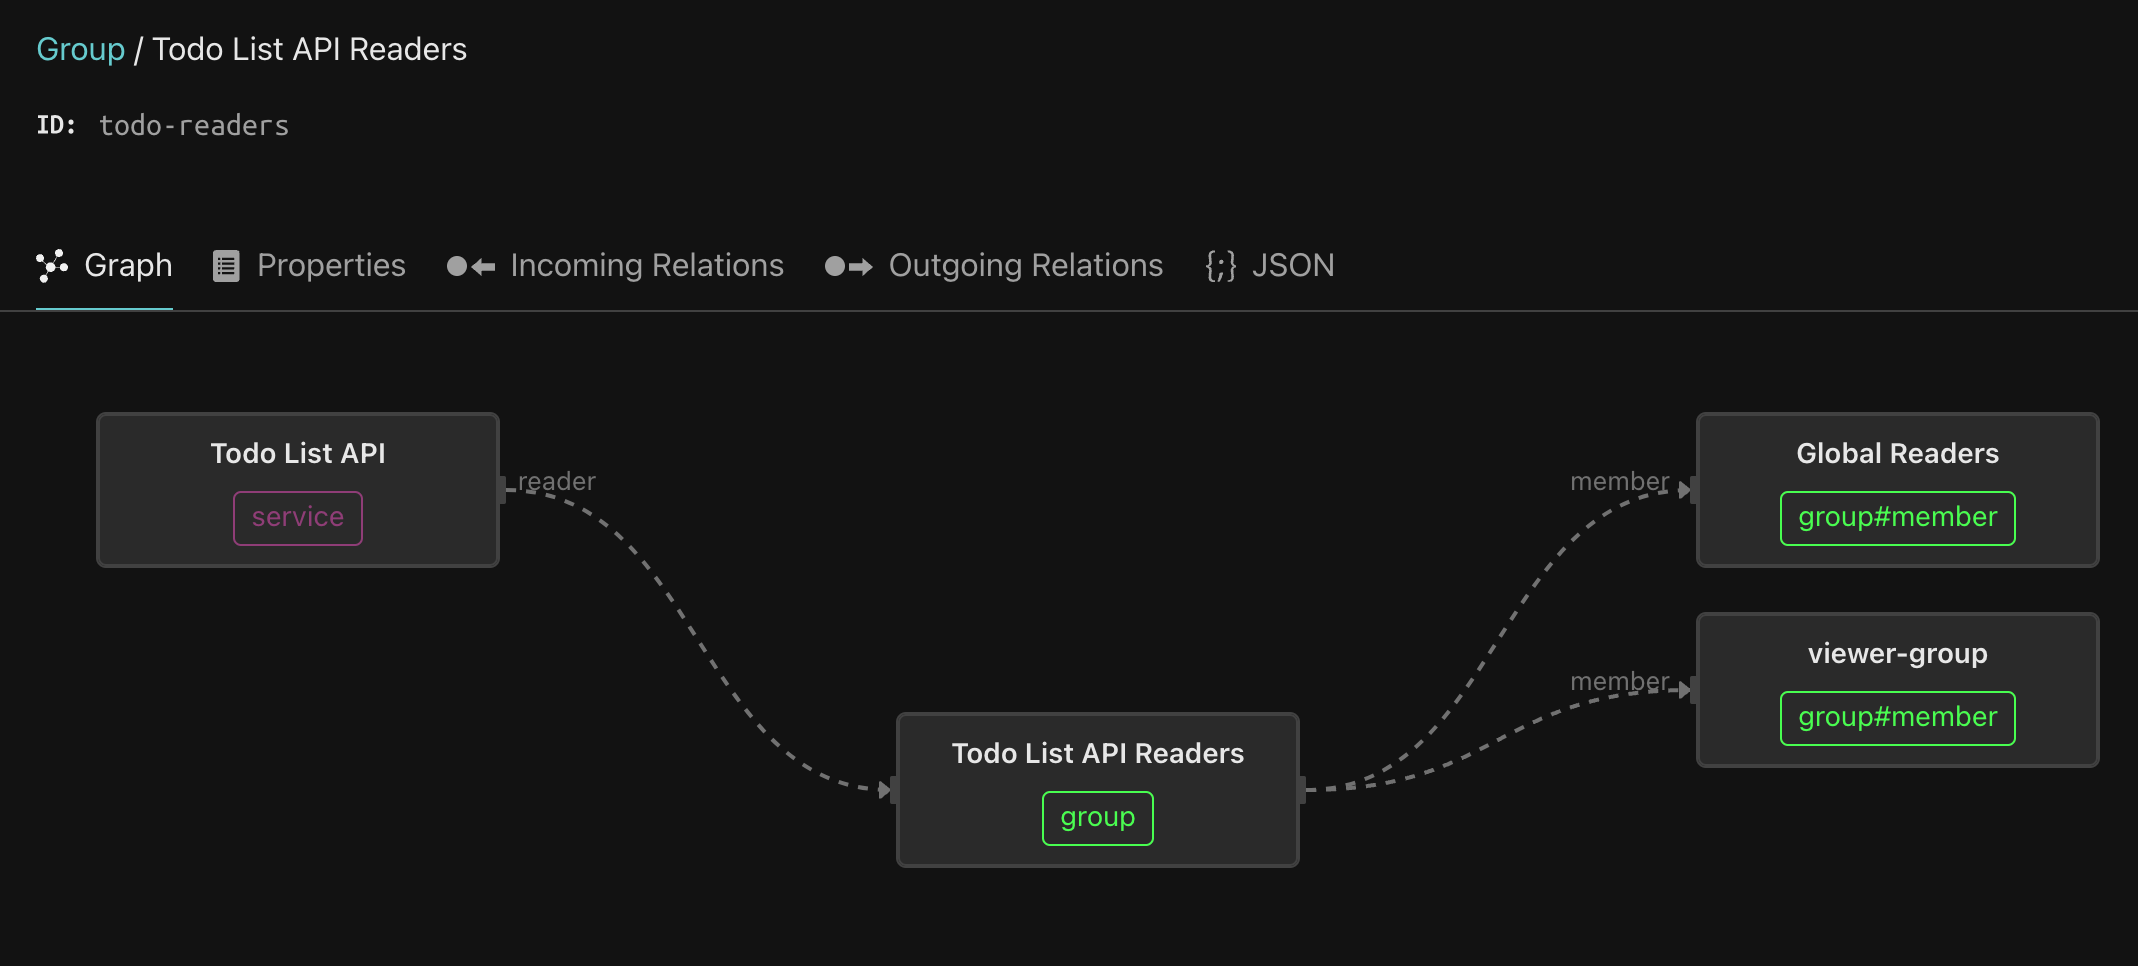
Clicking the viewer-group reveals its members - Beth and Jerry, as well as the members of the editor-group. Clicking the editor-group reveals its members - Morty and Summer, as well as members of the admin-group. And the admin-group includes Rick. So, transitively, every one of our protagonists are entitled to invoke any GET endpoint on the Todo API Service.
This pattern shows how to use nested groups in the IDP to control entitlements to classes of endpoints (in this case, the GET endpoints) in a service.
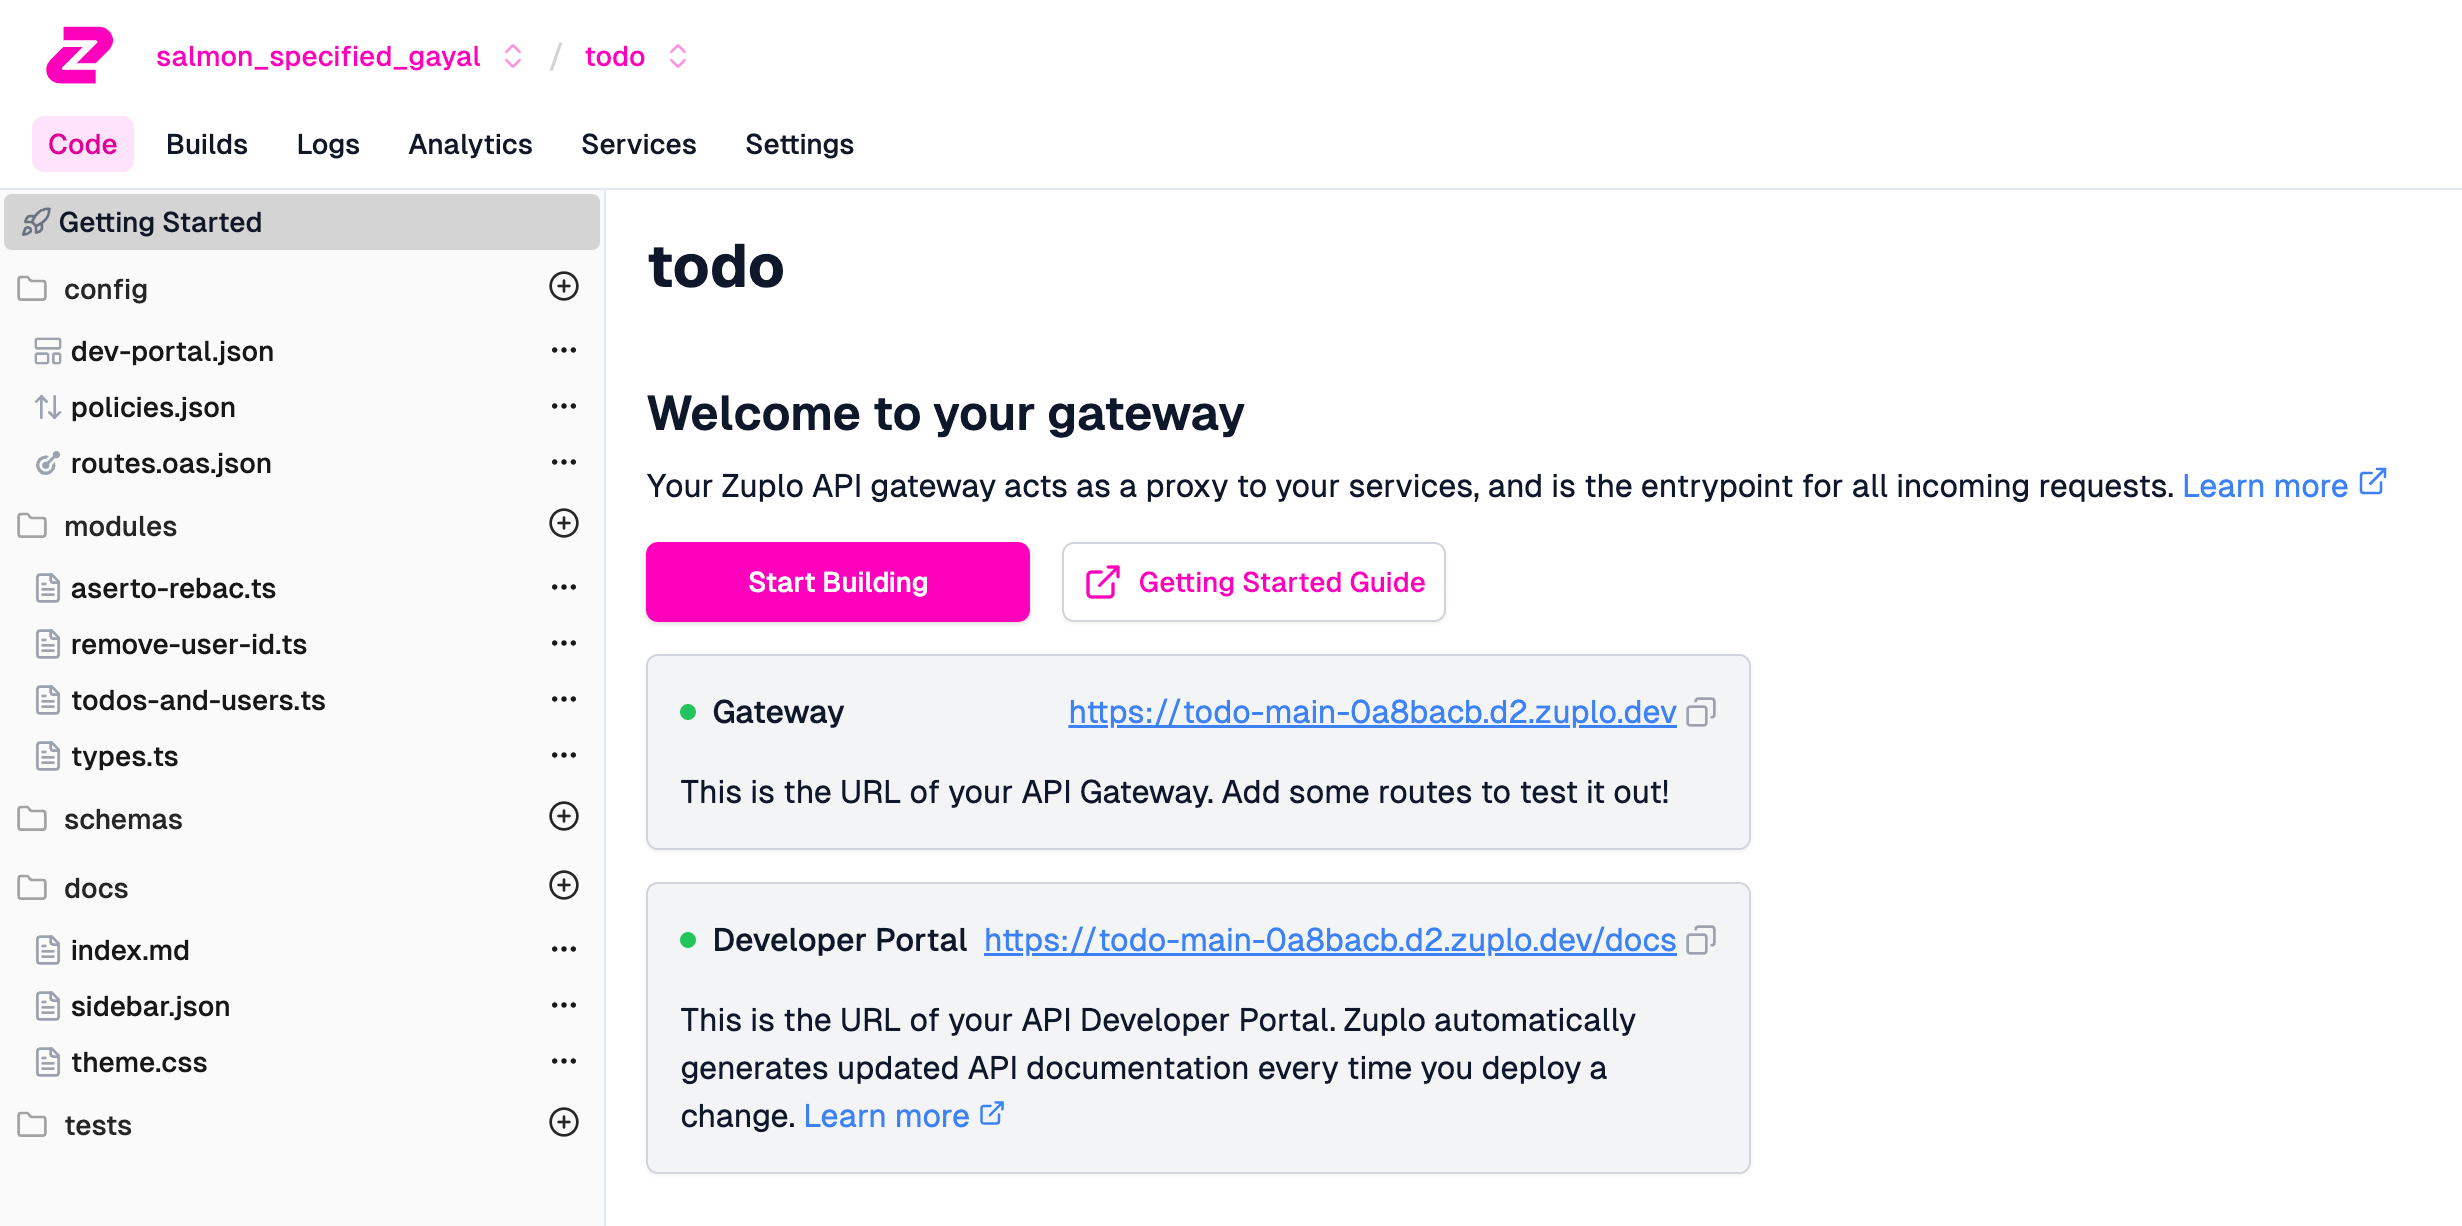
Integrating authorization with an API gateway
Let’s use Zuplo as an example of a modern API gateway. Create a free account, and use their Todo sample template. This should result in something like this:
Create the Aserto inbound policy
Click on the + icon next to modules, and create a new Inbound Policy.
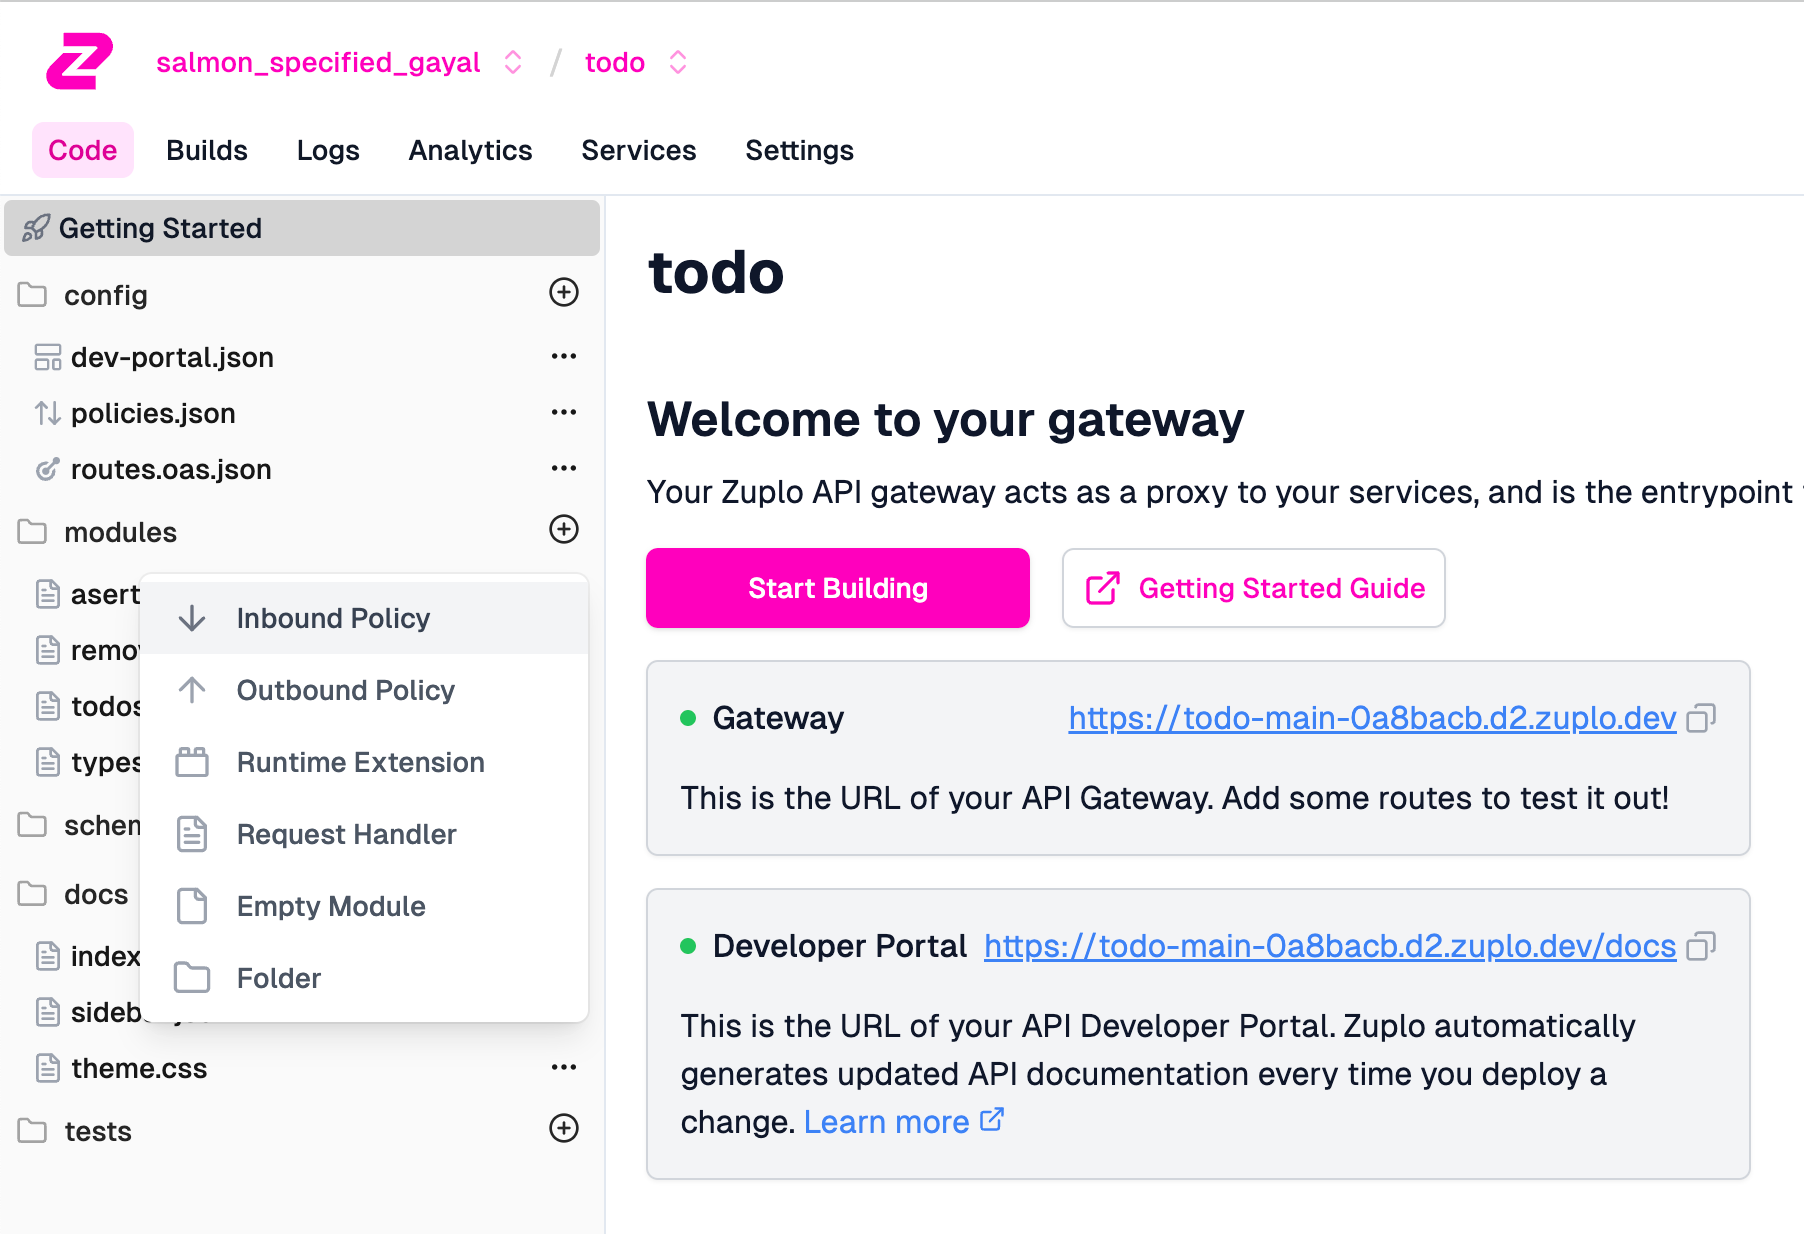
Type in aserto-rebac.ts and paste the following code in:
import { HttpProblems, ZuploContext, ZuploRequest } from "@zuplo/runtime"

type AsertoPolicyOptions = {
  // Aserto hosted authorizer configuration values (required)
  tenantId: string
  authorizerApiKey: string
  policyName: string

  // Canonicalized service name (required unless all the overrides below are provided)
  serviceName: string

  // The default behavior is to call the Aserto authorizer with the following check call:
  //   objectType: "endpoint"
  //   objectId: `${serviceName}:${httpMethod}:${routePath}`
  //   relation: "can_invoke"
  // Each of these can be overridden by providing explicit values for these.
  // The values can be in the following formats:
  //   1. "string": string literal
  //   2. "$header(HEADER_NAME)": retrieve the value of request.headers[HEADER_NAME]
  //   3. "$param(PARAM_NAME)": retrieve the value of request.params[PARAM_NAME]
  //   4. "$body(BODY_KEY_NAME)": retrieve the value of request.body[BODY_KEY_NAME] (this assumes a JSON body and can be a compound - like x.y.z)
  objectType: string
  objectId: string
  relation: string
}

const ASERTO_AUTHORIZER_URL = "https://authorizer.prod.aserto.com/api/v2/authz/is"
const HEADER = "$header("
const PARAM = "$param("
const BODY = "$body("

async function getValue(request: ZuploRequest, value: string): Promise<string> {
  if (!value) {
    return null
  }
  if (value.startsWith(HEADER)) {
    const header = value.substring(HEADER.length, value.length - 1)
    return request.headers[header]
  }
  if (value.startsWith(PARAM)) {
    const param = value.substring(PARAM.length, value.length - 1)
    return request.params[param]
  }
  if (value.startsWith(BODY)) {
    const bodyPath = value.substring(BODY.length, value.length - 1)
    const bodyPathComponents = bodyPath.split('.')
    let body = await request.json()
    for (const pathComponent of bodyPathComponents) {
      body = body[pathComponent]
    }
    return body
  }
  return value
}

function getCanonicalizedEndpointID(request: ZuploRequest, context: ZuploContext, serviceName: string): string {
  return `${serviceName}:${request.method}:${context.route.path}`
}

export default async function policy(
  request: ZuploRequest,
  context: ZuploContext,
  options: AsertoPolicyOptions,
  policyName: string
) {

  if (!request.user) {
    context.log.error(
      "User is not authenticated. An authentication policy must come before the authorization policy.",
    );
    return HttpProblems.unauthorized(request, context);
  }

  const endpointID = getCanonicalizedEndpointID(request, context, options.serviceName)

  const asertoRequest = JSON.stringify({
    "identity_context": {
      "type": "IDENTITY_TYPE_SUB",
      "identity": request.user.data.sub
    },
    "resource_context": {
      "object_type": await getValue(request, options.objectType) ?? "endpoint",
      "object_id": await getValue(request, options.objectId) ?? endpointID,
      "relation": await getValue(request, options.relation) ?? "can_invoke"
    },
    "policy_context": {
      "decisions": [
        "allowed"
      ],
      "path": "rebac.check"
    },
    "policy_instance": {
      "name": options.policyName,
      "instance_label": options.policyName
    }
  })

  try {
    context.log.debug(`rebac.check request: ${asertoRequest}`)

    const asertoResponse = await fetch(ASERTO_AUTHORIZER_URL, {
      headers: {
        "content-type": "application/json",
        "Aserto-Tenant-ID": options.tenantId,
        "Authorization": `basic ${options.authorizerApiKey}`
      },
      method: 'POST',
      body: asertoRequest
    })
    const response = await asertoResponse.json()
    context.log.debug(`aserto response: ${JSON.stringify(response)}`)

    if (response && response.decisions && response.decisions.length > 0 && response.decisions[0].is) {
      return request
    }
    context.log.error(
      `The user '${request.user.sub}' is not authorized to perform this action.`,
    )
    return HttpProblems.forbidden(request, context);
  } catch (e) {
    context.log.error(
      `Aserto authorization error. The user '${request.user.sub}' is not authorized to perform this action.`,
    )
    return HttpProblems.forbidden(request, context);
  }
}
Add inbound policies to the routes
Next, click the routes.oas.json file on the left navbar, and click the GET /v1/todos endpoint. Open the Policies chevron.
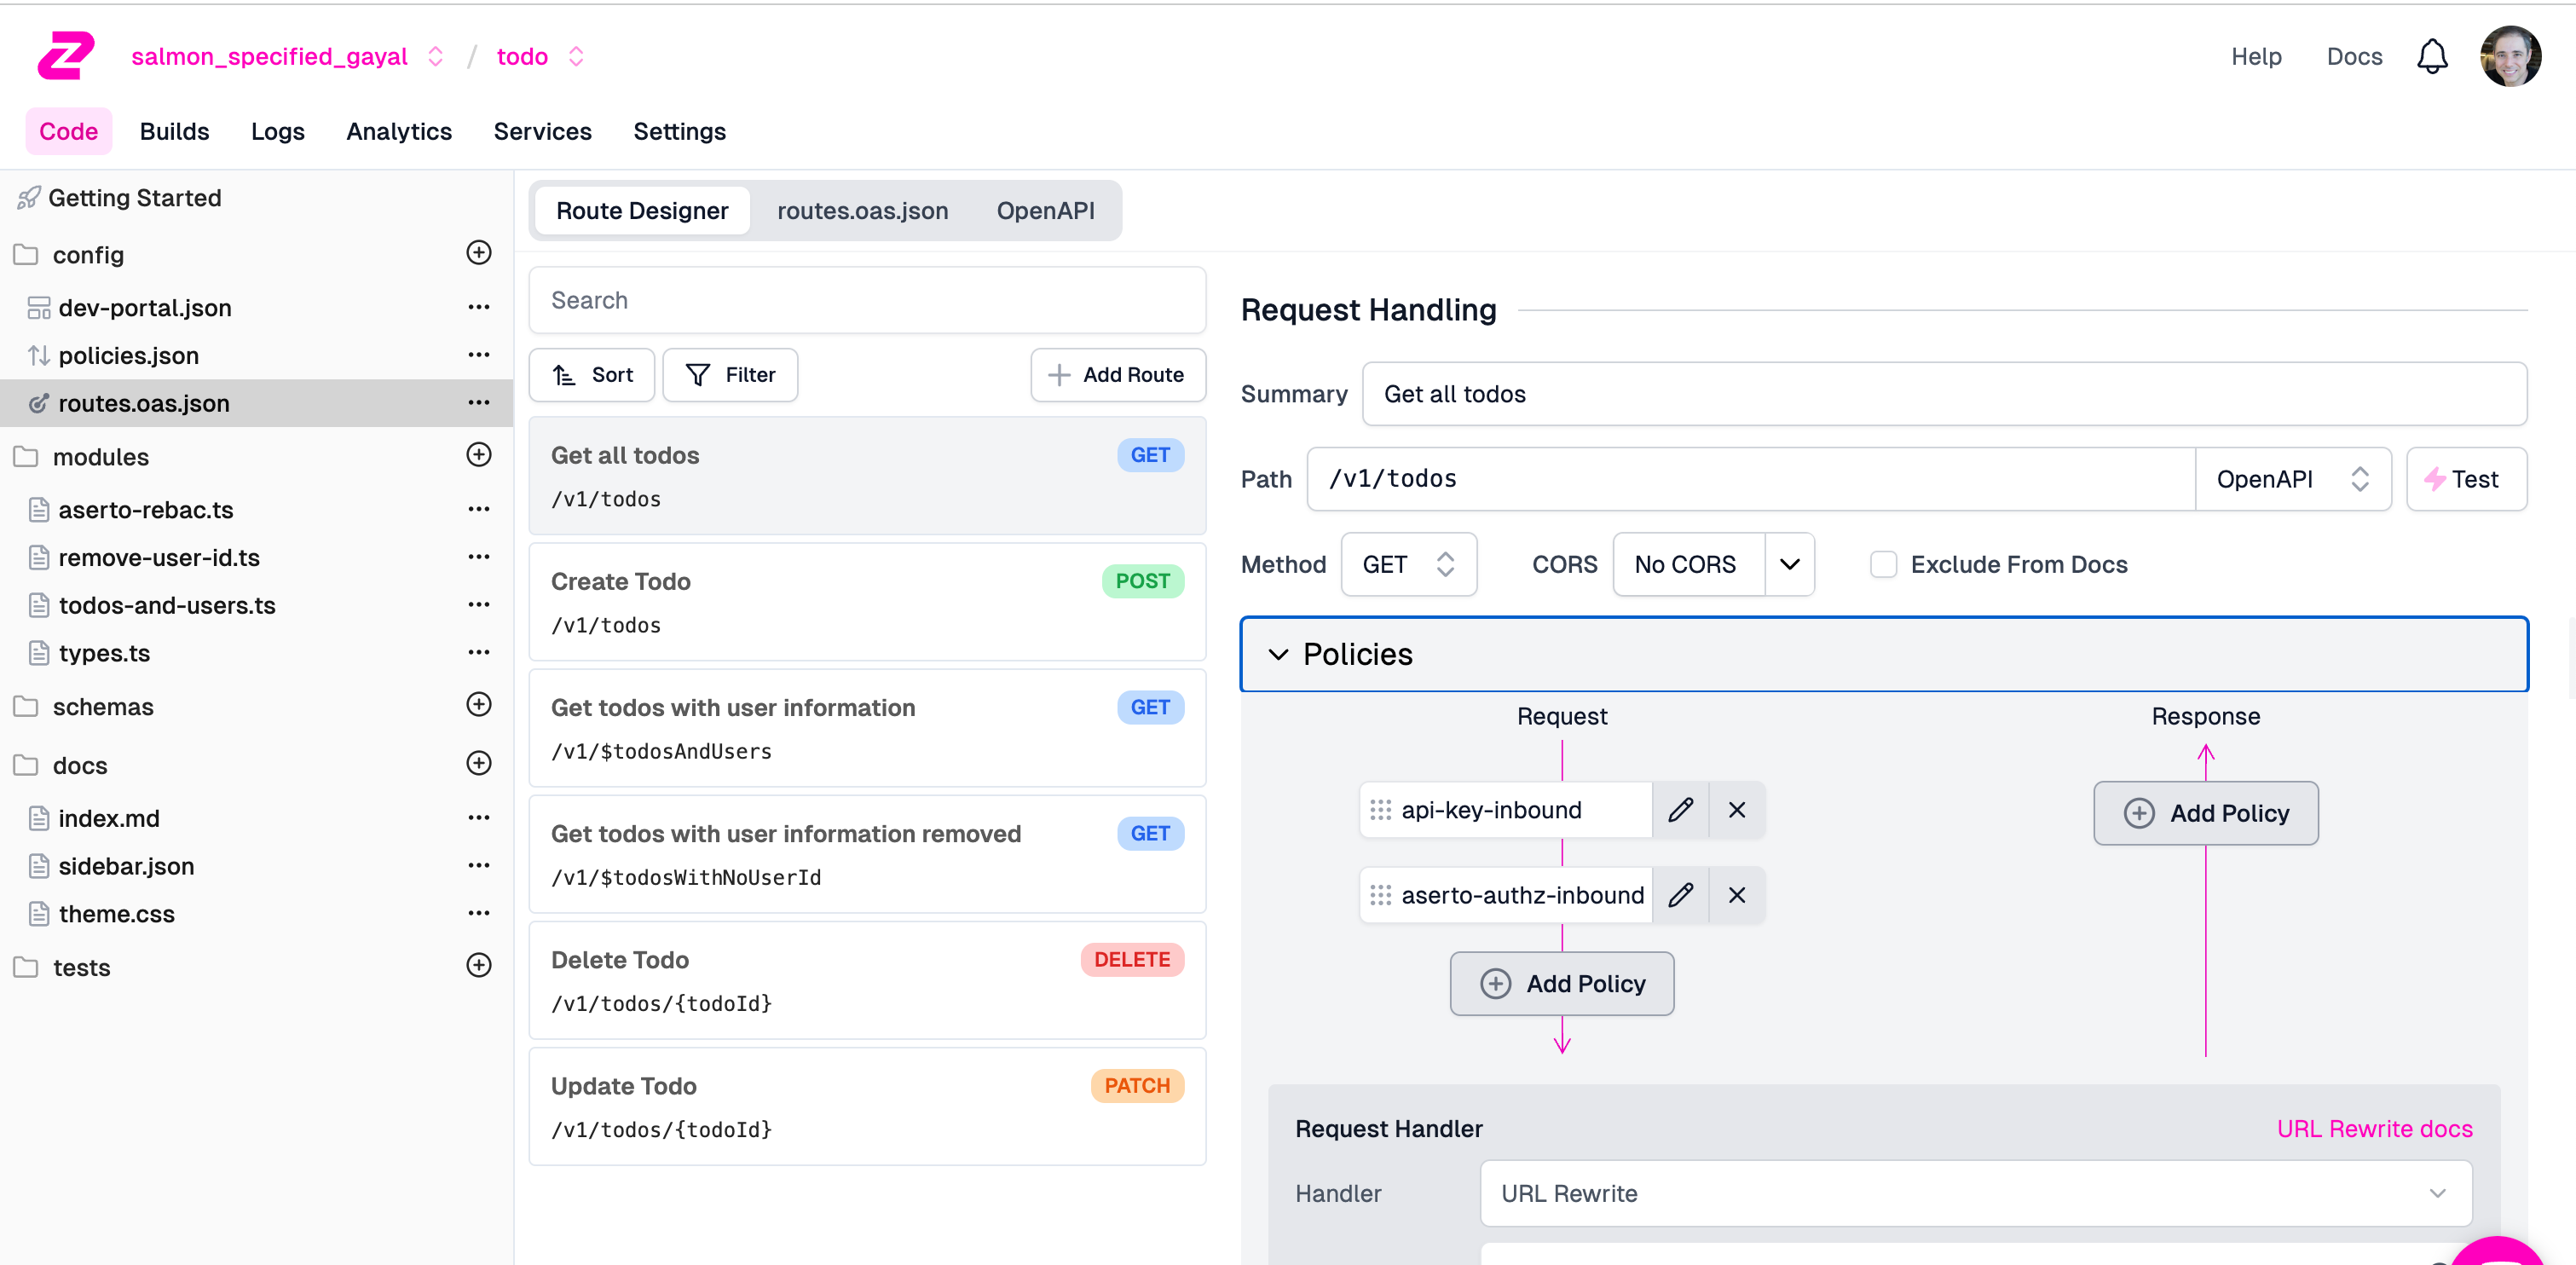
Add a new policy called API Key Authentication:
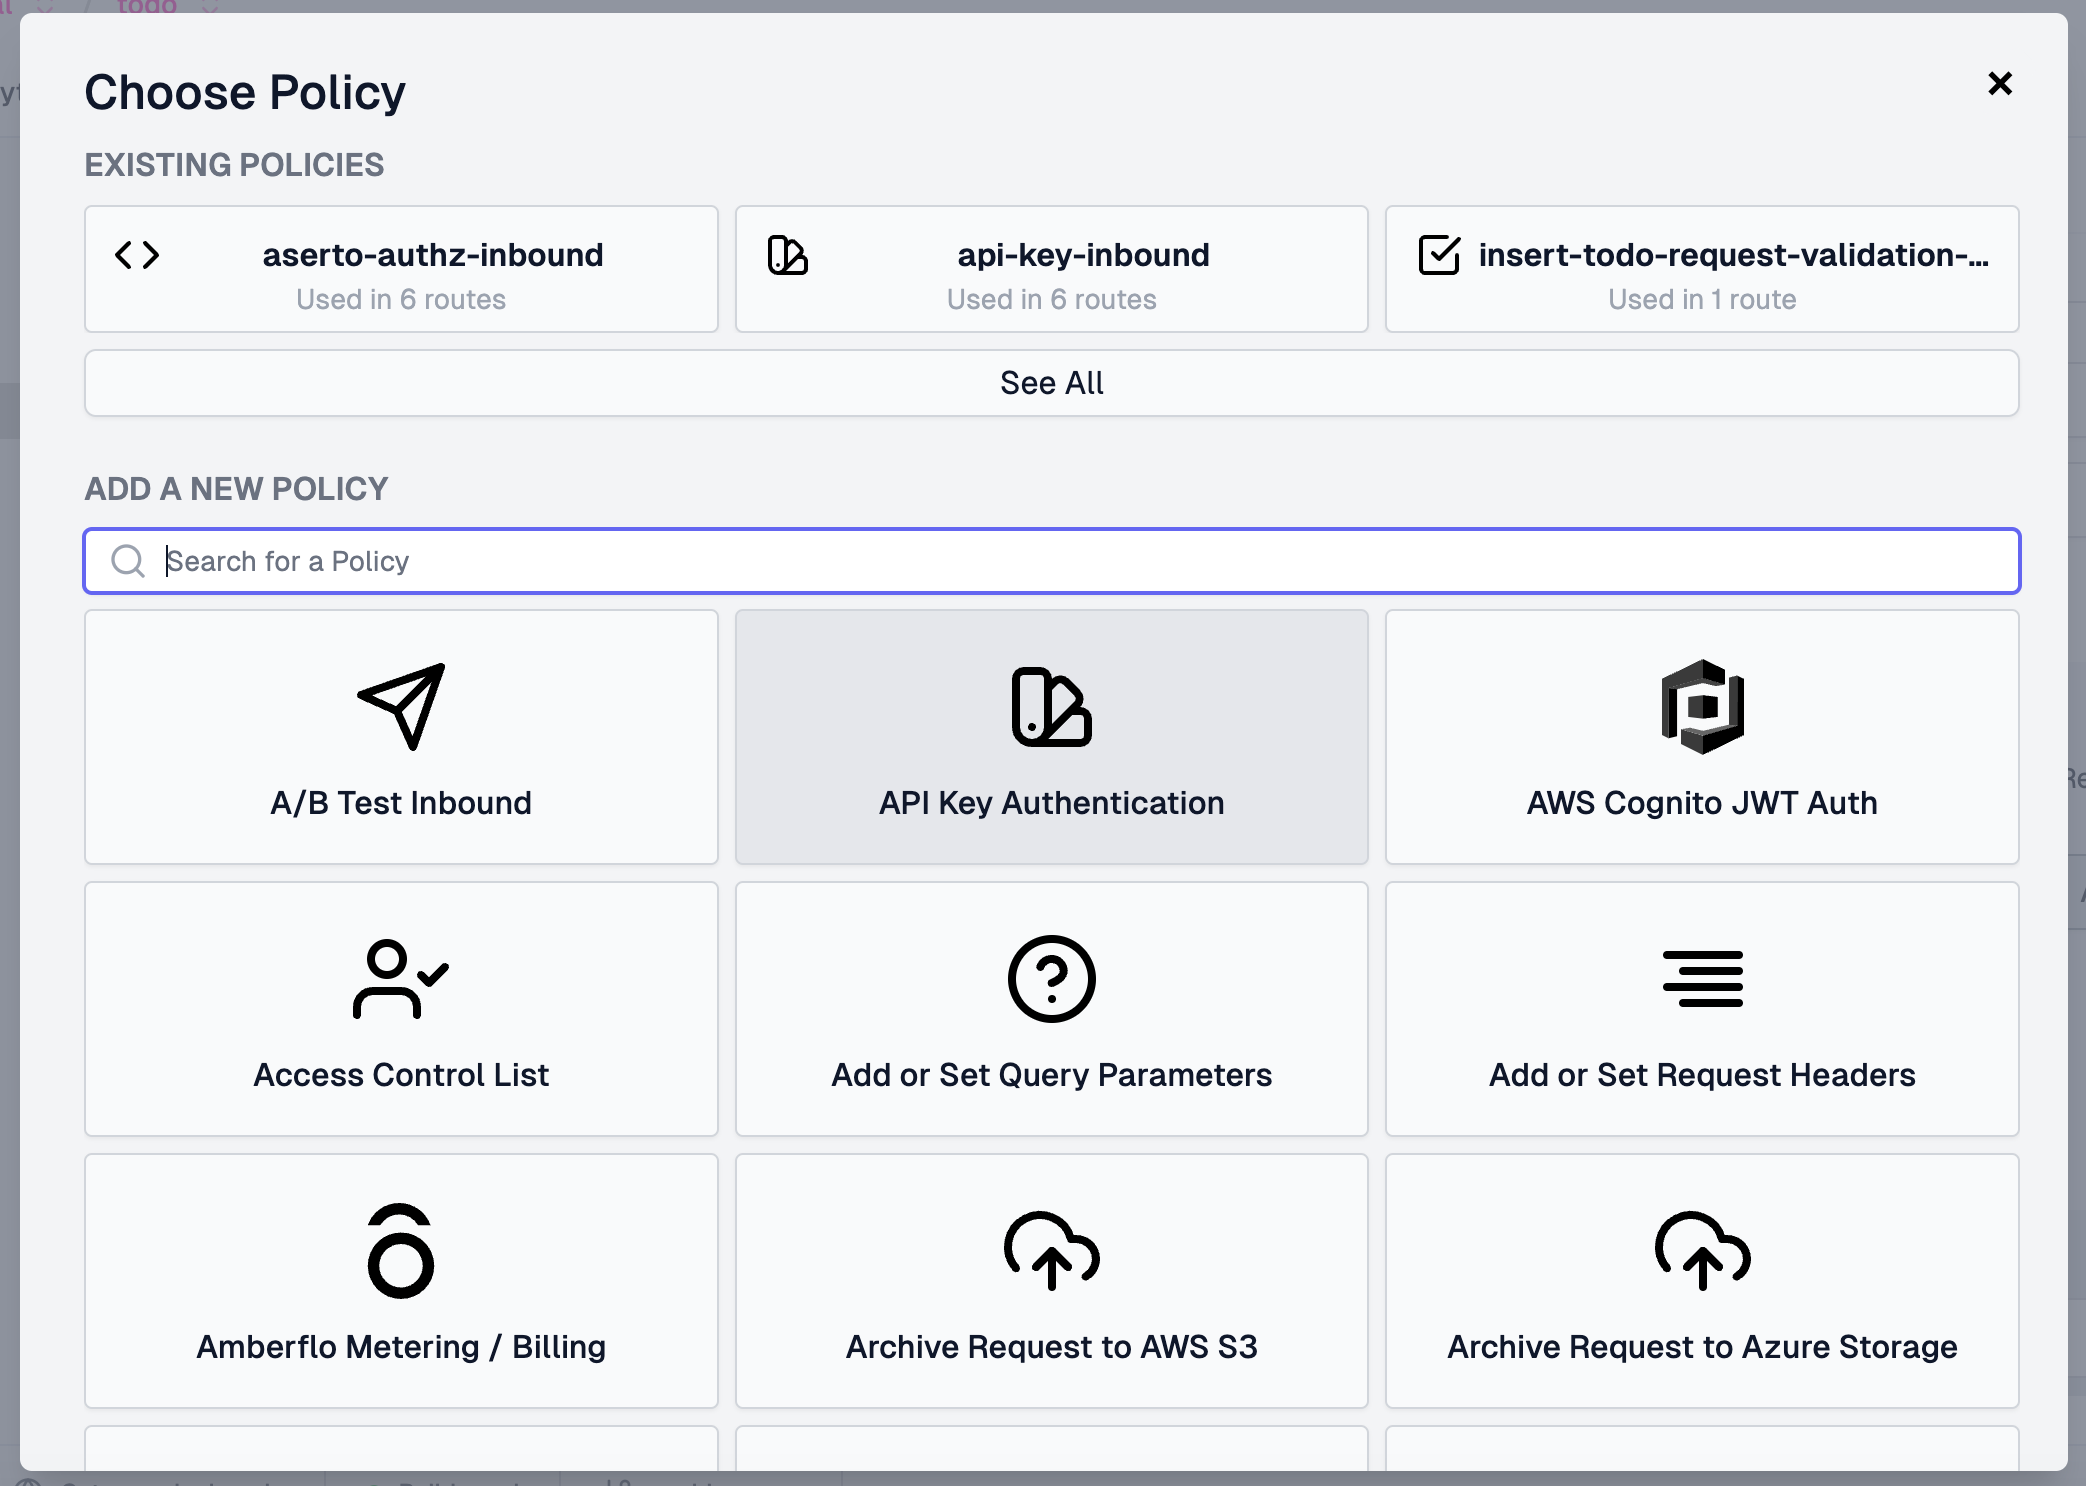
Add another called below it using the policy type Custom Code Inbound.
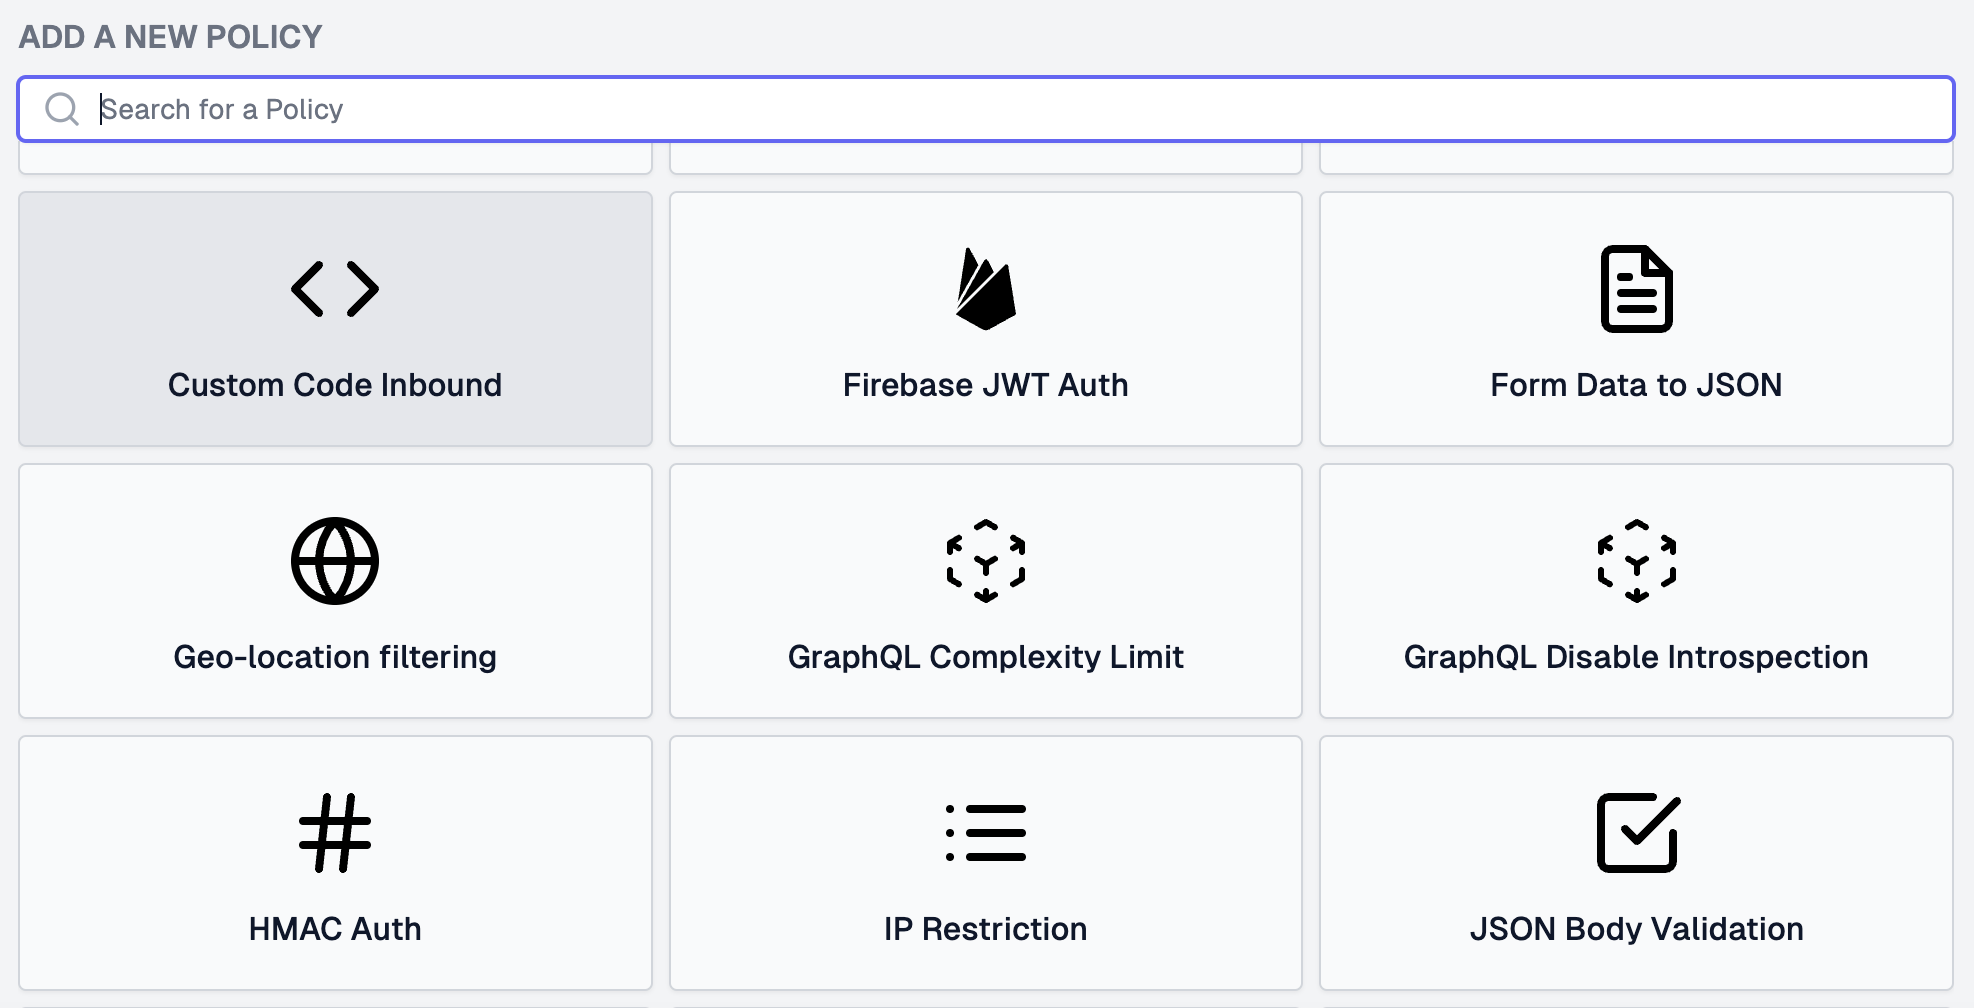
You can call the Custom Code Inbound policy aserto-authz-inbound, use the module name aserto-rebac, and configure it using the values shown below.
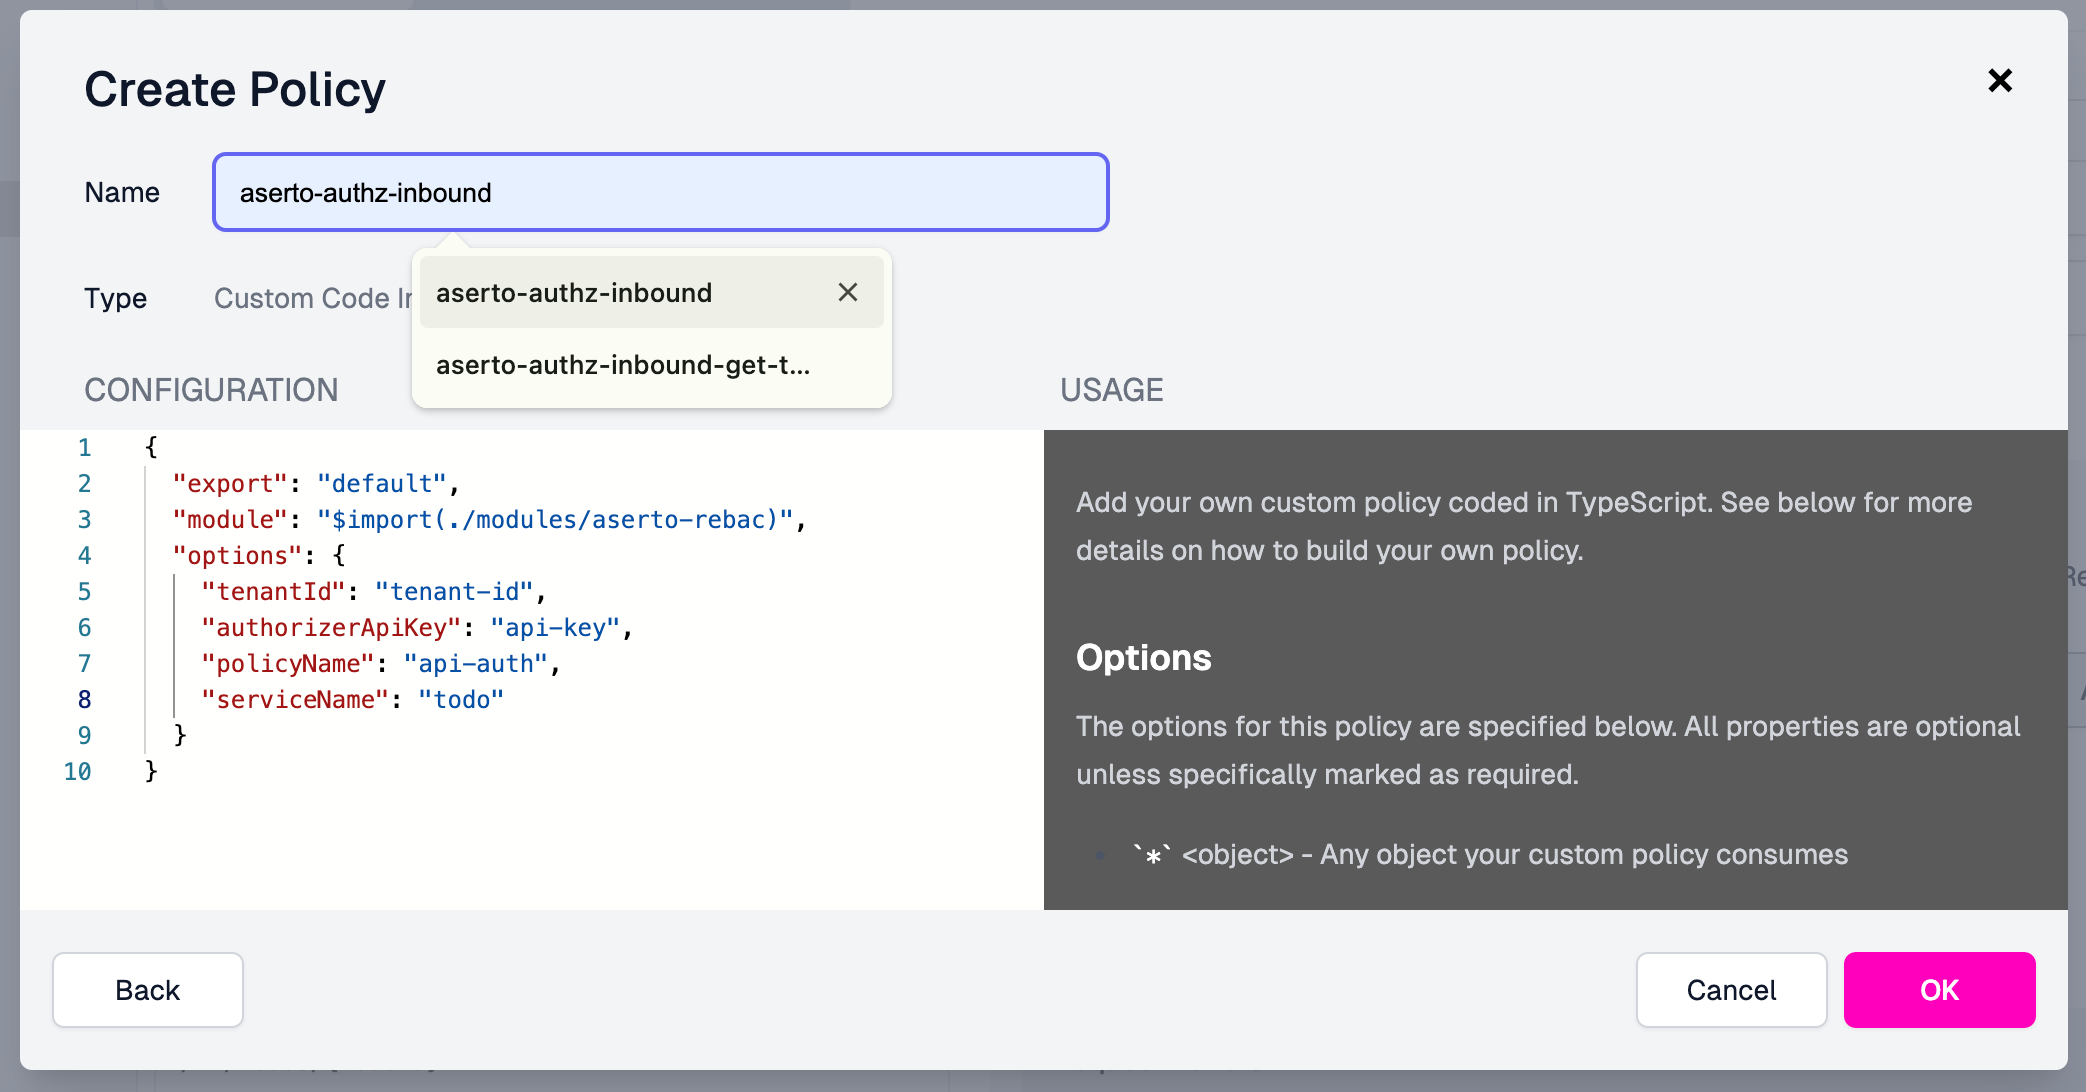
{
"export": "default",
"module": "$import(./modules/aserto-rebac)",
"options": {
"tenantId": "tenant-id",
"authorizerApiKey": "authorizer-api-key",
"policyName": "api-auth",
"serviceName": "todo"
}
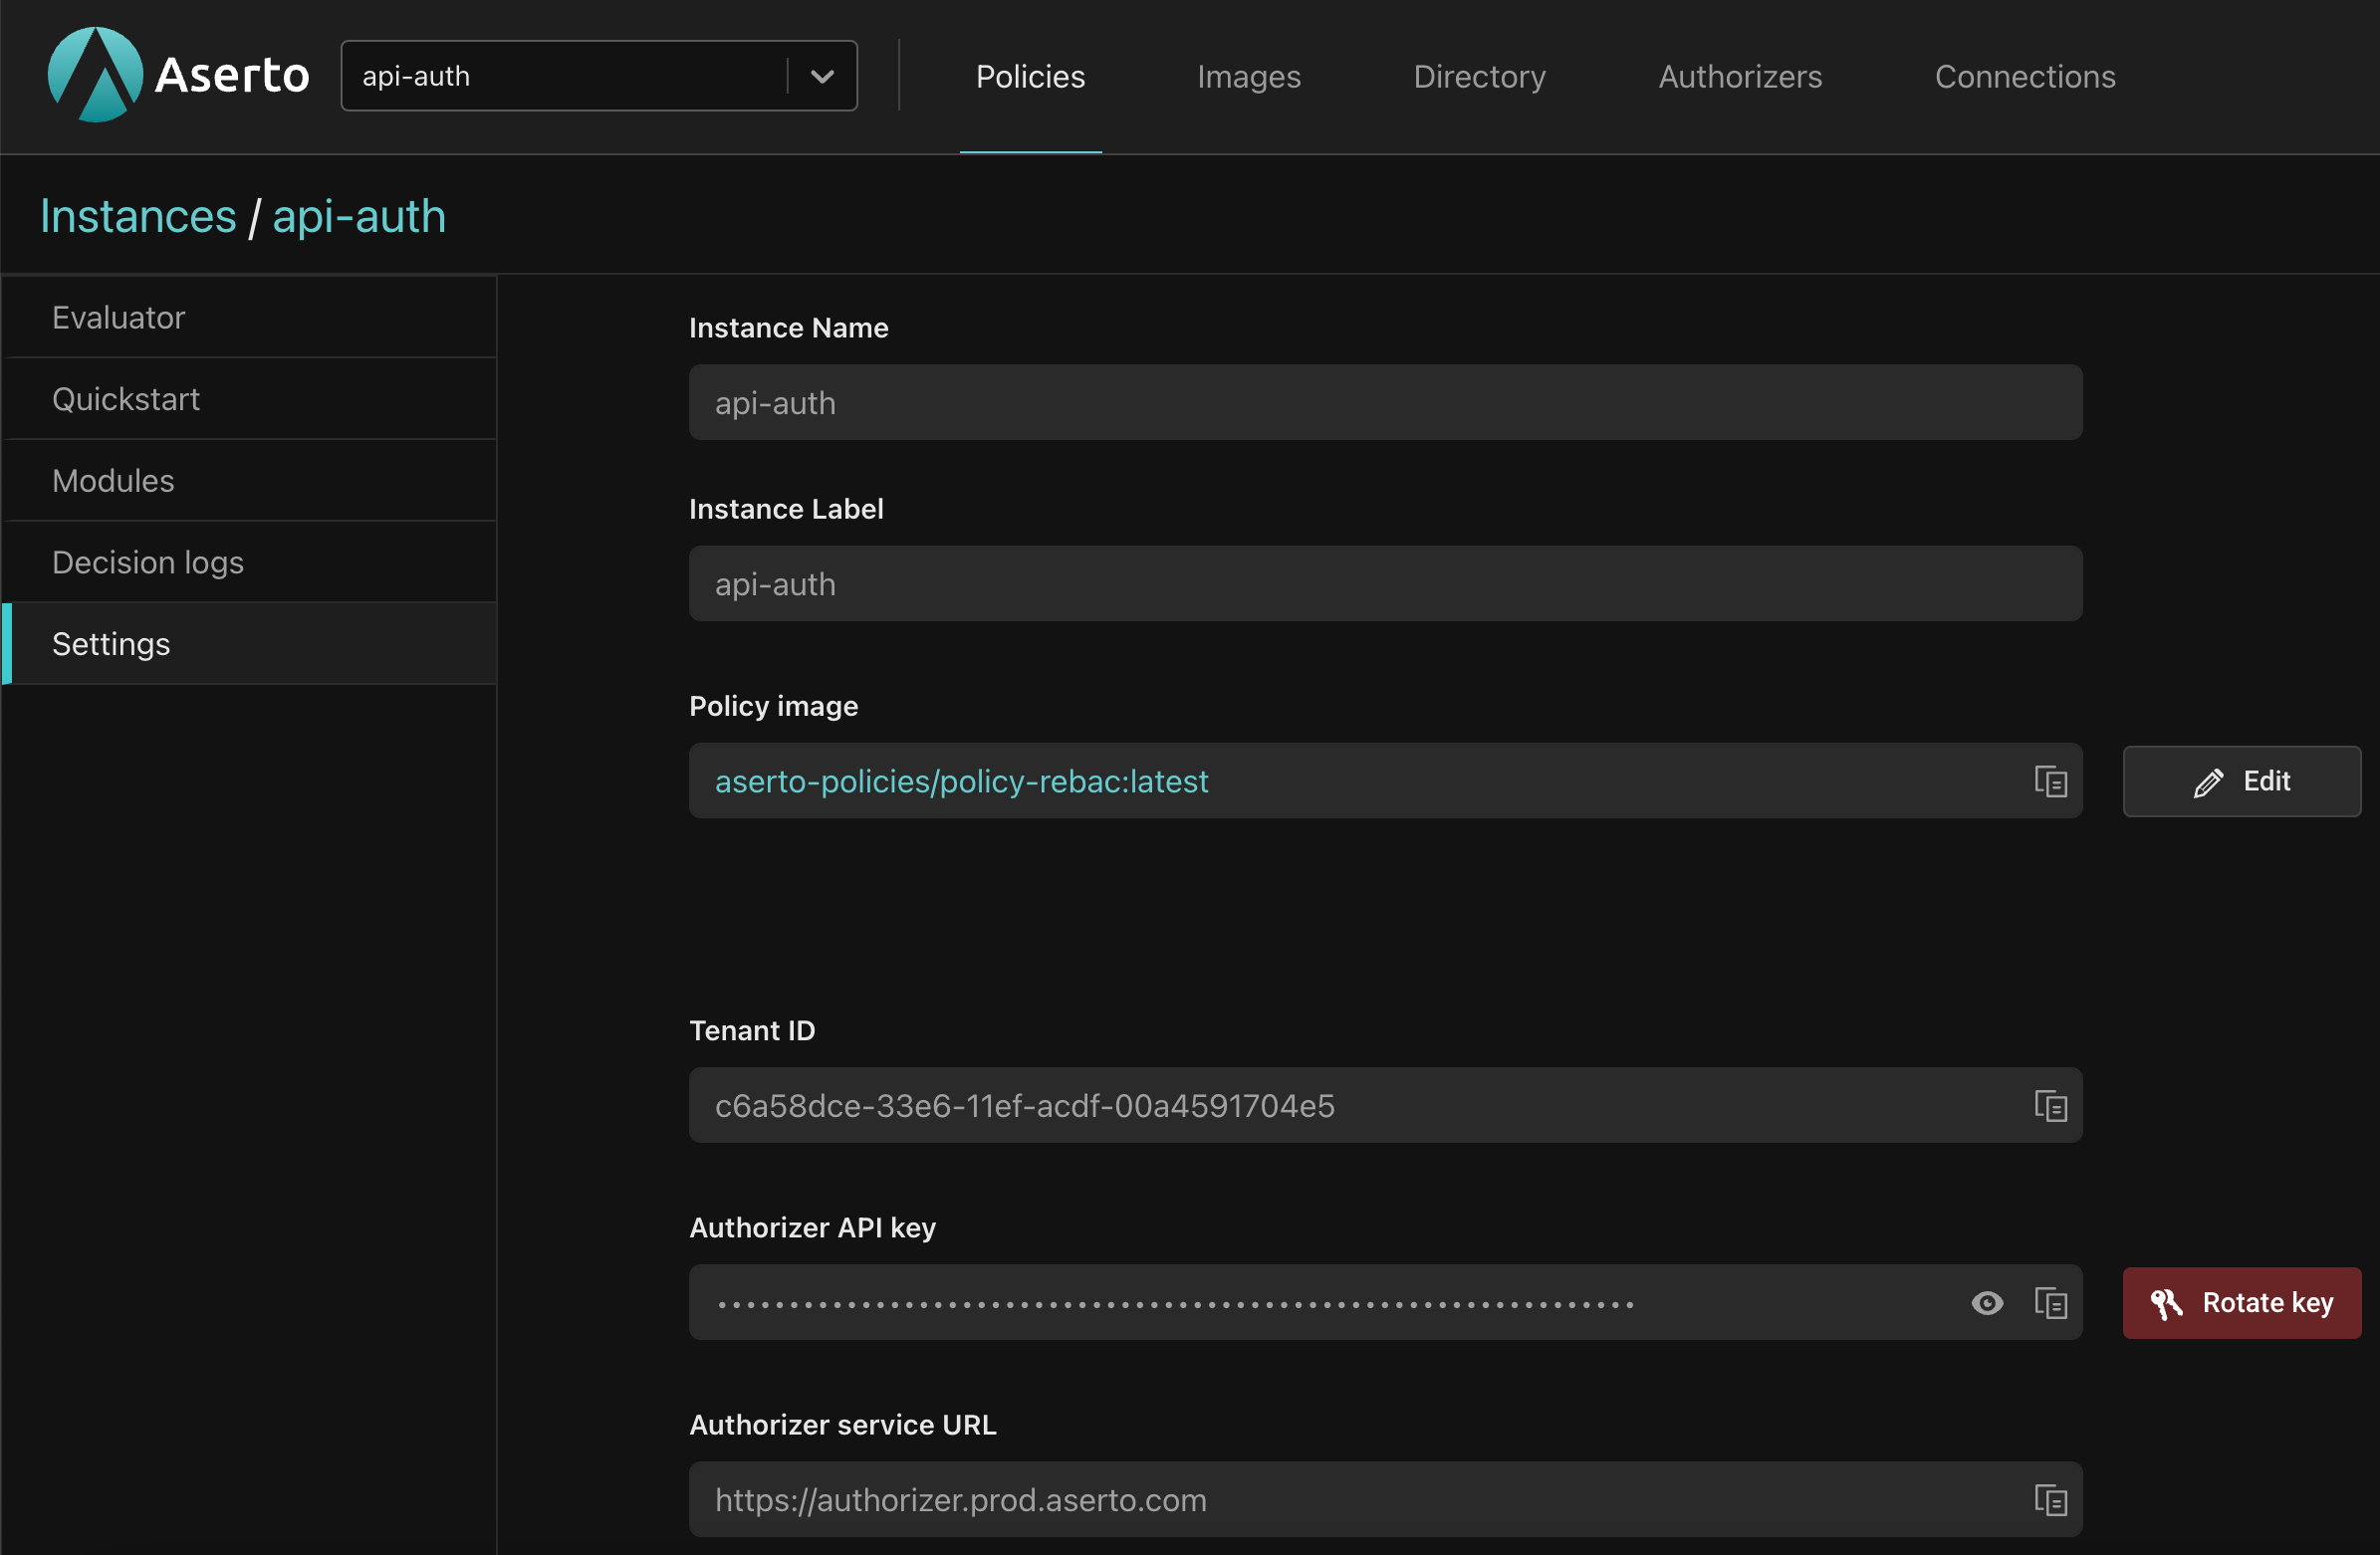
}Note that the values for tenantId and authorizerApiKey should come from the Settings tab of the api-auth policy instance in the Aserto Console.
You can repeat this process for all six routes, but after you’ve done it once, you can just select the policies you’ve already selected from the top of the policy selector (in other words, you only have to create and configure the aserto-authz-inbound once).
Now you can save your work by pressing command-S.
Set up API keys
Lastly, you’ll need to set up API Key consumers. Click the Services tab and the API Key Service.
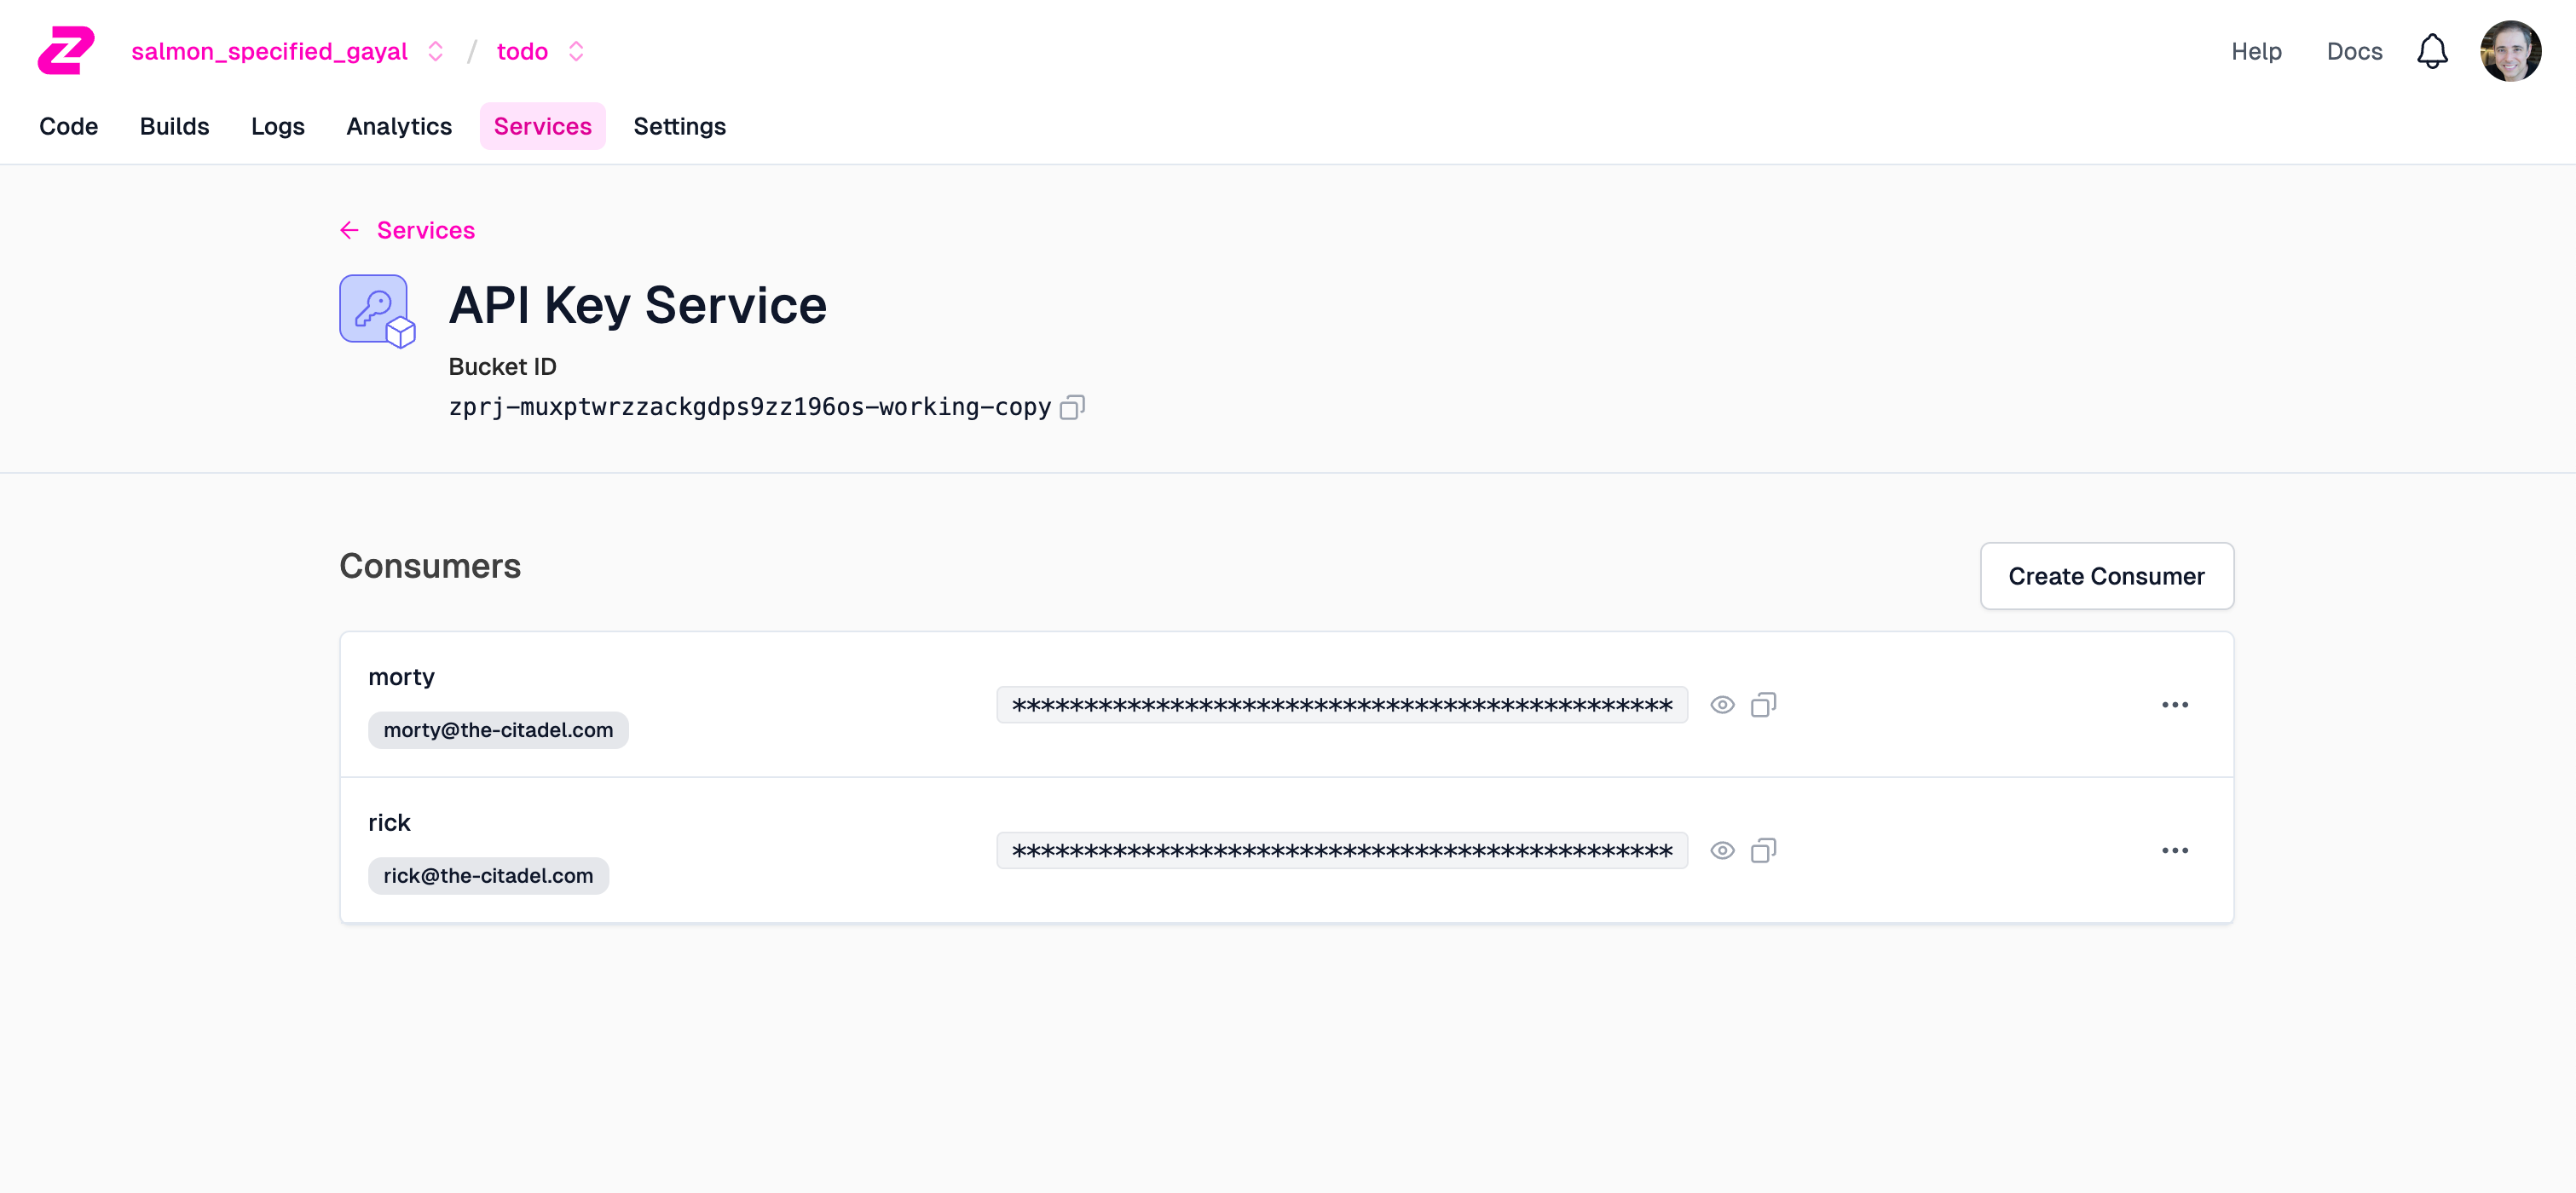
Create a consumer for each of Rick and Morty:
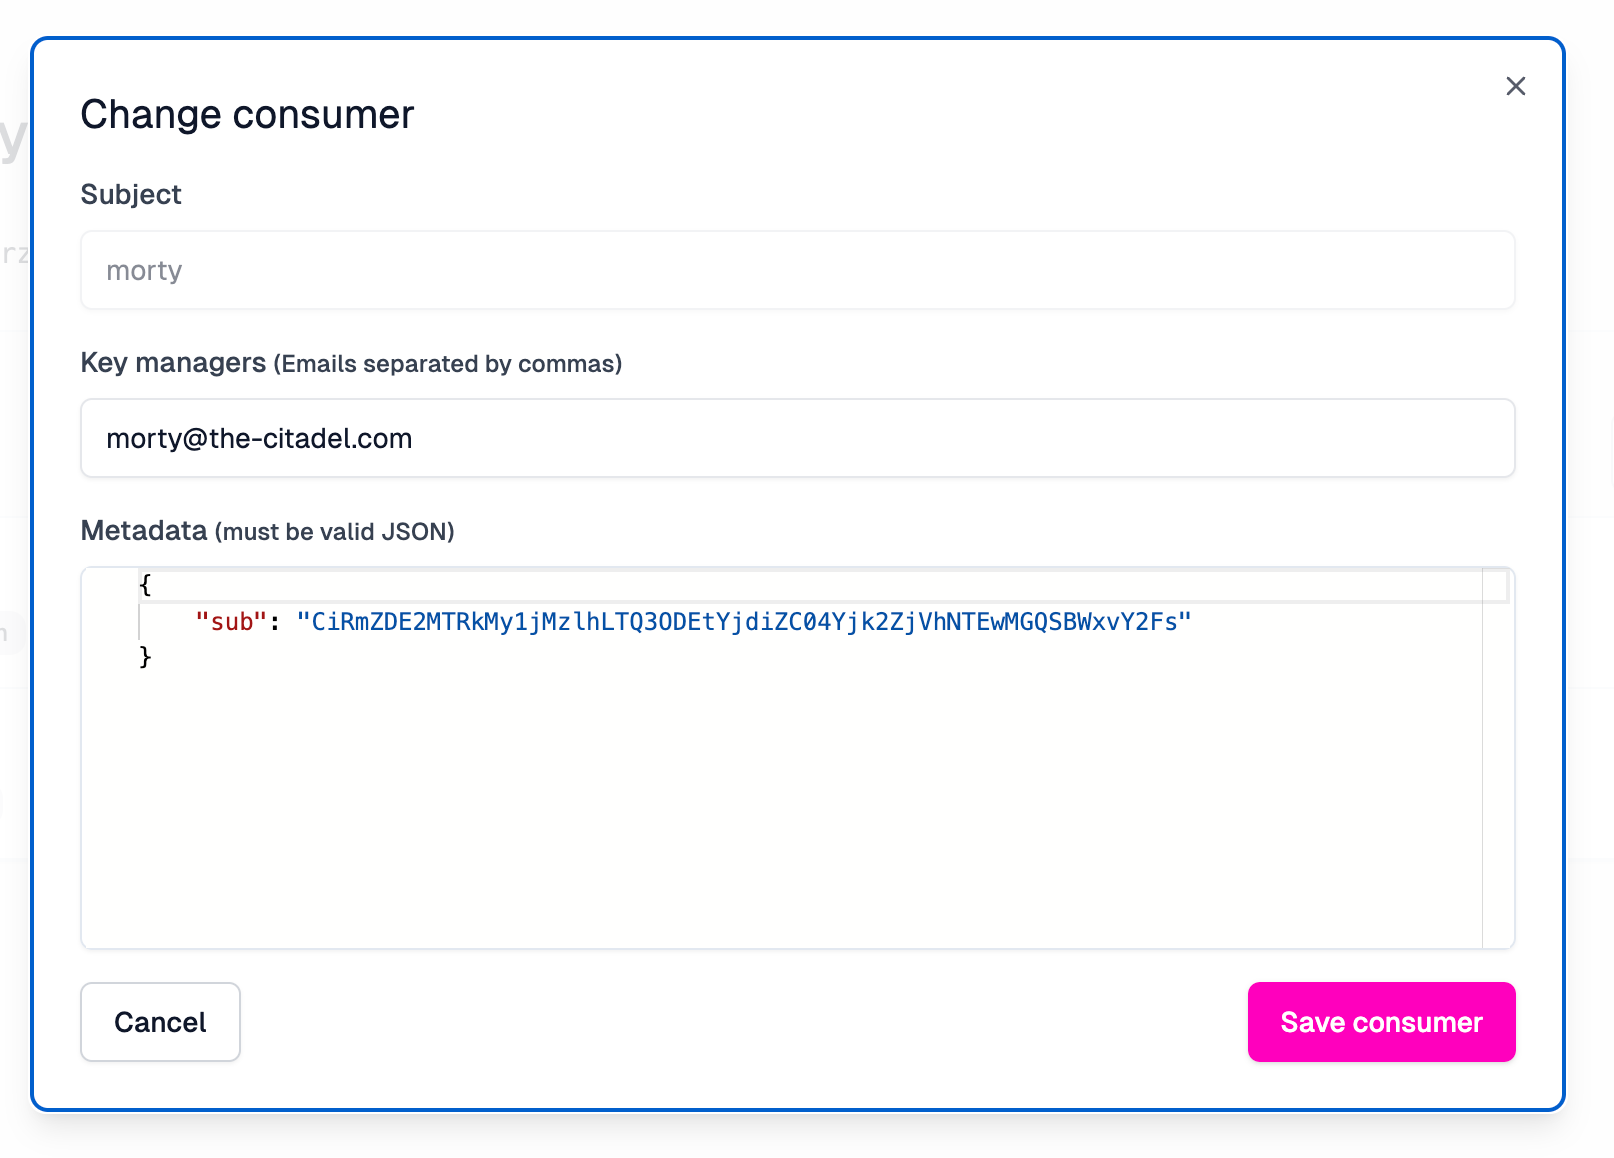
Ensure that the metadata for Rick is the following:
{
  "sub": "CiRmZDA2MTRkMy1jMzlhLTQ3ODEtYjdiZC04Yjk2ZjVhNTEwMGQSBWxvY2Fs"
}
The metadata for Morty has a slightly different sub claim:
{
  "sub": "CiRmZDE2MTRkMy1jMzlhLTQ3ODEtYjdiZC04Yjk2ZjVhNTEwMGQSBWxvY2Fs"
}
Now we have the two users set up, which we can use in the Authorization header of the requests that we send the gateway. The API key inbound policy will check that the user has a valid API key, and make it available in the aserto-authz-inbound policy. This will be the subject that the Aserto policy will pass to the Aserto hosted authorization service, along with the tenant ID, API key, policy name, and service name that we configured above.
Make sure you copy the API keys associated with Rick and with Morty by using the "copy handles" next to each one - we’ll use them in the next section.
Testing the APIs
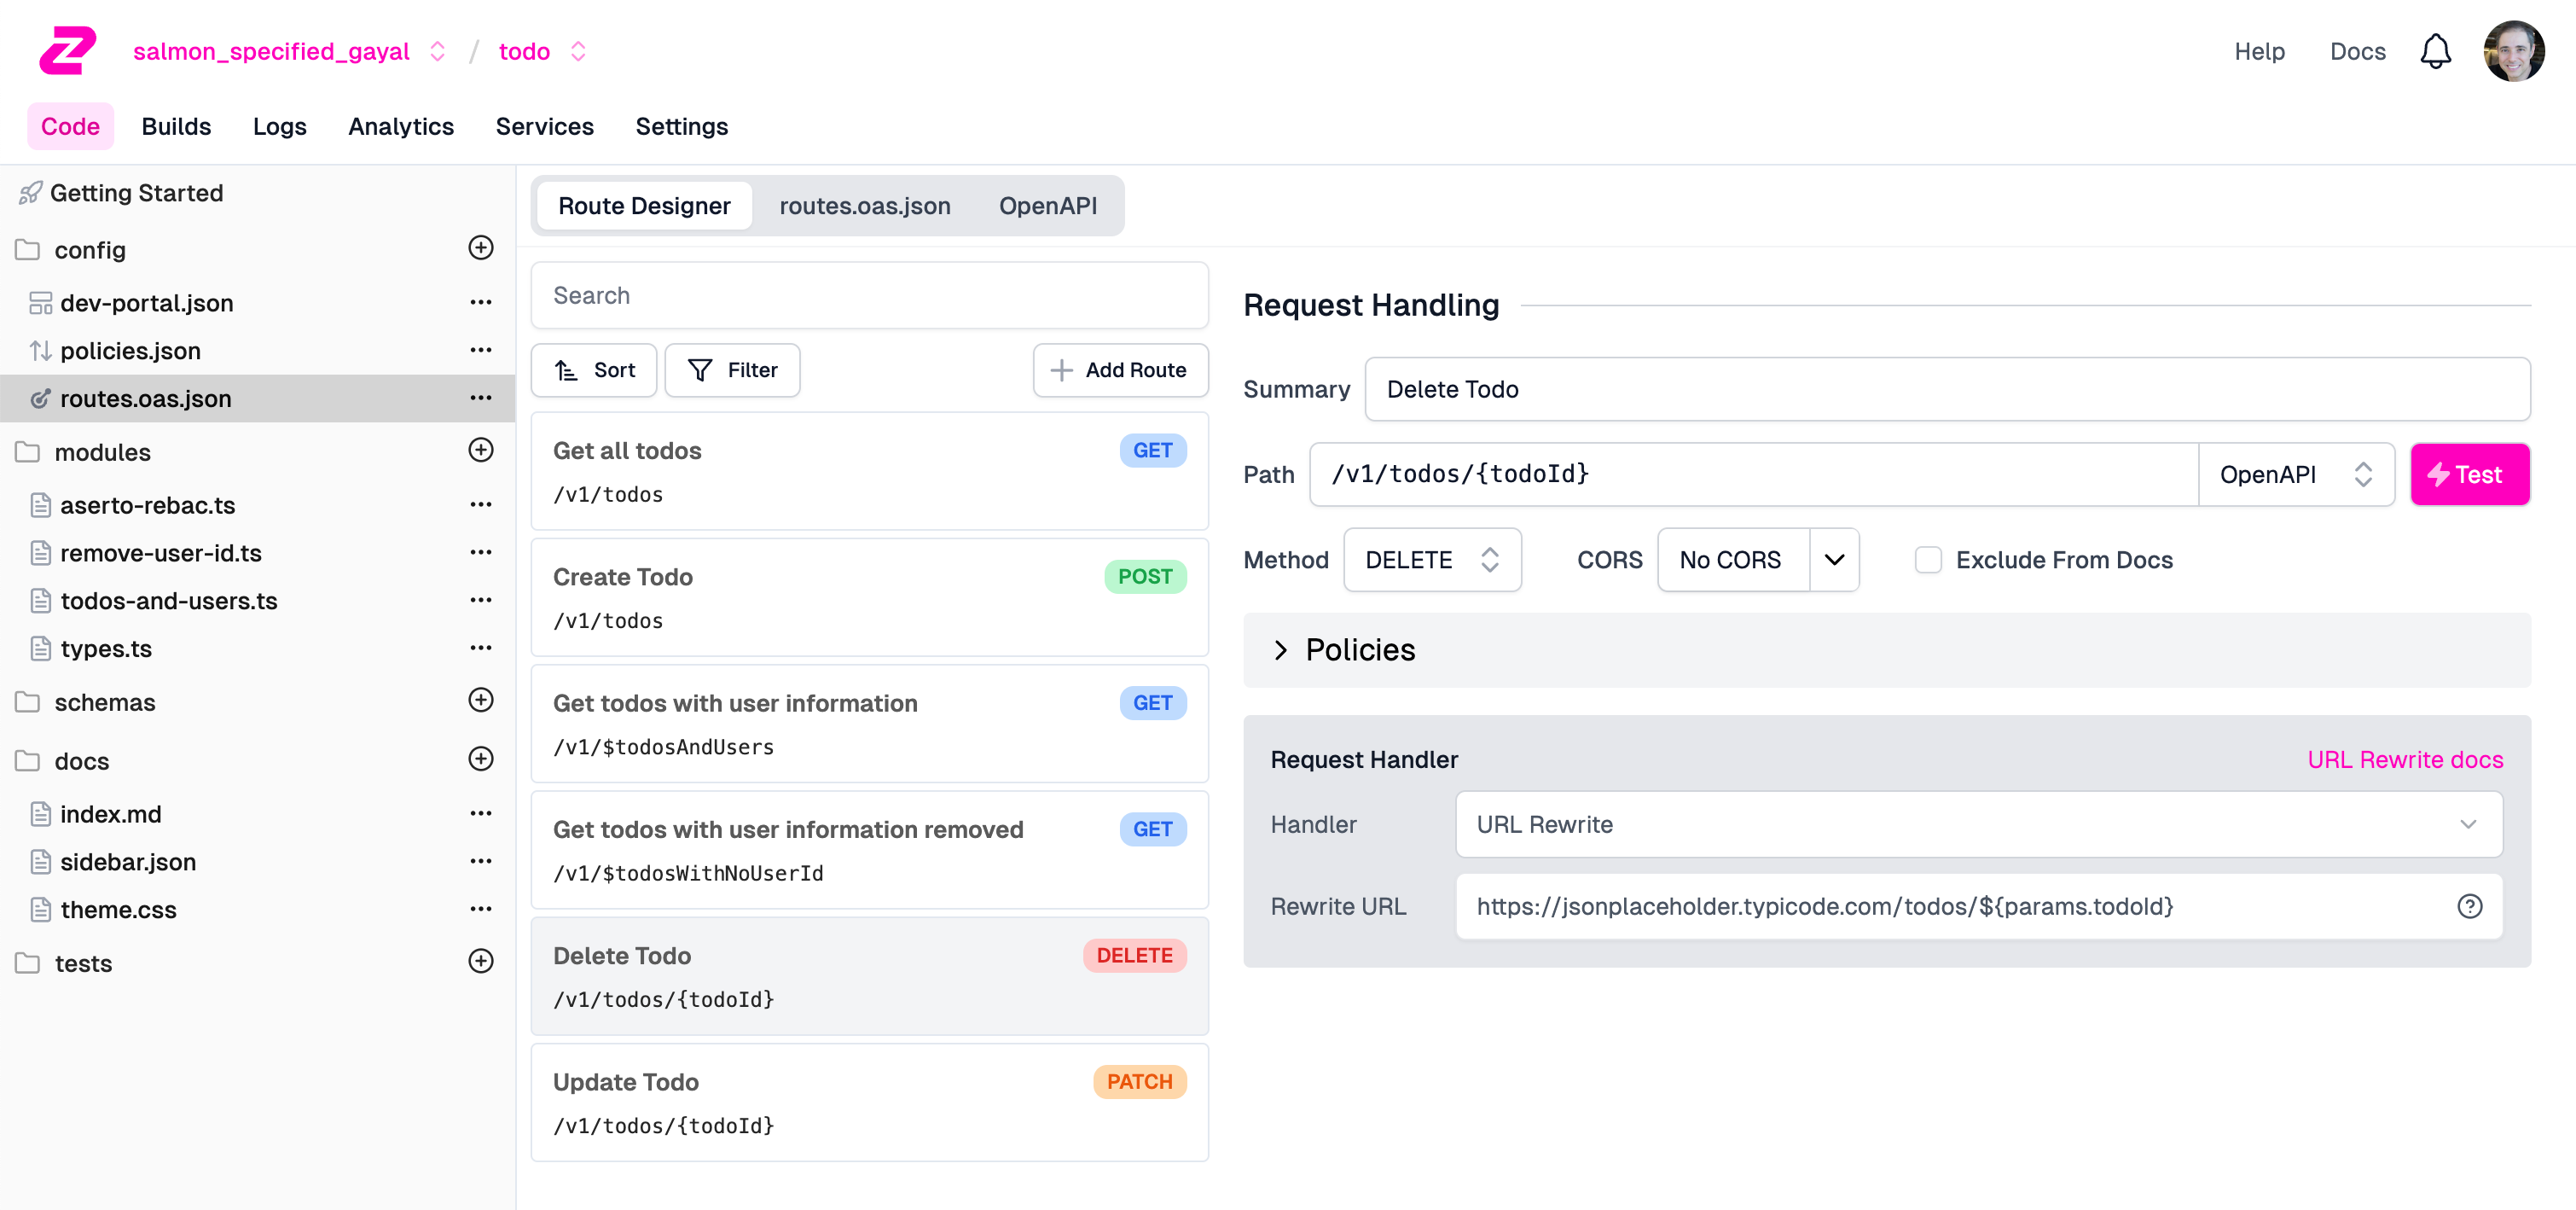
We can finally test our APIs using Zuplo’s Test modal. Go back to the routes.oas.json file in the left navbar, click the DELETE /v1/todos/{todoId} route, and click the Test button.
Now, fill in an arbitrary value for the todo ID, and enter the Authorization header and its value:
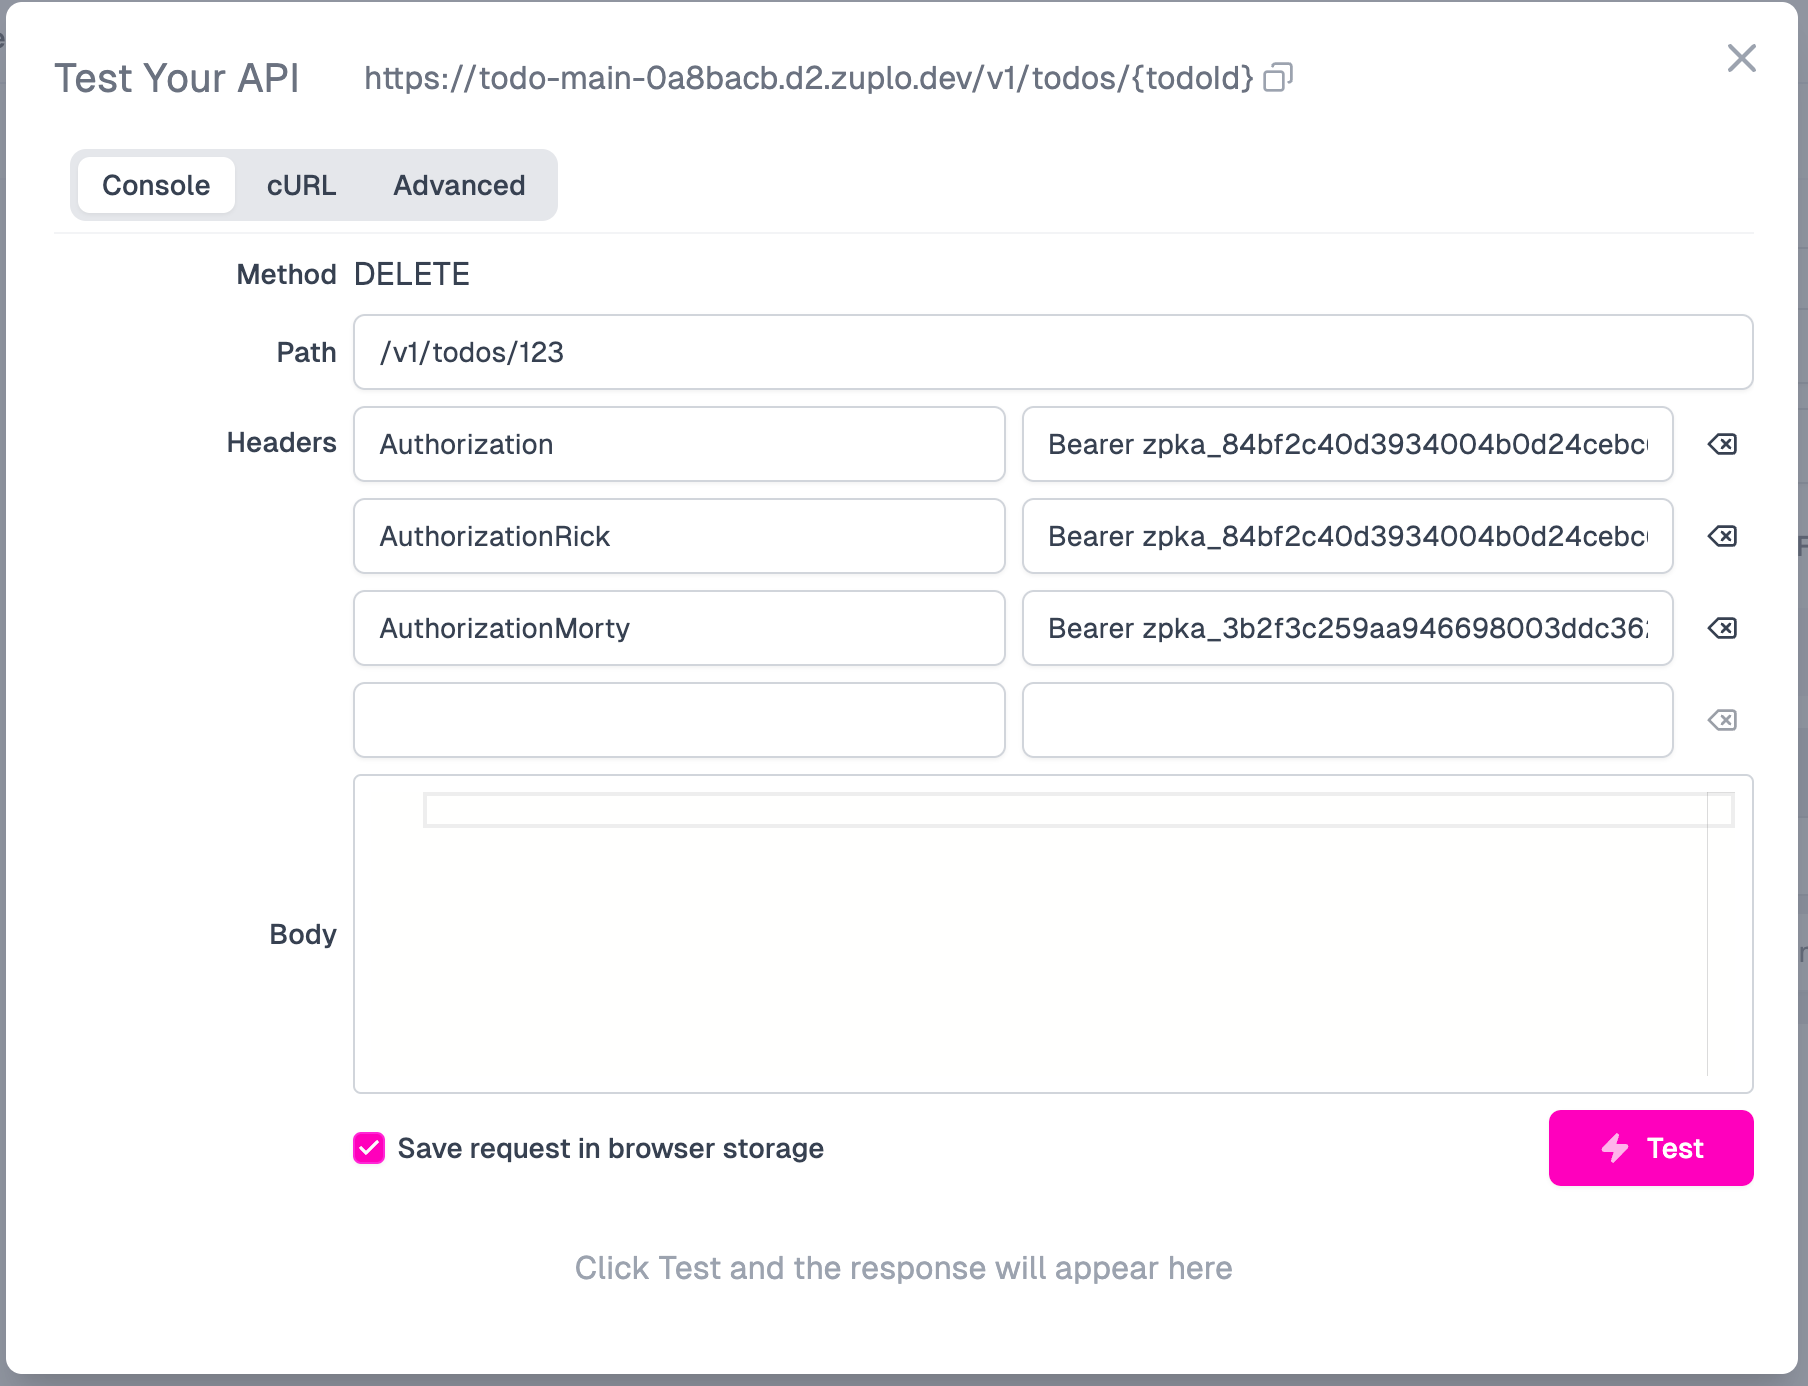
In the screenshot you’ll see that we also put in some dummy headers - AuthorizationRick and AuthorizationMorty, just so we can copy-paste these headers (and their Bearer tokens) into the Authorization header value. This is a convenient way to flip between invoking the service as Rick and as Morty.
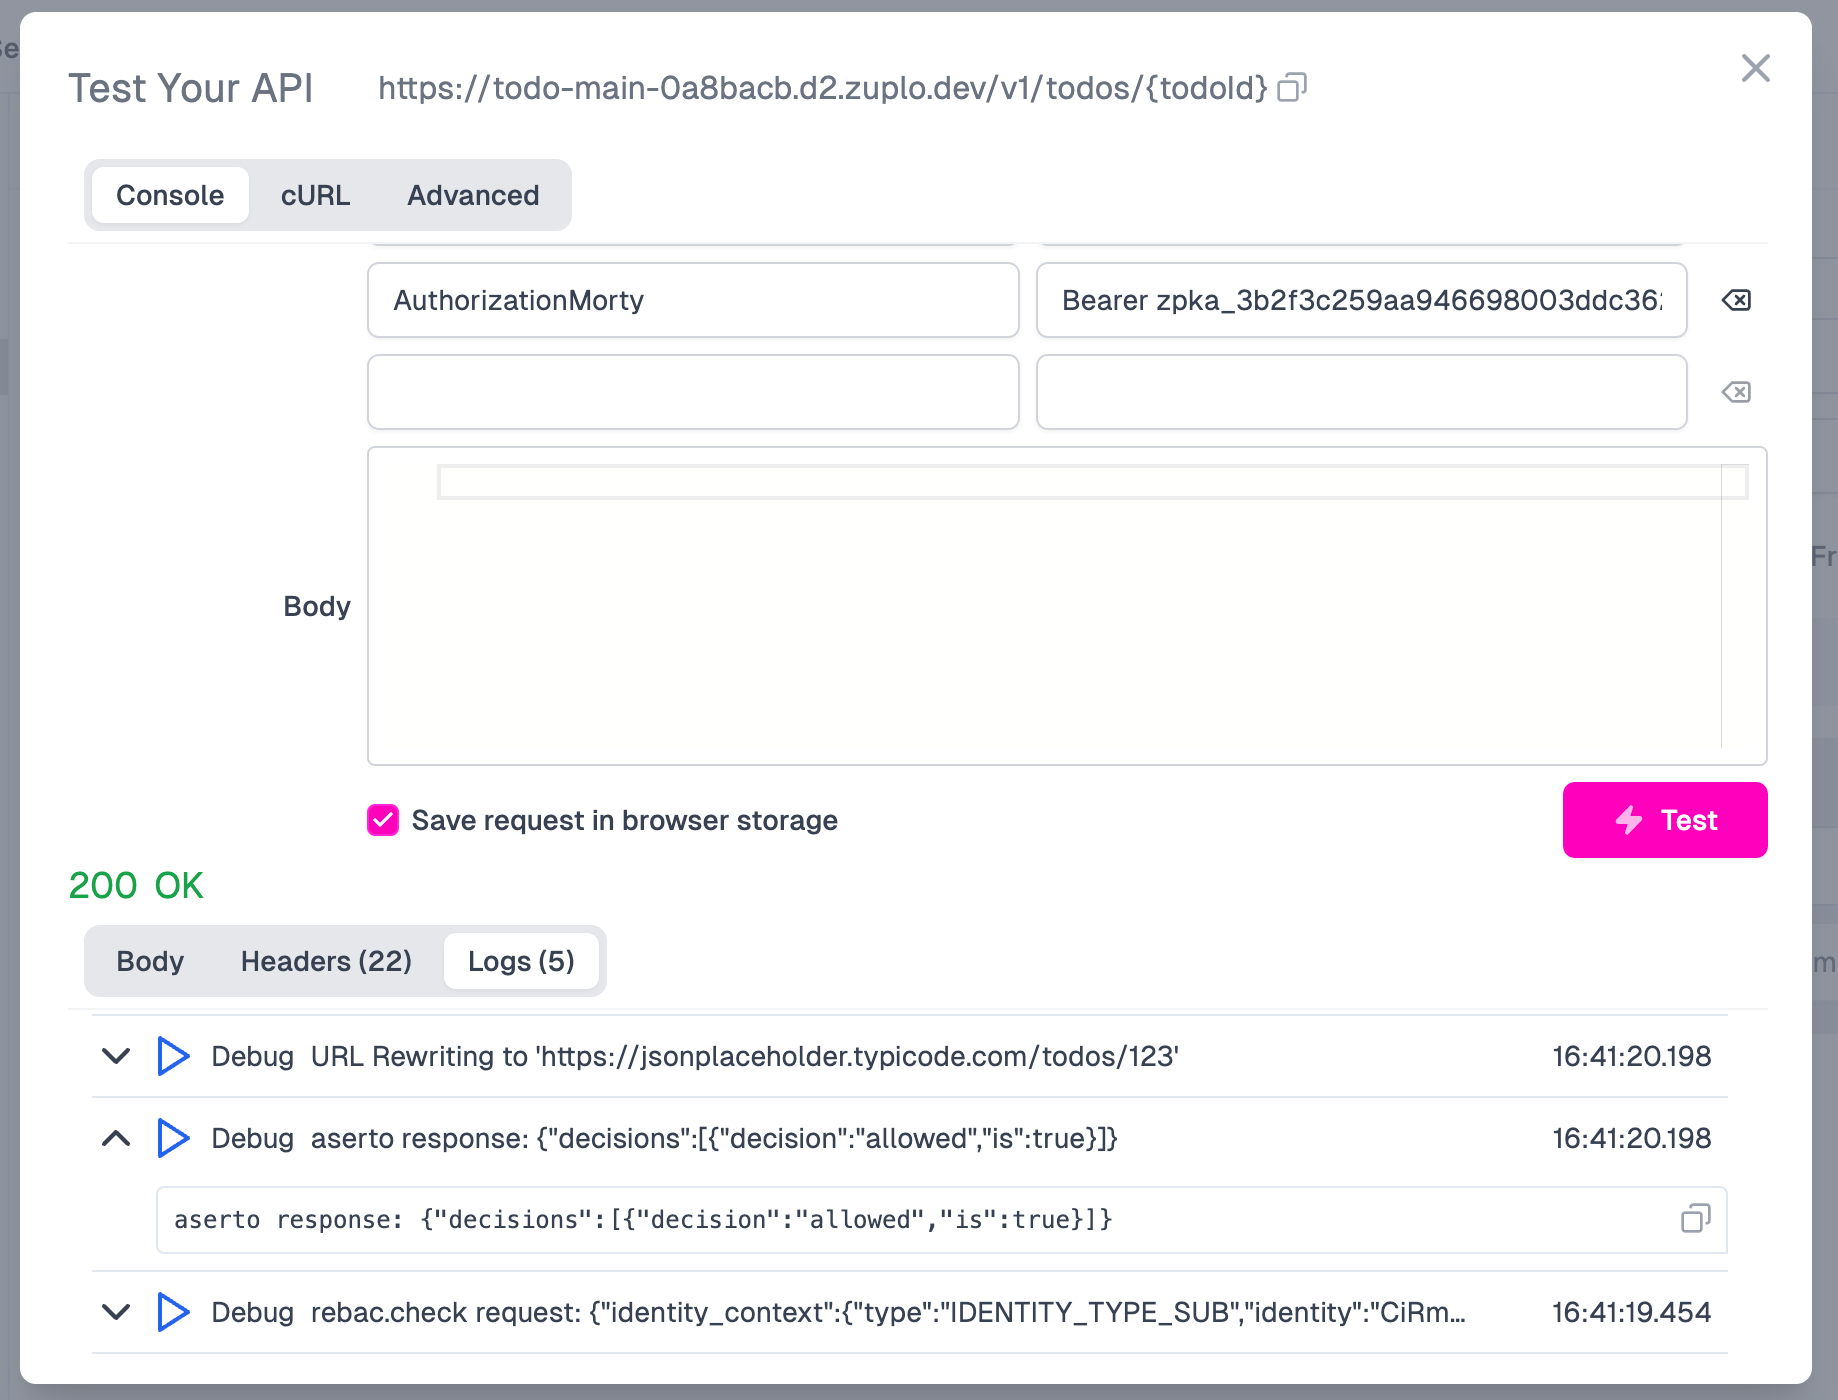
First, let’s try as Rick. Copy and paste the value of the AuthorizationRick header into the Authorization header value. Then click the Test button. You should see an HTTP 200 OK status, and the logs should show that Aserto returned the resulting allowed decision as true. This is as expected, since Rick is a superuser and can invoke all endpoints by virtue of being a Global Deleter.
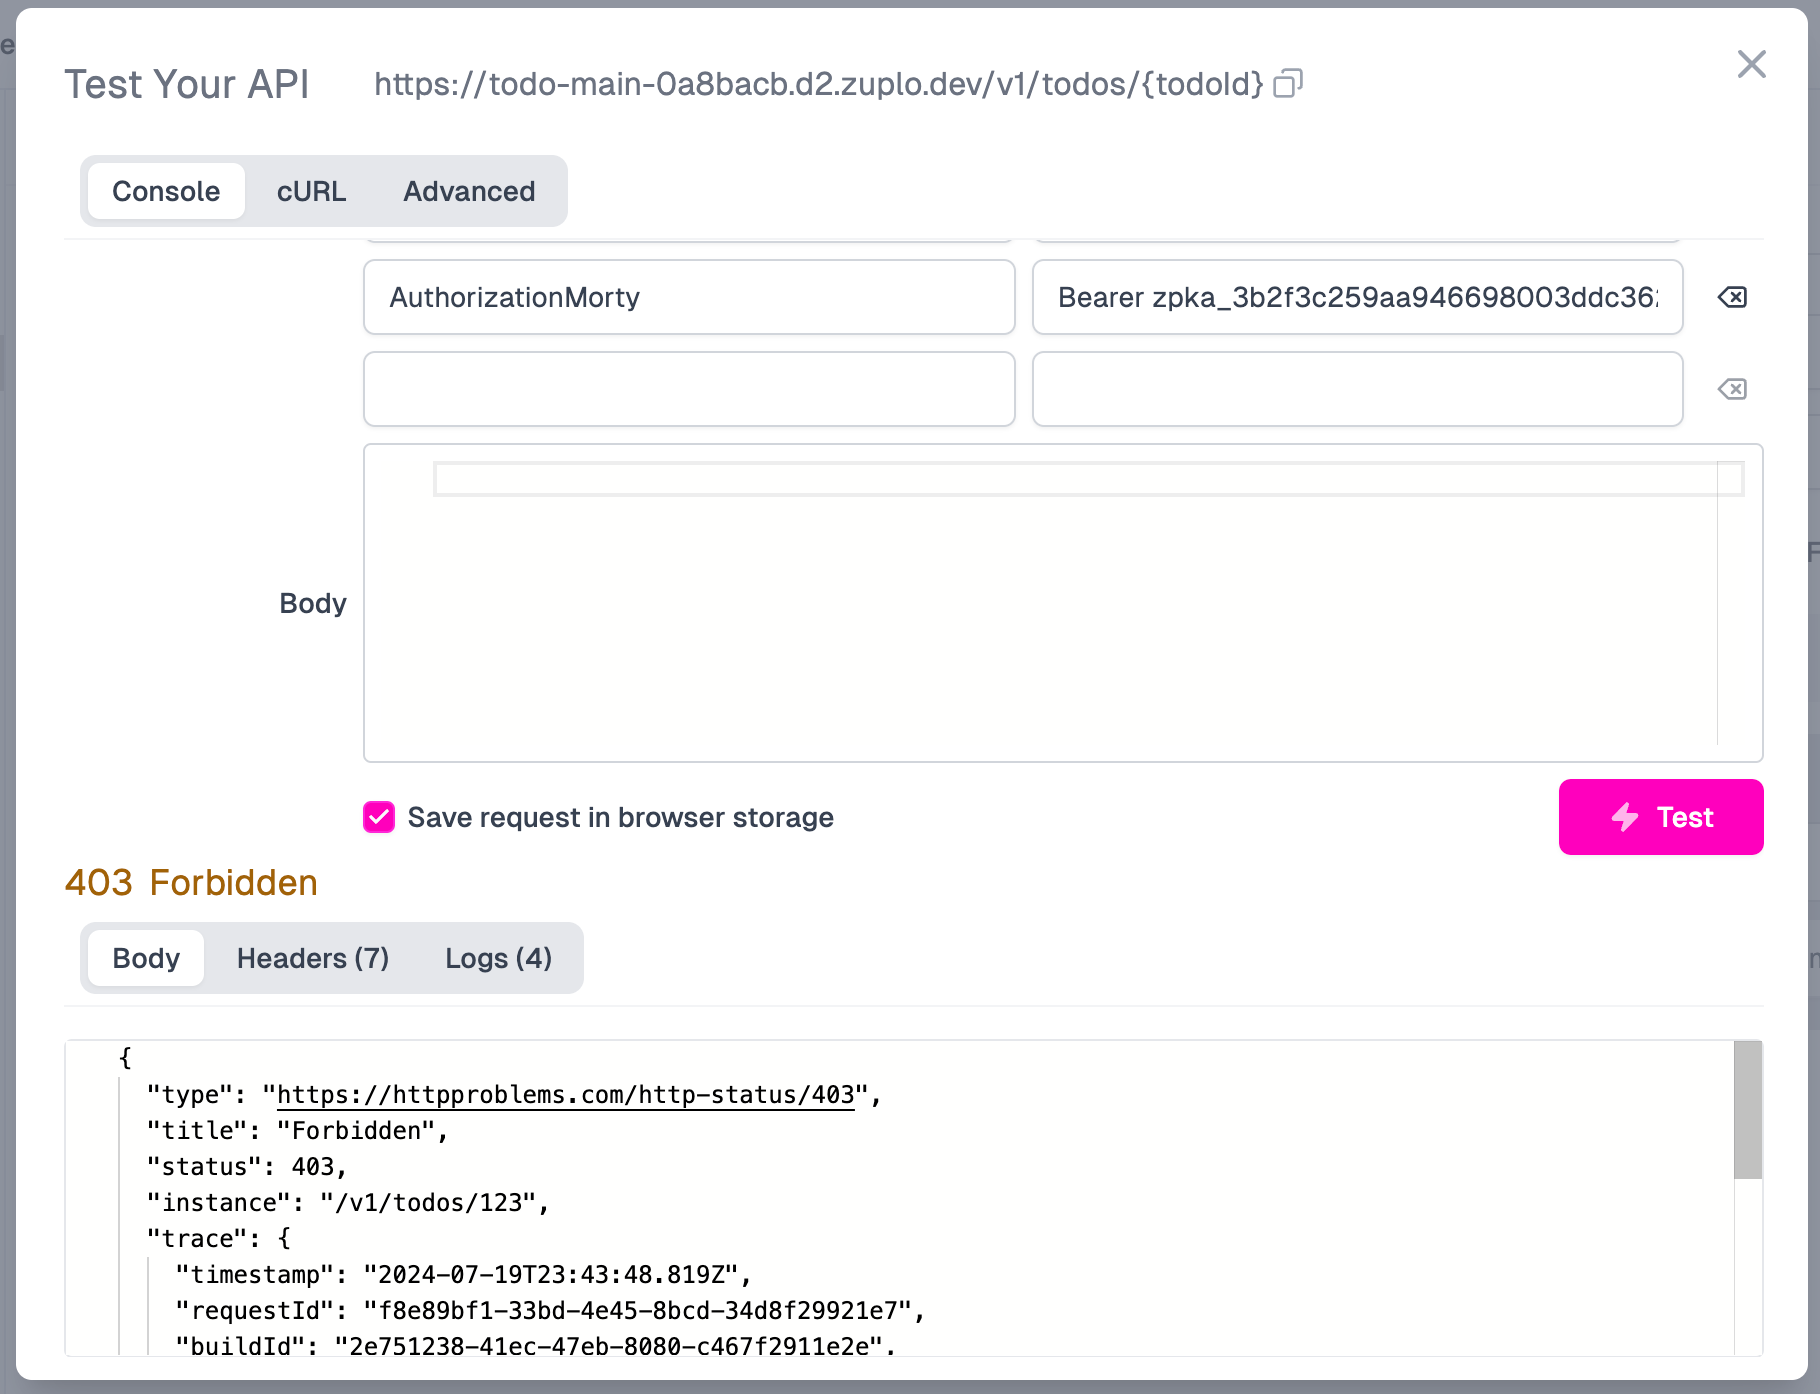
Next, paste Morty’s bearer token into the Authorization header, and click Test. You should see an HTTP 403 Forbidden status, as expected, since Morty is a member of the viewer-group, which can only invoke the GET APIs on the Todo API service.
Break the glass
Finally, let’s simulate a “break the glass” scenario where Morty needs access to the DELETE /v1/todos/{todoId} endpoint.
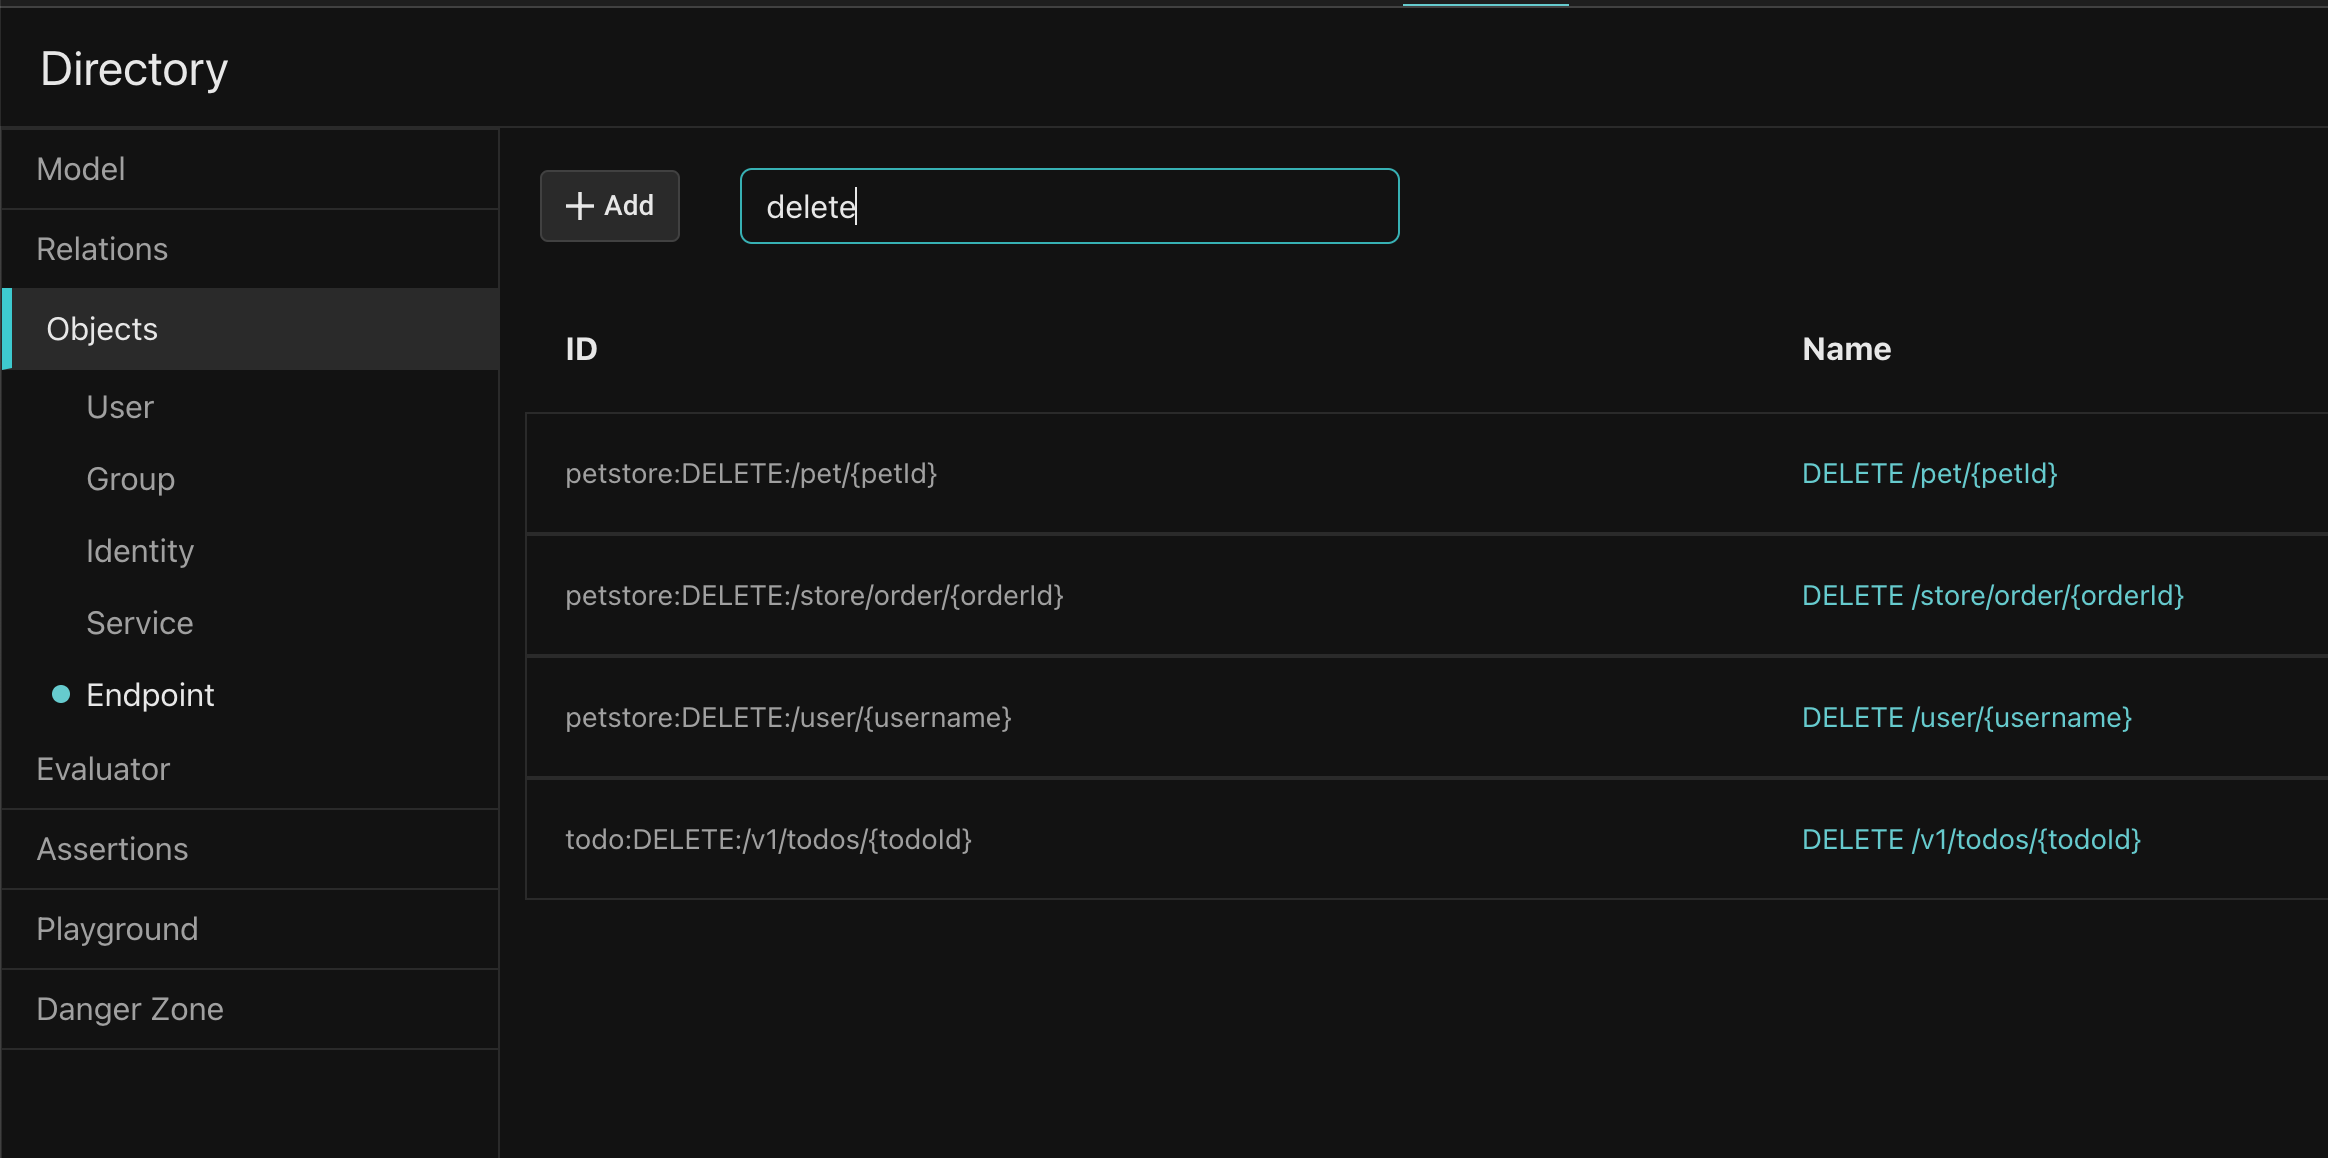
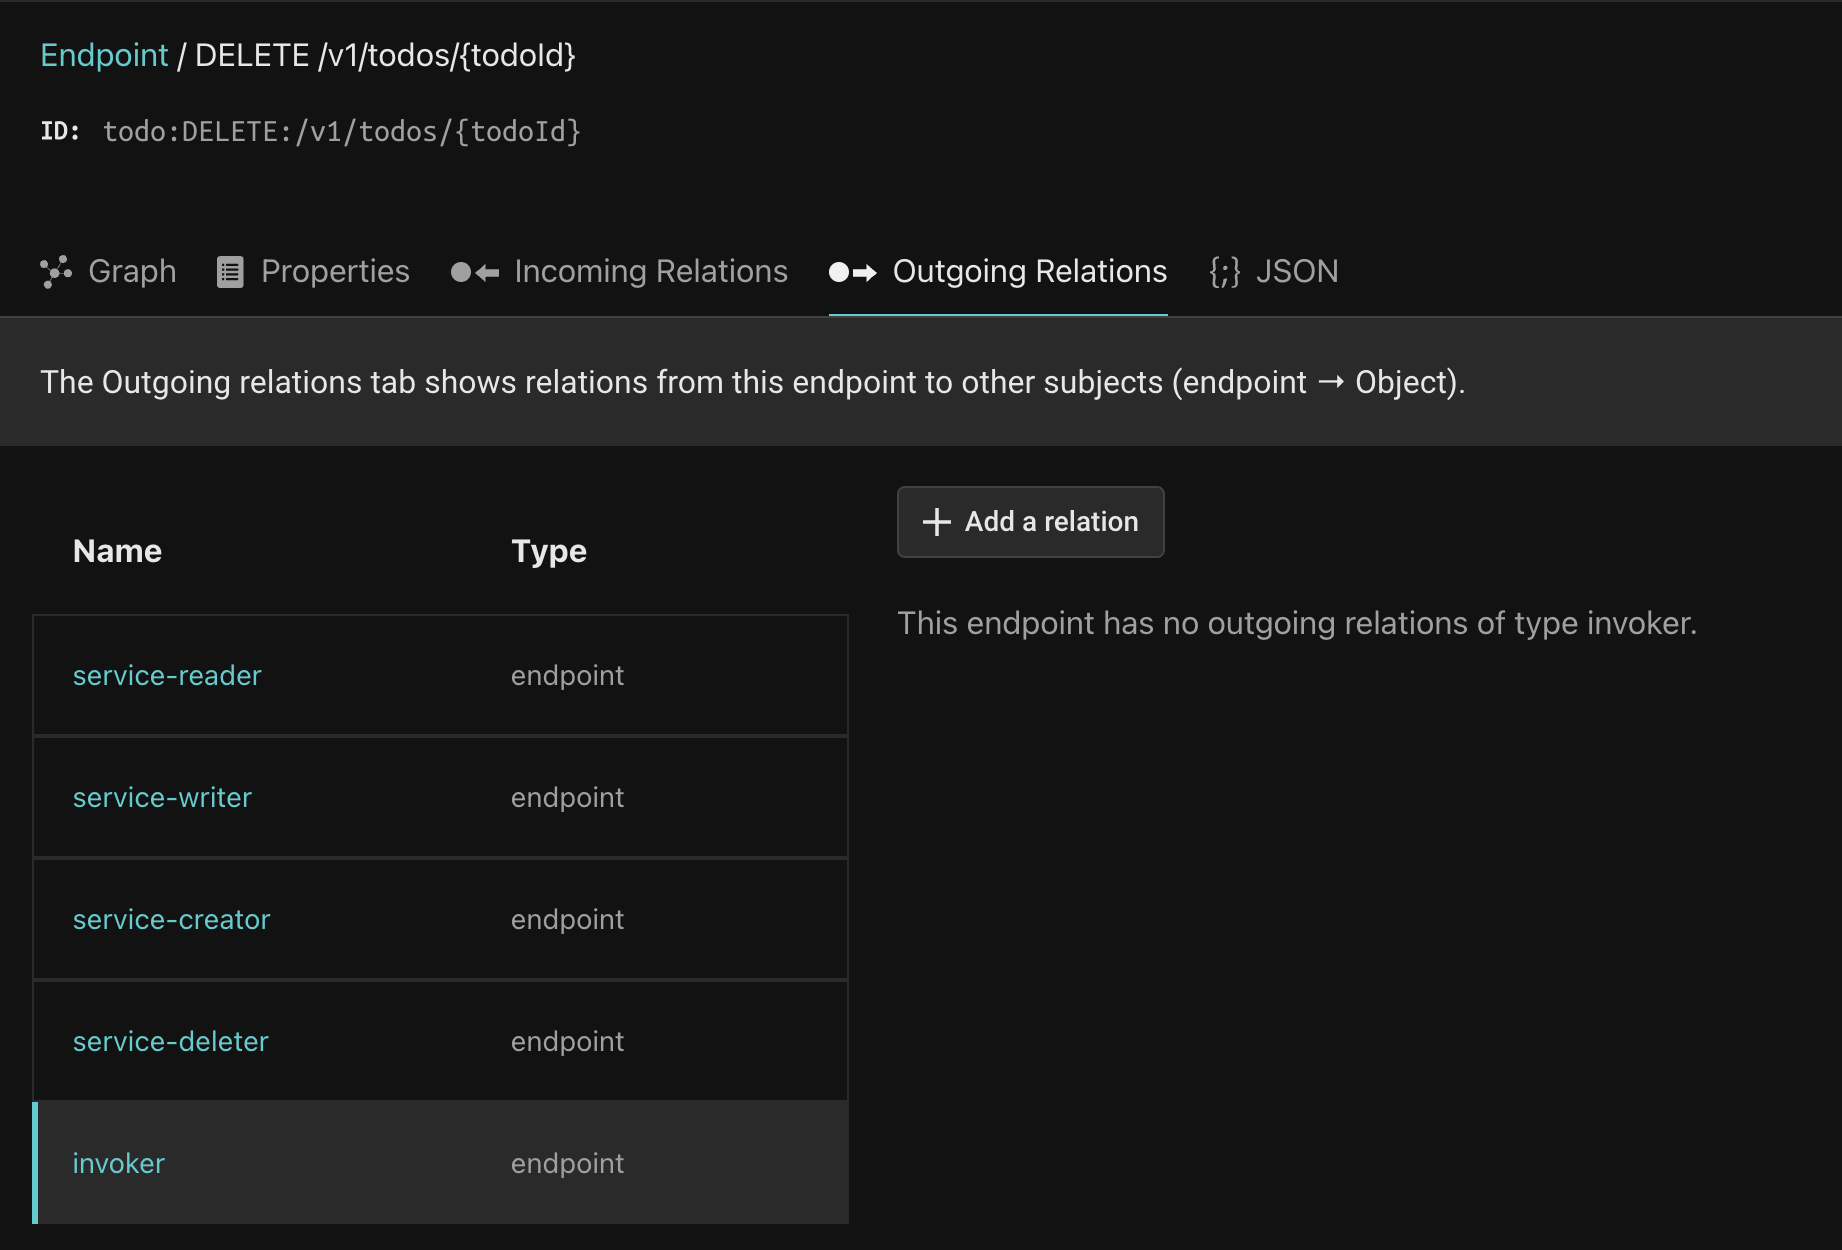
Go to the Aserto Console, click the Directory tab, and the Endpoint type. Type “delete” in the Find input and click the todo:DELETE:/v1/todos/{todoId} endpoint.
Click the Outgoing relations tab, and the invoker relation:
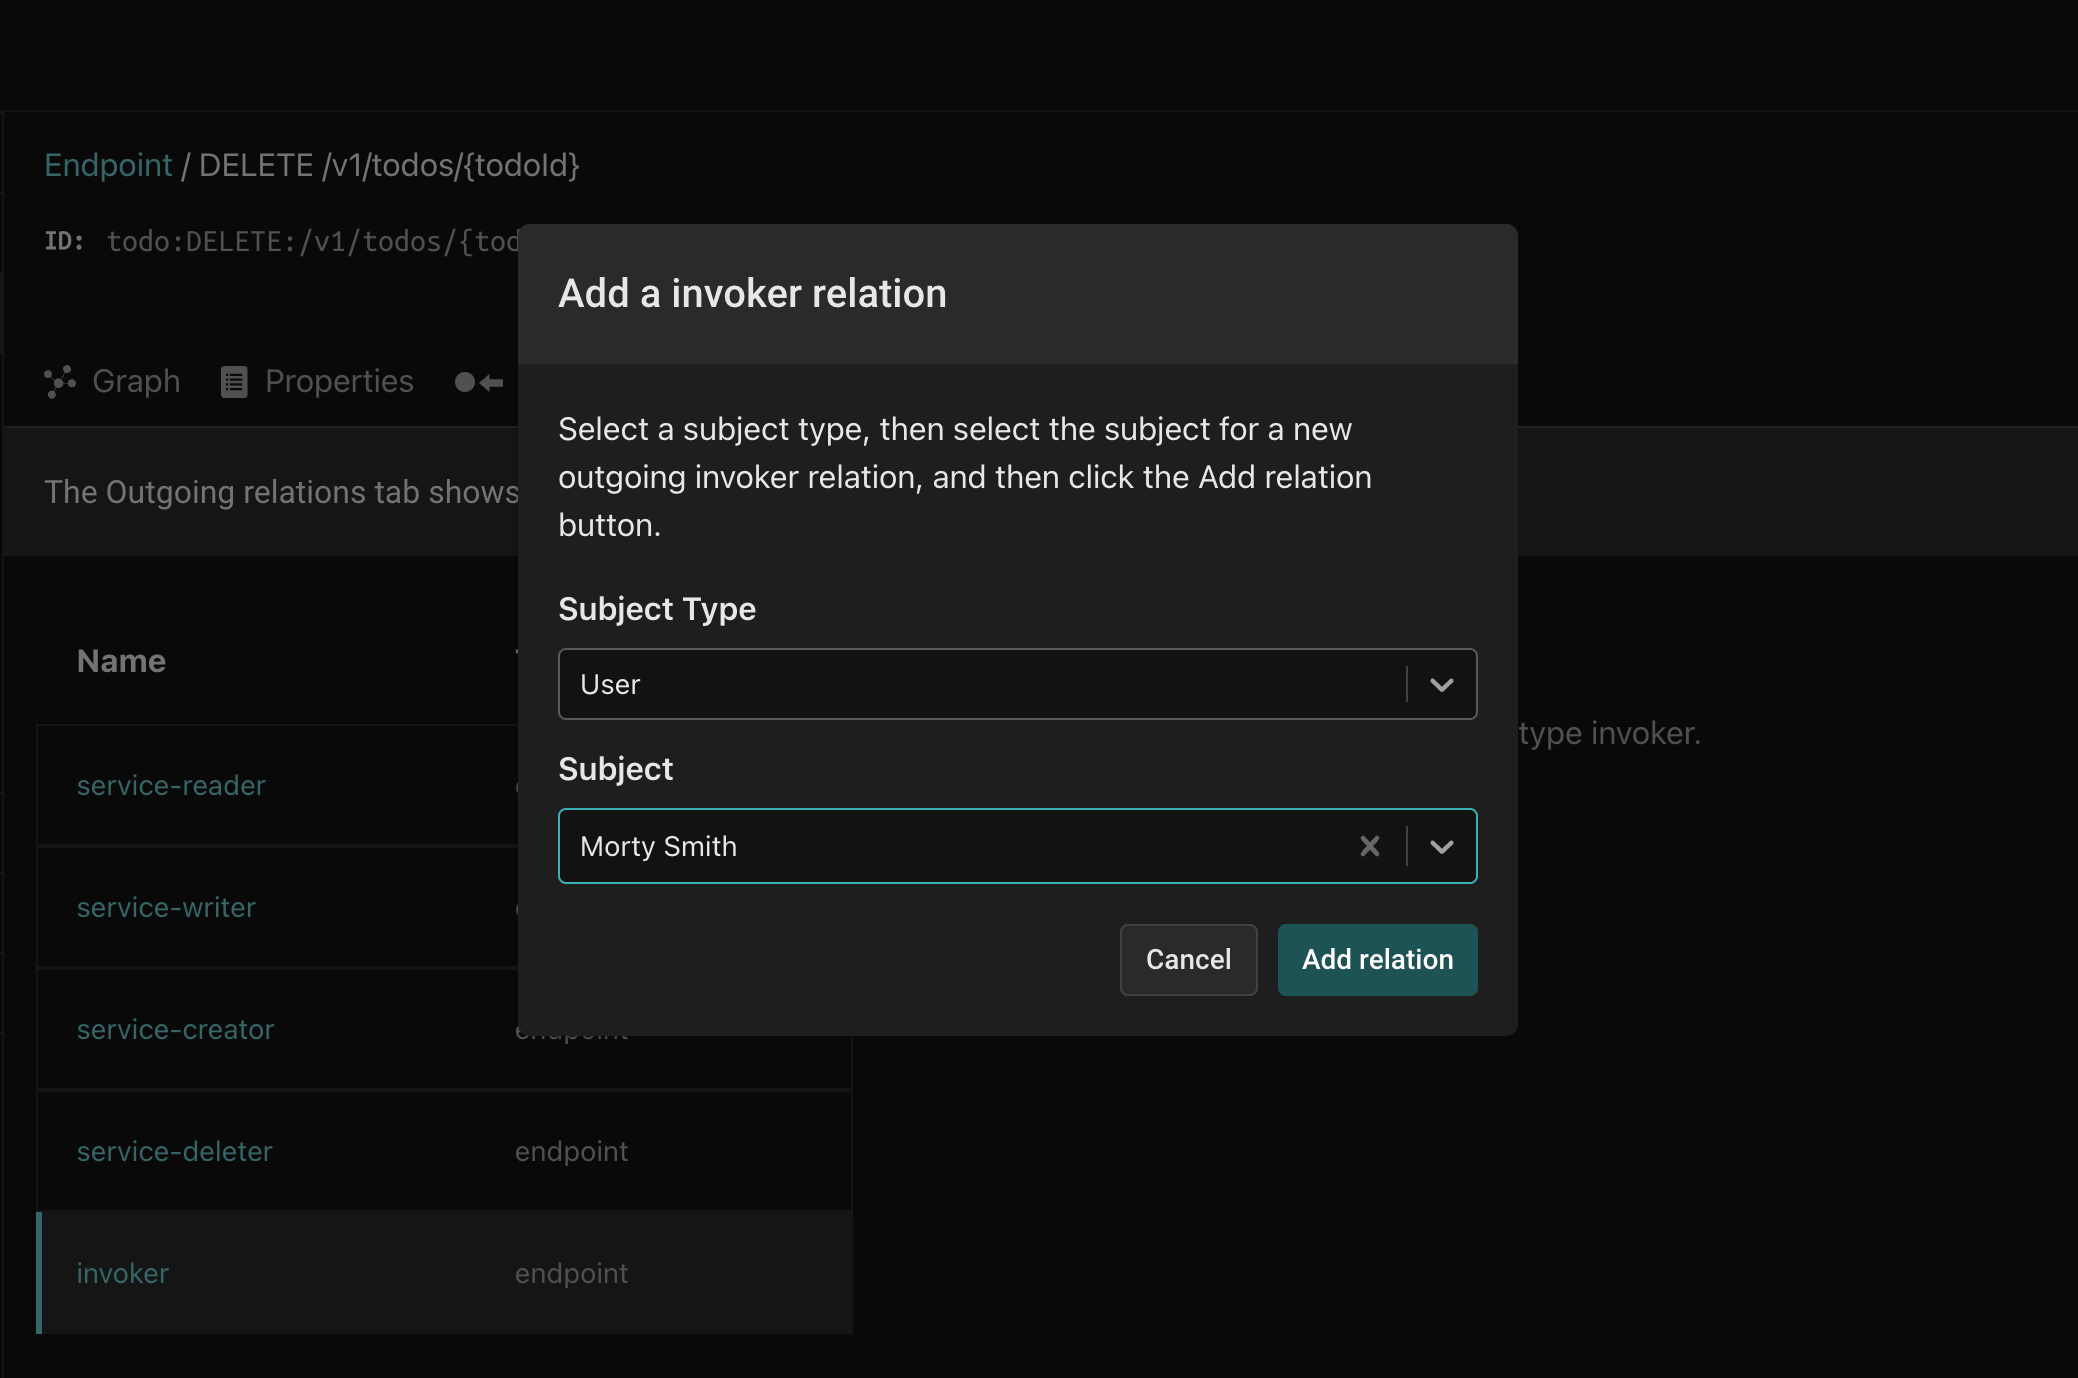
Click the Add a relation button and select User for the type and Morty for the instance. Click Add relation and you should see Morty as a direct assignee of the invoker relation.
Go back to the Zuplo console, and click the Test button again. You should now see an HTTP 200 OK status code, indicating that Morty is now able to invoke the DELETE /v1/todos/{todoId} endpoint. If you go back to the Aserto Console and delete the relation you just added, Morty will once again receive an HTTP 403 Forbidden status.
Governance
Before we wrap up, it’s worth noting that with the ReBAC model, we can now trivially find out which users are able to invoke which endpoints.
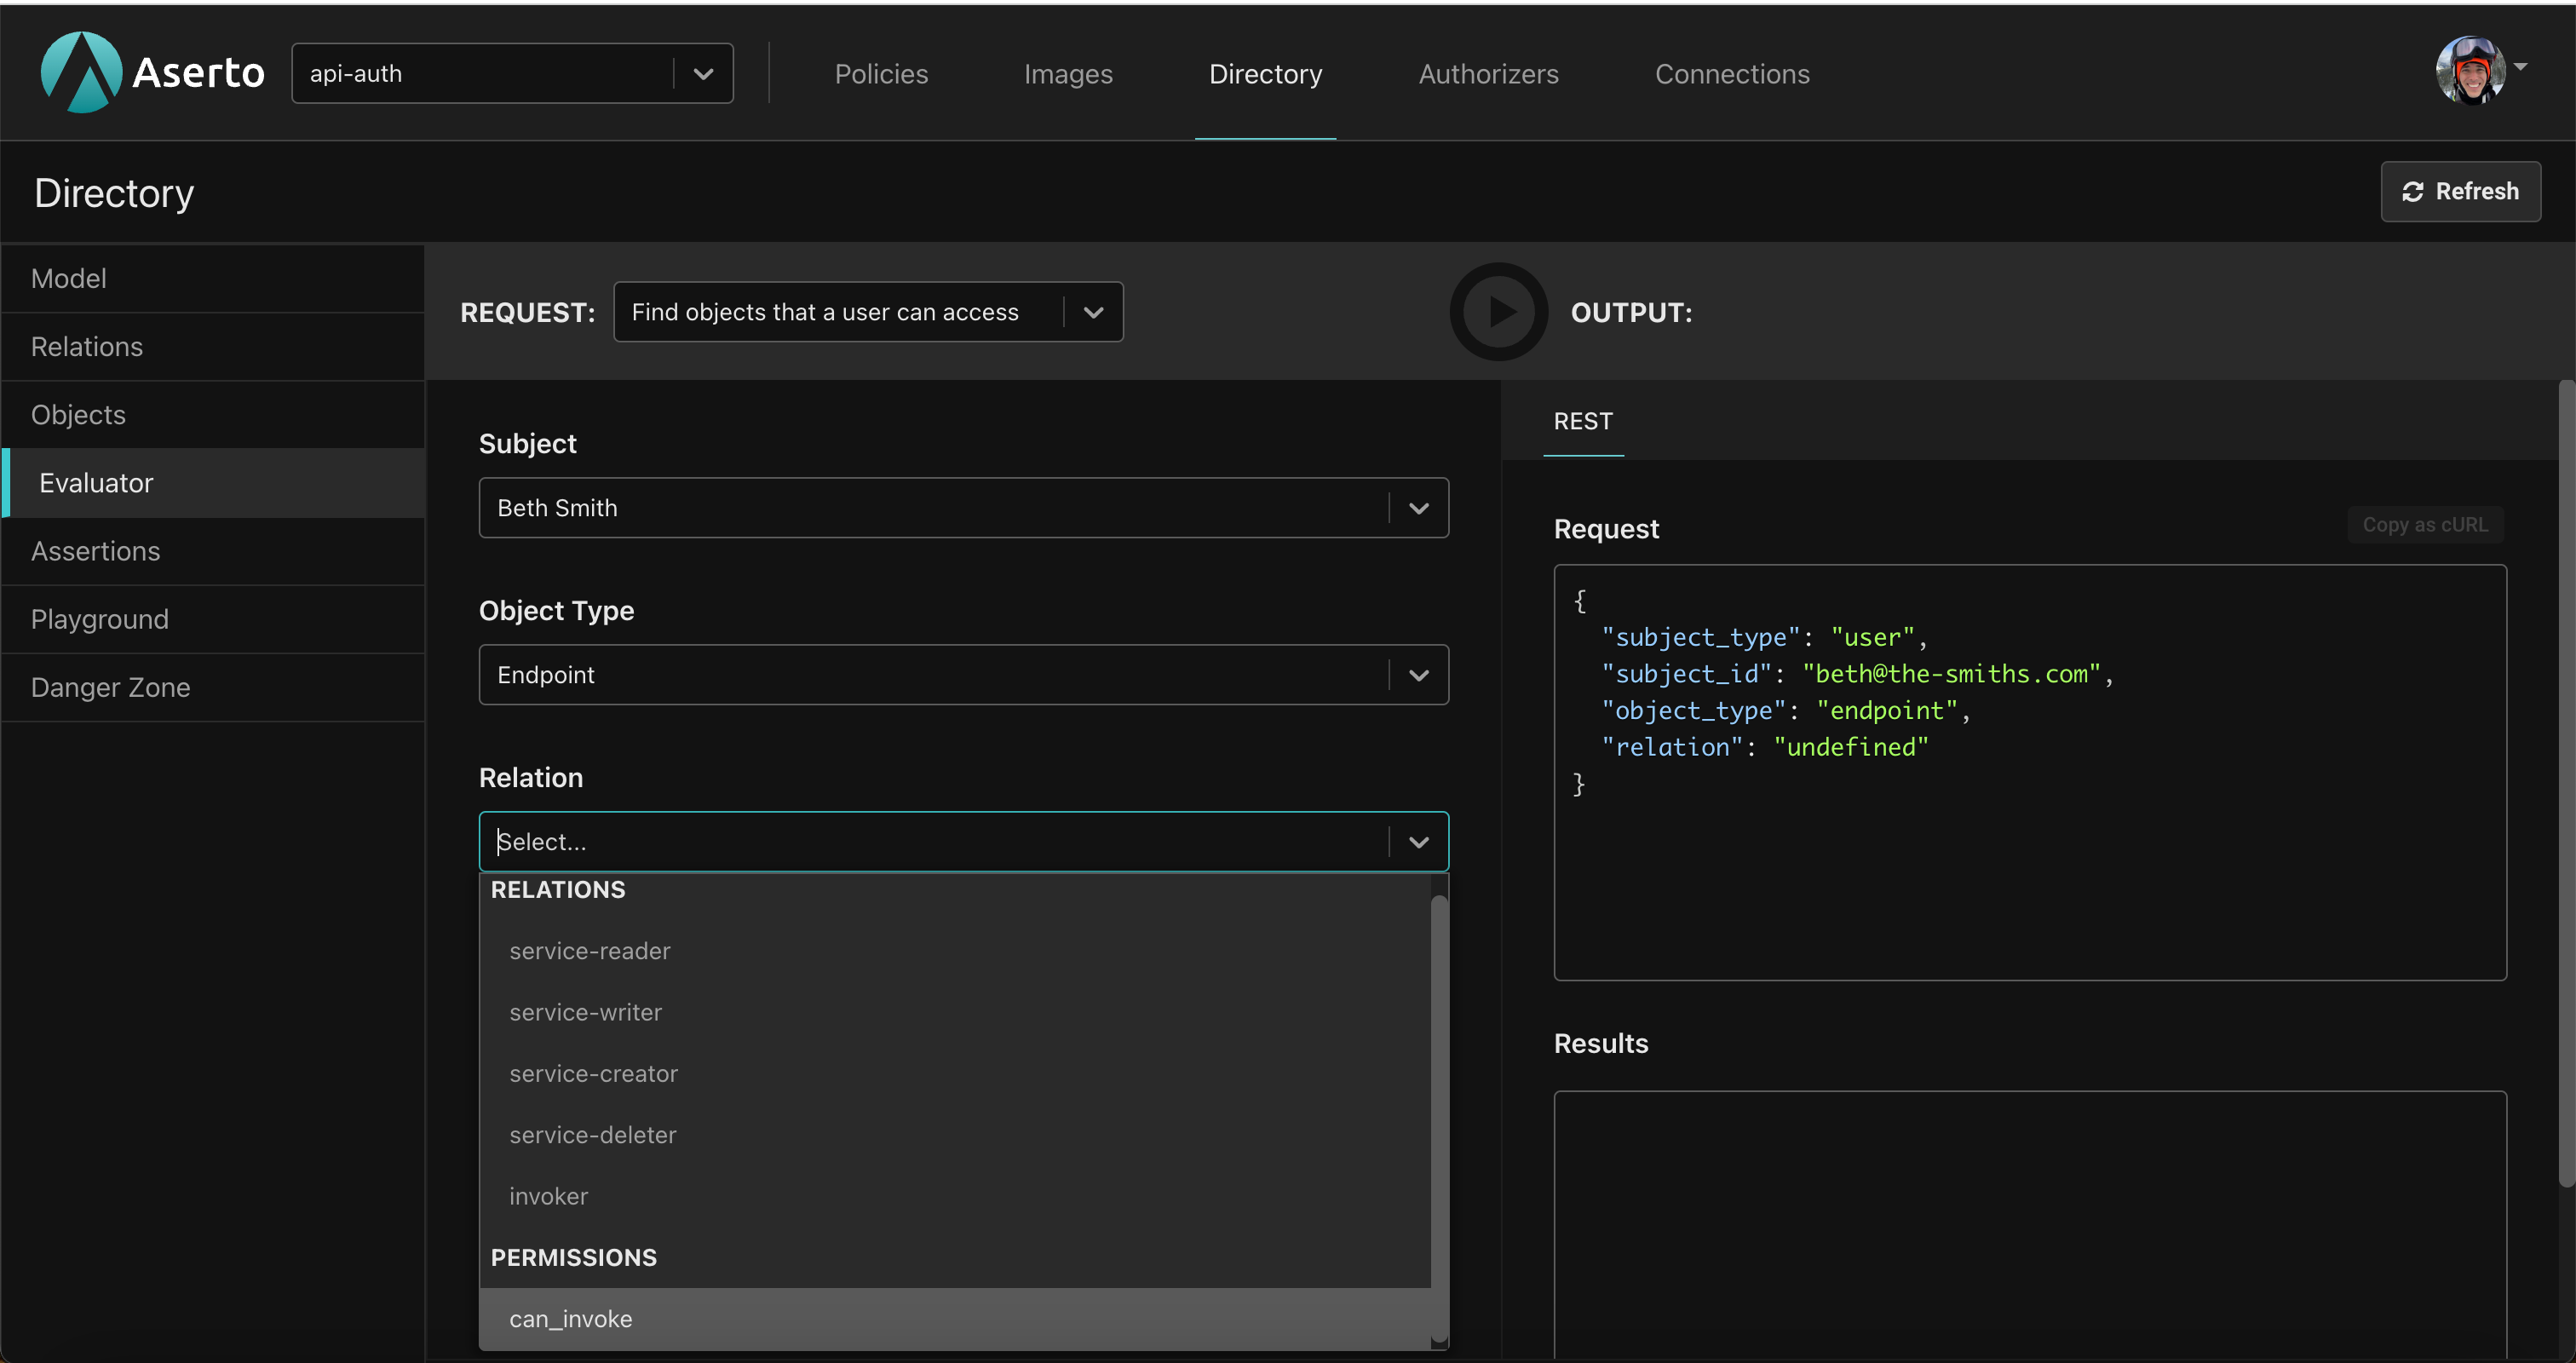
Go back to the Aserto Console, click on the Directory tab, and the Evaluator. Select the request called “Find objects that a user can access”, and select Beth, the Endpoint type, and the can_invoke permission.
Clicking the “Play” button invokes the query, and shows that Beth can only invoke the three GET endpoints on the Todo API service.
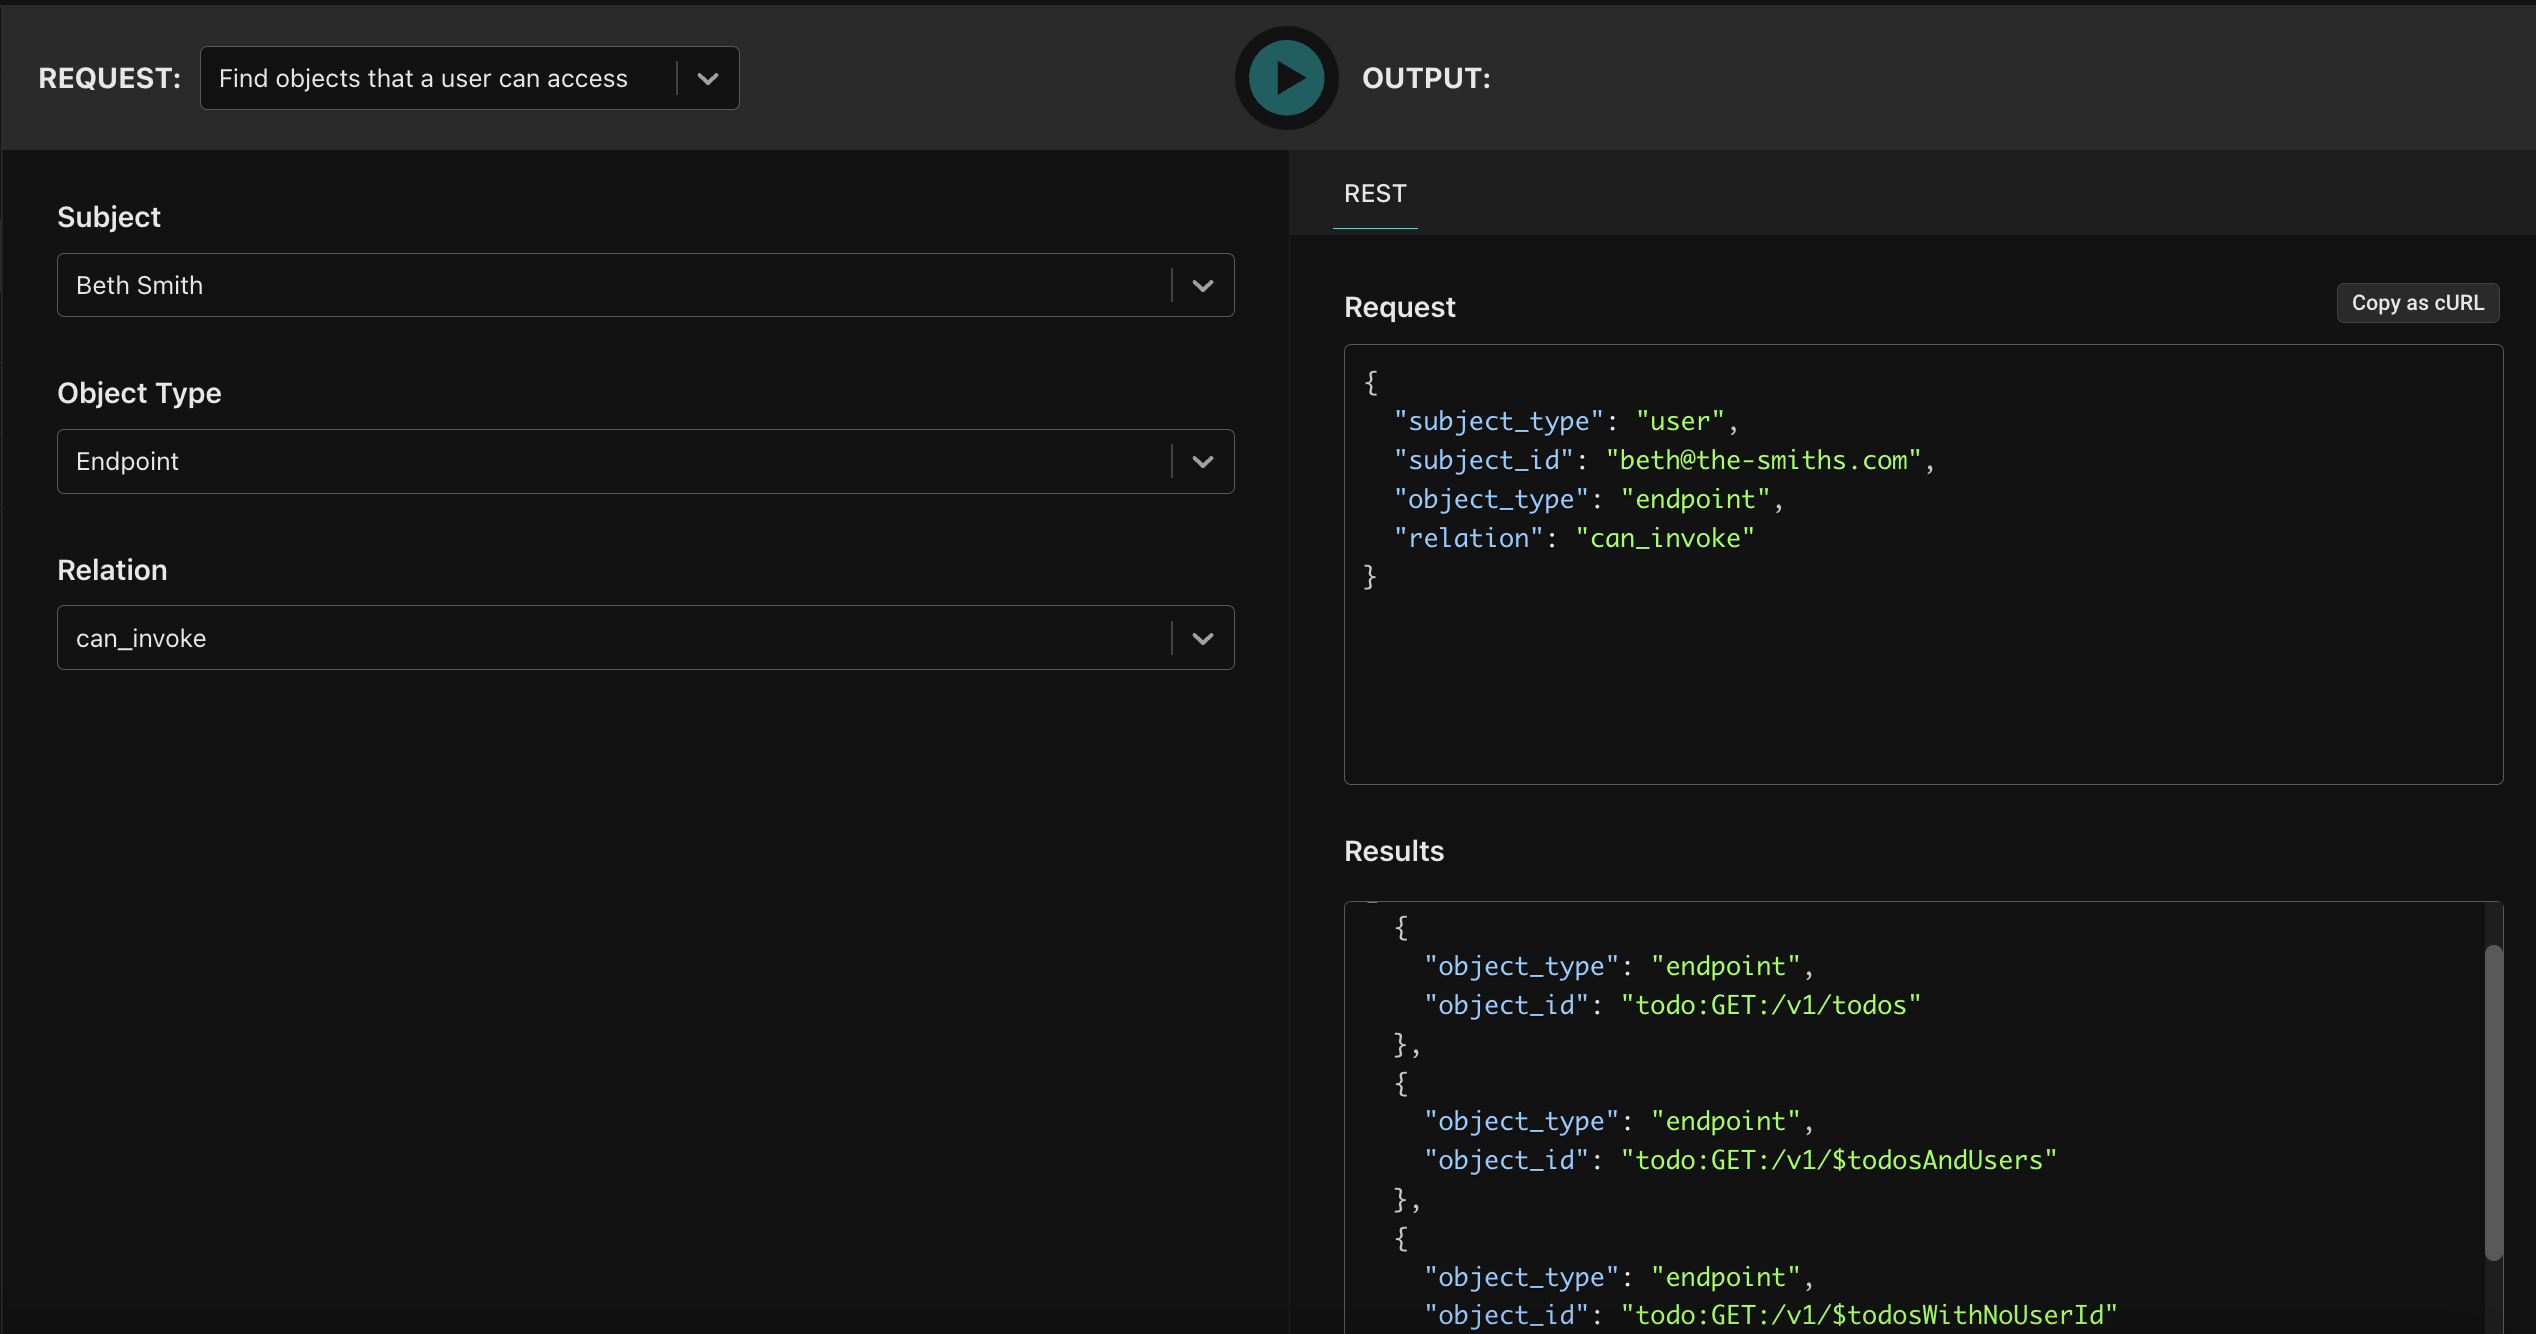
This makes sense because she’s a member of the viewer-group, and doesn’t have any additional entitlements. Play around with other users such as Morty and Rick to get different results, and feel free to copy the request as a cURL and execute it from a terminal to see how to invoke this type of request as a REST call.
curl 'https://directory.prod.aserto.com/api/v3/directory/graph/endpoint/can_invoke/user?object_id=&subject_id=beth%40the-smiths.com' \
-H 'aserto-tenant-id: <your-tenant-id>' \
-H 'authorization: basic <your-dir-api-key>' \
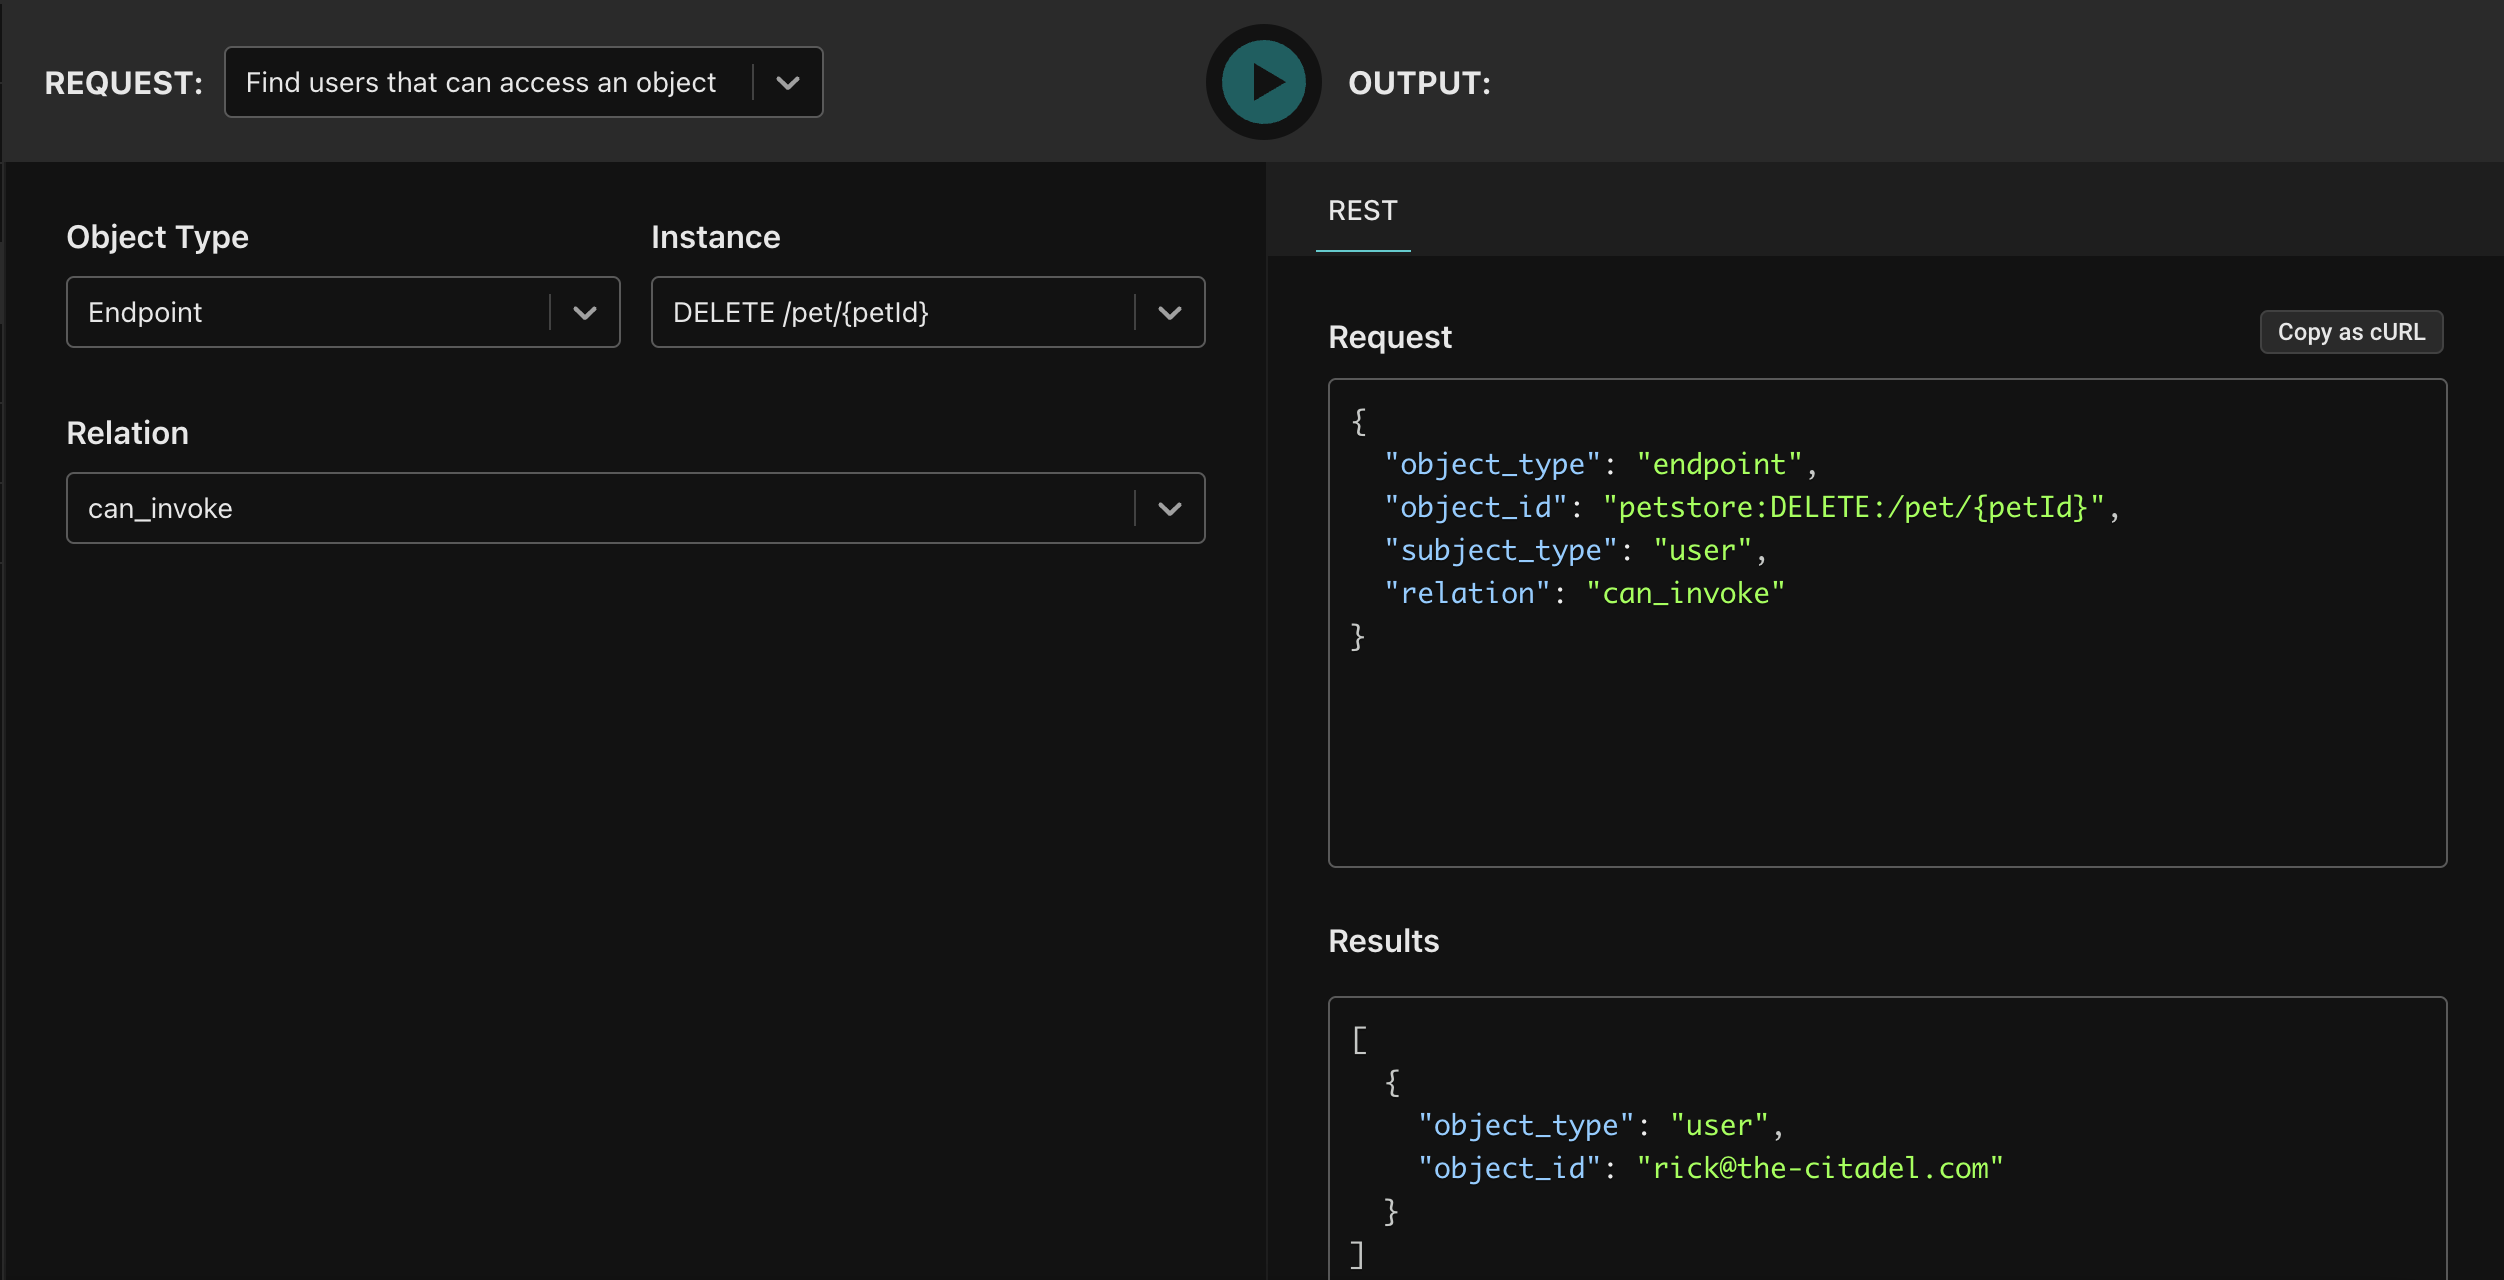
-H 'content-type: application/json'Lastly, we can ask the question in the opposite direction - which users can invoke an endpoint? Select the “Find users that can access an object” request, select the first endpoint (DELETE /v1/todos/{todoId}), and select the can_invoke permission. You should see only a single user - Rick - that is entitled to invoke that endpoint.
Summary
This tutorial covered a lot of ground - the API Authorization model, importing an OpenAPI spec, entitling users on services and endpoints, calling Aserto / Topaz from an API gateway, and answering governance questions.
This is only the tip of the iceberg, but should hopefully show the potential of setting up a scalable way to perform fine-grained API authorization for all your services, enforced at the API gateway.
Aserto has a CLI toolchain that enables organizations to easily onboard a new service from its OpenAPI spec, creating the possibility of a CI/CD pipeline that easily adds new services (or handles adding new endpoints) in an automated fashion.
Entitling users to endpoints can be done by adding users to IDP groups (which are imported into Aserto), and break-the-glass scenarios can be achieved in the Aserto Console, through the aserto/topaz CLI, through the REST or gRPC APIs, or one of our language SDKs.
We hope you enjoyed this tutorial. We have a longer-form video version here, and if you have any questions, feel free to contact us or join our community slack.
Happy hacking!
Omri Gazitt
CEO, Aserto


Related Content

API Authorization using Aserto and Zuplo
Platform Engineering teams that want to authorize access to their APIs now have a turnkey solution from Aserto and Zuplo.
Sep 25th, 2024
An “easy button” for API Authorization
Scaling a fine-grained authorization model for APIs can be tricky, especially when you have hundreds or thousands of them. Fortunately, Topaz makes it easy!
Jul 8th, 2024